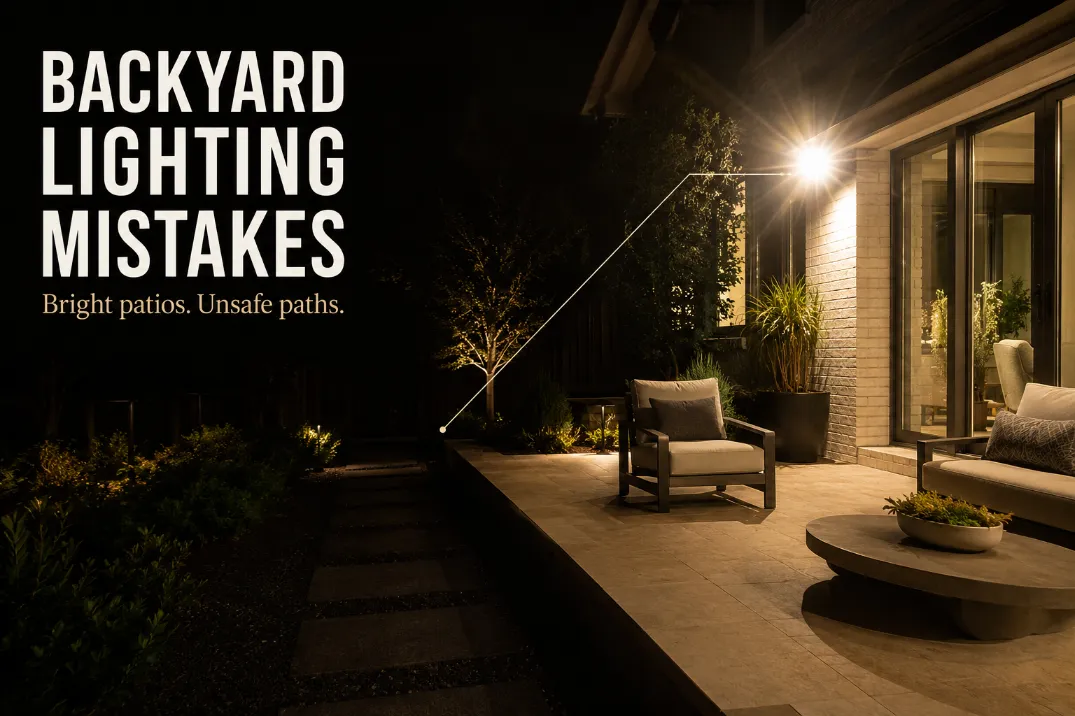
Most backyard lighting mistakes are not caused by darkness. They are caused by misplaced brightness: one harsh fixture near the house, weak route cues beyond the patio, and no hierarchy between walking, cooking, dining, and lounging.
The first purchase should not be a fixture. It should be a dark-yard walk-through.
Start after full dark, not at dusk. Check whether you can read each step edge from 6–8 feet away, whether the door-to-seating route has any black gap longer than 10–12 feet, and whether a seated person can see an exposed bulb at eye level.
If the patio looks bright but people still slow down, look at their feet, or cut across grass, the problem is layout. That is different from simple dimness. Dimness needs more usable light. Bad flow needs better placement, shielding, and route logic.
Quick Diagnostic Checklist
Use this checklist after the yard has been dark for at least 30 minutes. Early evening light can hide the worst problems.
- Step edges disappear from 6–8 feet away.
- One wall light feels bright, but the next walking zone drops into shadow.
- Guests drift across grass or behind furniture instead of following the intended route.
- A seated person faces an exposed bulb, wall pack, or harsh lantern.
- Grill, dining, and lounge zones all have the same light level.
- Solar path lights fade within the second or third hour of use.
- The farthest low-voltage fixtures look weaker than the ones near the transformer.
The useful distinction is this: a safe yard often has less total brightness than people expect, but more intentional cues. Adding brighter bulbs to the same poor layout usually magnifies the mistake.
What People Usually Misread First
Brightness feels like safety, but contrast controls safety
A single bright fixture near the back door can make the rest of the yard harder to read. Your eyes adjust to the bright source, then the darker areas beyond it feel even darker.
That is why one 900-lumen wall light can be less useful than several lower-output fixtures placed along the route.
For most residential patios, the goal is not maximum brightness. It is wayfinding. Path lights in the 100–200 lumen range often do more for safety than one oversized floodlight because they show edges, turns, and destinations without flattening the yard.
The symptom is “I cannot see where I’m stepping.” The underlying mechanism is usually contrast: a bright source stealing visual adjustment while the surface that needs to be read stays underlit.
The darkest corner is not always the first priority
A black corner near the fence may look like the obvious issue, but it is not always the most important one.
The bigger safety problem is usually the dim transition people actually cross: the patio step, the turn behind the grill, the path from the sliding door, or the shift from pavers to lawn.
This is where homeowners often overestimate mood lighting and underestimate movement lighting. String lights over a lounge can make the patio look finished without helping anyone read a step, slope, threshold, or hose in the walking route.
If hidden corners are a recurring issue, Dim Backyard Corners That Create Layout Problems can help diagnose that layer, but the first priority is still the path people use every night.
The Mistakes That Hurt Safety and Flow Most
Mistake 1: Lighting the patio surface but not the route
Many backyards are lit as if the patio is the whole experience. The door light comes on, the dining table is visible, and everything beyond the hardscape fades out. That only works if everyone stays seated.
Real use is messier. People carry food, move chairs, check the grill, let the dog out, walk to a side gate, or take trash through the yard.
A usable route needs a visible cue every 6–10 feet where the direction is not obvious. That cue can be a path light, step light, downlight, or reflected light from a wall. It does not always mean another fixture at perfect intervals. It means continuity.
Pro Tip: Walk the yard with one hand occupied, as if you are carrying a drink or plate. If you hesitate, angle your feet sideways, or look down for more than a second, that route needs better visual guidance.
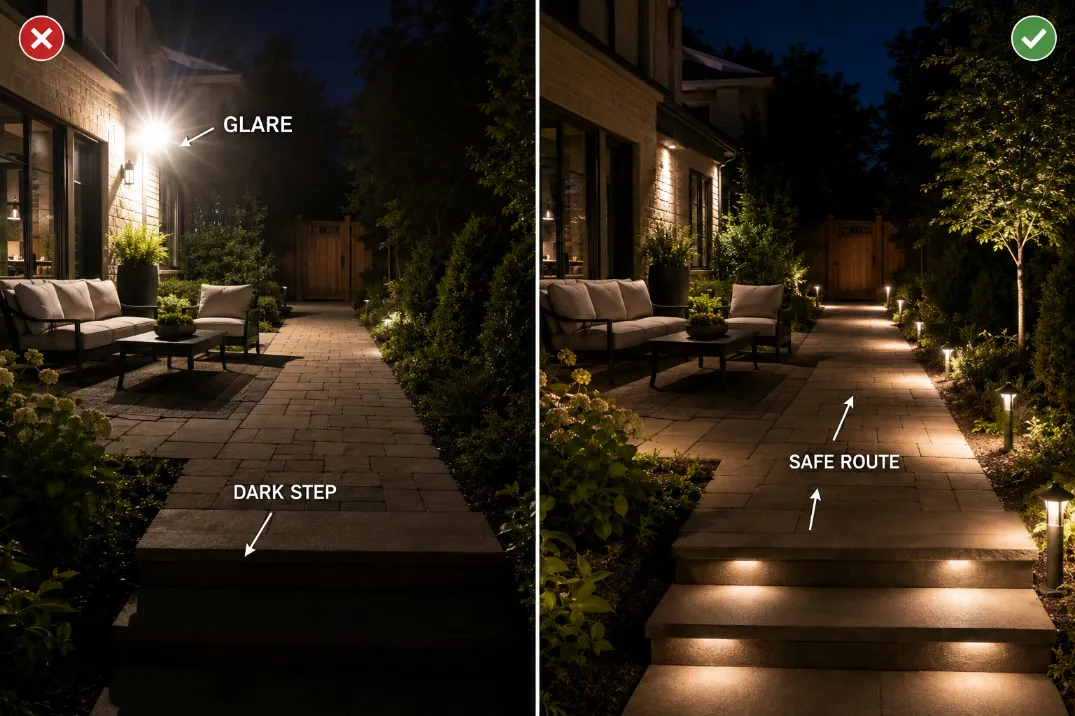
Mistake 2: Using glare where you need guidance
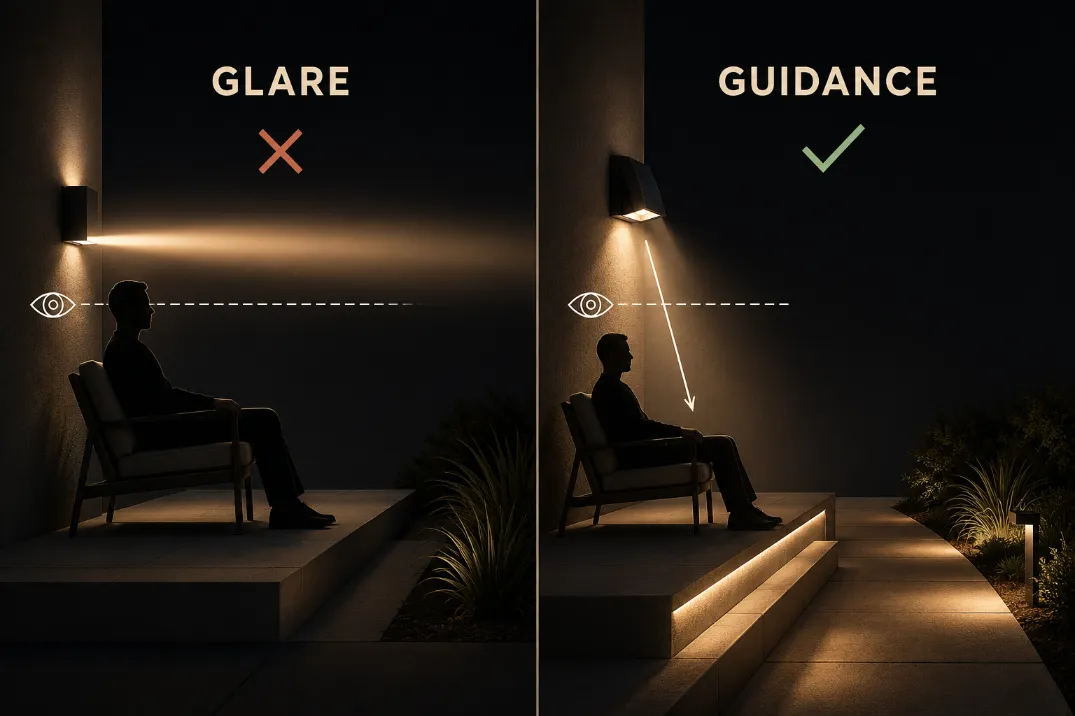
Glare creates the impression of light without improving the surface people need to see. Exposed bulbs, bright wall packs, upward-facing fixtures, and floodlights aimed across a patio can make a yard feel less safe because they pull attention away from steps, edges, and changes in surface.
The fix is rarely just a lower-watt bulb. Direction matters more. Shielded light aimed downward from above shoulder height usually performs better than light aimed outward at face height.
A fixture can be technically bright enough and still fail if it makes someone squint from a dining chair.
This is especially common near sliding doors and covered patios, where one fixture is expected to cover the door, table, grill, and walkway.
If glare is the main problem, Patio Lighting Glare Mistakes goes deeper into fixture angle, but the rule is simple: if the bulb is visible from a normal seated position, the fixture is probably working against comfort.
Mistake 3: Treating steps, slopes, and flat paths the same
Flat patios forgive weak lighting better than elevation changes do. Steps, slopes, deck transitions, and raised paver edges need sharper visual definition. The front edge of a step should be readable before someone reaches it, not discovered underfoot.
For stairs, useful light is usually at the tread, riser, or nearby side edge. For slopes, the goal is to show grade and direction.
In northern states where freeze-thaw movement can lift pavers or shift edging, lighting becomes part of safety because small height changes are harder to read at night.
A height change as small as ½ inch can catch a toe when it is hidden by shadow. That does not mean every irregularity needs a dedicated fixture, but it does mean step and slope lighting should outrank decorative tree uplighting.
For route-specific planning, Path Lighting for Steps, Slopes, and Walkways is a stronger next step than adding another general patio light.
A Better Way to Plan Backyard Lighting
Start with movement, then add atmosphere
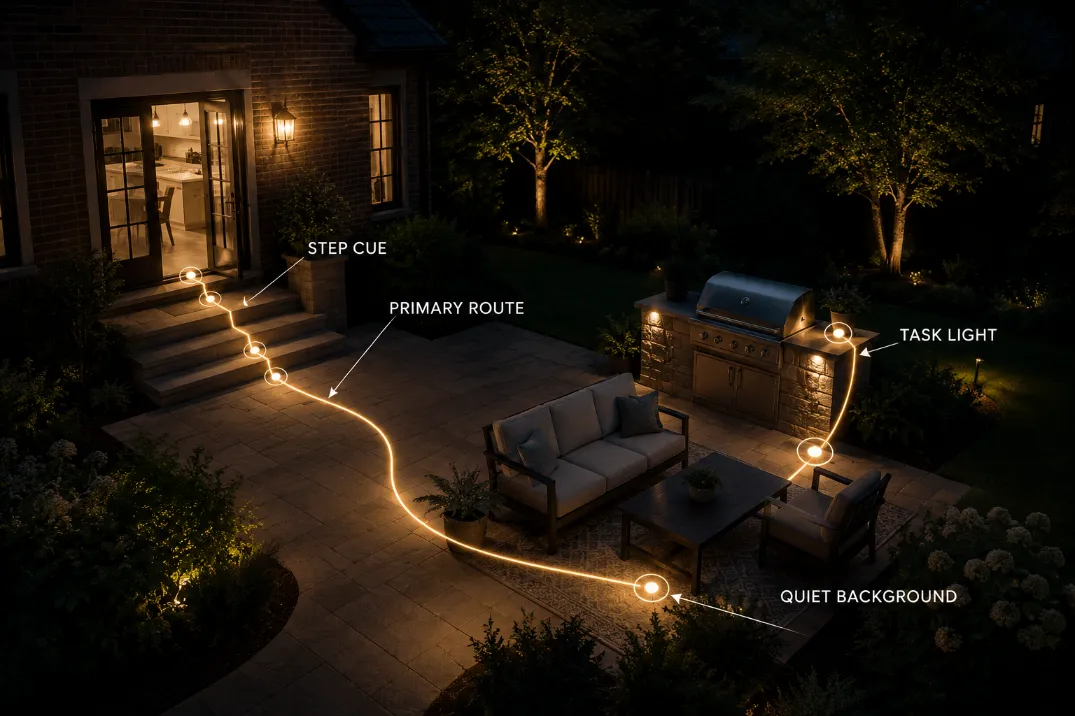
The best lighting order is not decorative first. Start with movement: door, steps, primary path, grill, dining area, lounge, gate. Then add softer atmosphere where it supports the layout instead of competing with it.
Draw the route people take in the first 30 seconds after stepping outside. That route deserves the clearest light. Secondary areas can be softer. Rarely used corners can stay low unless storage, pets, security, or drainage access make them important.
This is why lighting zones matter. Dining needs enough light to see food and faces. Lounging needs softer light that does not shine into eyes. Grilling needs task light on the cooking surface, not a bright fixture behind the cook.
A more detailed zone approach is useful in Patio Lighting Zones for Dining, Lounge, and Grill Areas, but the key point is hierarchy. Equal brightness everywhere creates a flat, confusing yard.
Use lower light more often, not stronger light everywhere
A healthier lighting plan usually has more sources at lower output. A failing plan often has fewer sources at higher output. That comparison matters more than the exact fixture style.
| Nighttime problem | More likely cause | Fix that often wastes time | Better first move |
|---|---|---|---|
| Patio looks bright but steps vanish | Glare and contrast | Installing a brighter wall bulb | Shield the source and light the step edge |
| Path feels confusing | Missing route cues | Scattering random solar lights | Add cues at turns and surface changes |
| Grill area is shadowed | Light behind the cook | Bigger overhead bulb | Aim task light at the cooking surface |
| Yard feels harsh | Too many exposed sources | Cooler, brighter LEDs | Use warm, shielded, lower-output layers |
| Far path lights look weak | Voltage drop or poor connections | Replacing bulbs only | Check transformer capacity and wire run |
Warmer light also tends to feel better outdoors. Many residential patios are more comfortable around 2700K to 3000K than under cool, bluish light. Warm light does not solve safety by itself, but it reduces the harsh commercial look that makes small yards feel exposed.
Why the Obvious Fix Often Fails
Brighter bulbs magnify the wrong pattern
The most common wasted fix is replacing every bulb with a brighter one. It feels logical because the yard is “too dark.” But if the actual problem is poor placement, brighter bulbs only intensify the bright spots and deepen contrast around them.
This is where routine fixes stop making sense: if one fixture has already been upgraded once and the walking route still feels unclear, stop increasing output. Move, shield, dim, or add a lower fixture instead. Another 500 lumens at the same bad angle rarely fixes a layout problem.
This mistake shows up often in yards where the house wall carries all the lighting. Wall-mounted fixtures are convenient, but they usually light the area closest to the house better than the outer edge of the patio. Chairs, steps, and path turns end up depending on spill light instead of intentional placement.
The far end of the system may be starving for power
Low-voltage lighting can be excellent for backyard paths and patio edges, but weak system design creates its own version of bad flow. If the fixtures closest to the transformer look normal while the farthest ones look dim, uneven, or unreliable, the issue may be voltage drop, poor connections, undersized wire, or too many fixtures on one run.
This is not a bulb problem. Replacing lamps may briefly improve appearance without fixing why the far end is weak. The useful signal is comparison: the first fixture is acceptable, the last fixture is noticeably weaker, and the difference gets worse after more lights are added.
When that happens, the fix may involve splitting the run, adjusting transformer capacity, improving connections, or redesigning the circuit layout. That is a different repair than simply buying brighter path lights.
Solar lights help only when they are placed like a system
Solar path lights can work, but they are often treated as decoration instead of wayfinding. A few scattered lights along a bed edge may look pleasant from the house while doing little for the route people actually use.
In humid climates like Florida or coastal parts of California, cheap solar fixtures can cloud, corrode, or lose brightness faster if water gets into the lens or battery compartment.
In shaded yards, they may underperform after cloudy days. If solar path lights are dim by the second or third hour after sunset, they should not be trusted as the only safety lighting for steps or slopes.
That does not make solar lighting useless. It means solar is better for low-risk cues unless the fixtures are reliable, well placed, and tested during the hours when the yard is actually used.
The Safety Mistake That Has Nothing to Do With Brightness
Indoor-rated fixtures do not belong outdoors
A backyard can have good visual placement and still be unsafe if the fixtures, outlets, or connections are wrong for weather exposure. Outdoor fixtures need to match the location. A covered porch, an open patio wall, a wet garden edge, and an exposed post do not face the same moisture conditions.
This is the point where cheap shortcuts become poor value. Indoor-rated lamps, unprotected connections, and fixtures that trap water can fail long before the layout does. Coastal moisture, sprinkler overspray, snow melt, and summer storms all test parts that seemed fine during installation.
Extension cords are not a permanent lighting plan
Temporary plug-in lights can help you test placement, but cords stretched across patios, lawn edges, door thresholds, or mulched beds create trip and weather hazards. They also make the yard feel improvised instead of easier to use.
A good boundary is simple: if the lighting crosses a walking route, serves steps, stays outdoors for weeks, or needs to work in wet weather, it should not depend on a casual extension cord. At that point, a planned outdoor-rated setup makes more sense than another temporary workaround.
Timers help reliability, not layout
Dusk-to-dawn sensors, smart plugs, and timers can make a good lighting plan easier to live with. They are especially useful when the main route needs to be lit before someone remembers to flip a switch.
But controls do not fix bad fixture placement. A motion floodlight can help you notice movement, but it should not be the main light for eating, walking, or carrying food across a patio.
Sudden brightness can be uncomfortable, and floodlights often aim too high or too broadly to define steps and edges.
What Changes in Small, Busy, or Multi-Use Backyards
Small yards need fewer focal points
Small backyards often become harder to use when every object gets its own light. The grill glows, the table glows, the tree glows, the fence glows, and the walkway still makes no sense.
In compact spaces, too many visible sources can shrink the yard because the eye jumps from fixture to fixture instead of reading one calm layout.
A small patio usually benefits from two or three priorities: the door-to-seat route, the main task zone, and one soft background layer.
If clutter is already part of the problem, How to Light a Small Patio Without Clutter is more useful than adding another set of string lights.
Large yards need hierarchy, not full coverage
Large backyards fail for the opposite reason. Homeowners try to light everything and end up with a patchy, expensive field of fixtures. The better approach is hierarchy: primary route first, active zones second, background depth third.
A back fence or tree line can stay dim if it is not part of the usable route. In fact, a slightly darker background often makes the lit path and patio feel calmer. What matters is that people understand where to go and where not to go.
How to Fix the Layout Without Overlighting
Step 1: Turn off decorative lights and test the route
Start by turning off string lights, tree uplights, and accent lights. Leave only the fixtures people depend on for movement. Walk from the house to every regular destination: seating, grill, gate, trash area, storage, hot tub, or steps.
Mark any place where you slow down, look down, or lose the route. Those are lighting problems. Not every dark area is a problem.
Step 2: Fix eye-level glare before adding new fixtures
Shield, redirect, dim, or replace the fixture that shines into faces. This matters because glare corrupts the whole lighting plan. You cannot accurately judge the rest of the yard while one fixture is overpowering your vision.
Downlights, capped path lights, step lights, and fixtures with opaque shields usually solve more than bare bulbs or exposed lantern-style fixtures. The fixture should reveal surfaces, not announce itself.
Step 3: Add cues at decision points
Decision points matter more than straight runs. Put lighting attention where people change direction, step down, pass behind furniture, or move from one surface to another. A path that turns from patio to gravel, lawn, or deck needs a cue at the transition.
In dry desert areas such as Arizona, dusty lenses and hard mineral buildup can reduce output faster than expected, so the fix may include cleaning lenses every few weeks during dusty periods.
In wetter Midwest climates, seasonal rainfall can tilt lightweight fixtures in soft soil, sending light away from the path. Recheck fixture angle after heavy rain, mulch refreshes, and freeze-thaw movement.
A fixture tilted 10–15 degrees away from the walkway can stop marking the edge it was installed to protect.
Pro Tip: After adjusting lights, test the yard from a seated position and from the doorway. A layout that looks good while standing over the fixture may still glare from a chair.
Step 4: Keep atmosphere separate from safety
String lights, lanterns, and uplights can add warmth, but they should not be responsible for steps, slopes, or cooking. Treat them as atmosphere after the safety layer works. That way, if a decorative strand fails, the yard does not become unusable.
This is also where overlighting becomes a real risk. More fixtures can reduce comfort if they compete for attention or erase the difference between zones.
A restrained plan that leaves some quiet darkness is often better than a fully illuminated yard. For that balance, Backyard Lighting Without Overlighting is the better next step.
Questions People Usually Ask
Are solar lights safe enough for steps?
Solar lights can help mark nearby edges, but they are risky as the only lighting for steps if they fade quickly, sit in shade, or tilt easily in soft soil. For steps used every night, choose a more reliable fixture type or test the solar lights several hours after dark before relying on them.
Do I need low-voltage or hardwired backyard lighting?
Low-voltage lighting is often enough for paths, patio edges, beds, and many step areas. Hardwired fixtures make more sense for permanent wall lights, covered patios, larger task areas, or places where wiring, outlets, and weather exposure need a more durable setup.
If the work involves exterior wiring, breakers, wet-location concerns, pools, or hot tubs, use a qualified electrician.
Are motion floodlights enough for a patio?
Usually not. Motion floodlights help with security and quick visibility, but they are too abrupt and broad for normal patio use. They do not define the route, soften glare, or separate dining, lounging, and cooking zones.
What color temperature is best for backyard safety?
For most residential backyards, 2700K to 3000K is a good range because it feels warm without turning surfaces orange.
Color temperature is secondary to placement, though. A well-shielded warm fixture in the right place is more useful than a bright cool fixture aimed into someone’s eyes.
For broader official guidance, see the U.S. Department of Energy lighting design guide.