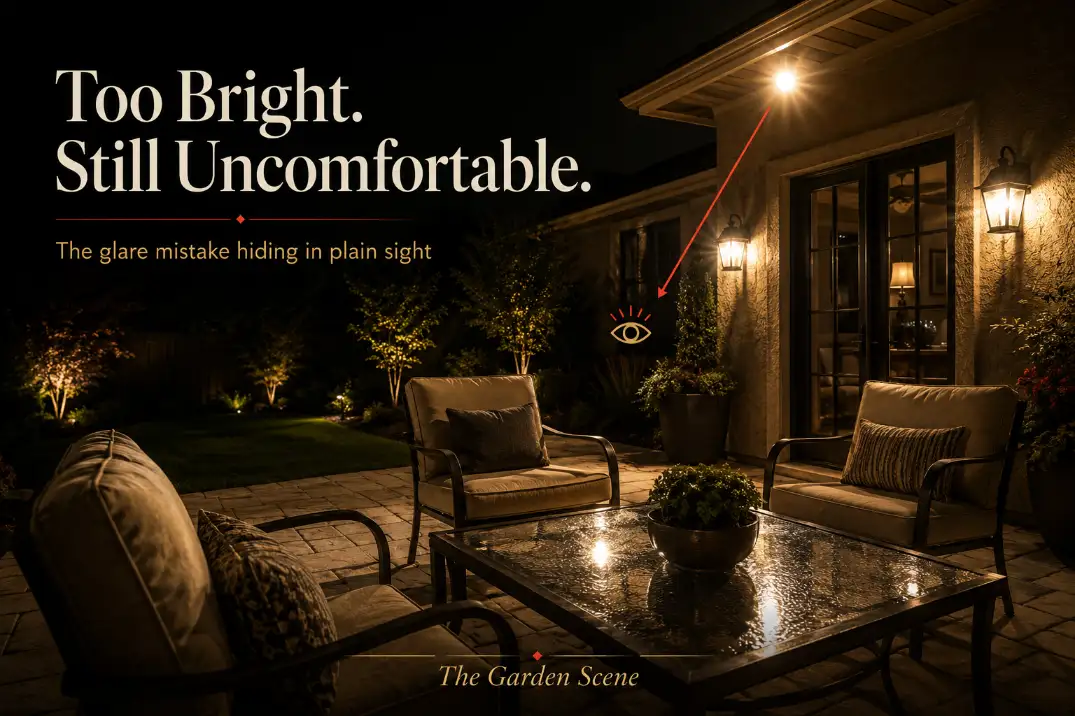
Patio lighting glare usually comes from a visible light source, not from the patio being “too bright” overall. A 400-lumen bulb aimed into someone’s eyes can feel harsher than a 900-lumen fixture aimed down onto a table, step, or wall.
That is why some patios look well lit but still feel tense after people sit outside for 10 to 20 minutes.
Start with the source, not the bulb box. Sit in the main chair and check whether you can see bare bulbs, clear lenses, exposed LED strips, or floodlight faces.
Pay special attention to fixtures sitting in the 42- to 66-inch sightline near seating, shiny surfaces reflecting light back at faces, and any single floodlight doing the work of an entire patio plan.
The fastest fix is usually to shield the source, aim the beam down, separate task lighting from mood lighting, and only then adjust brightness or color temperature.
First, Make Sure the Problem Is Glare
Glare means the source is reaching your eye
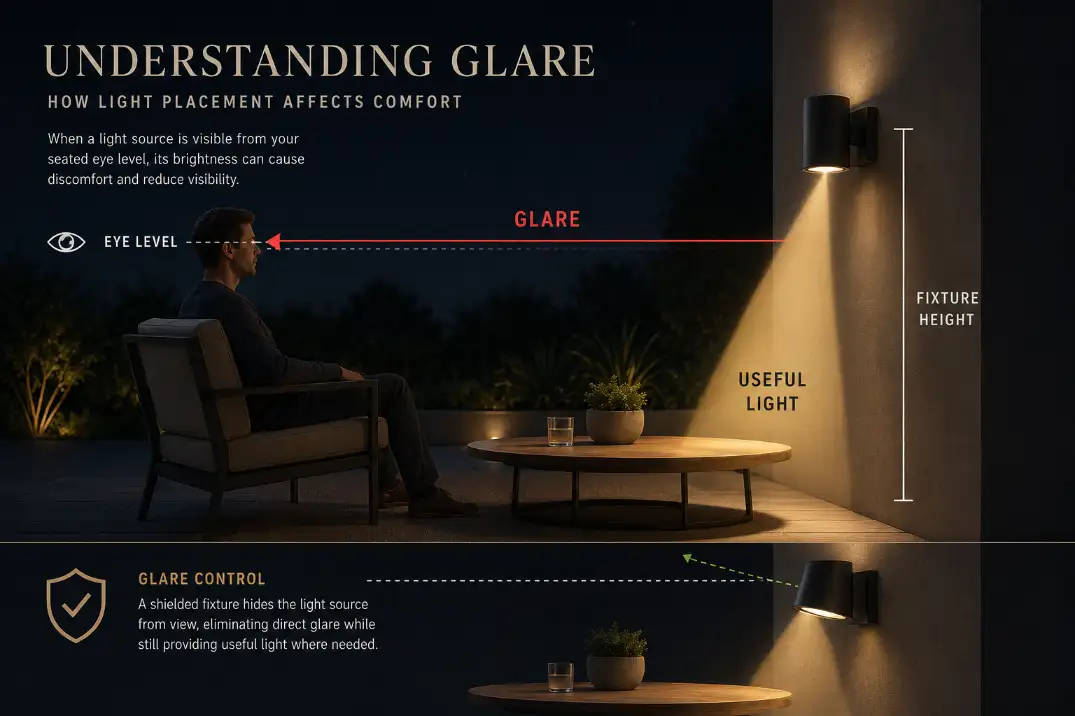
Glare happens when a bulb, LED chip, lens, or concentrated beam reaches your eyes directly. The patio may not be especially bright overall, but one visible source can dominate the space.
A simple test works better than guessing. Sit in the main chair and look naturally across the patio. If you can see the bare bulb, glowing LED strip, clear lens, or exposed flood face, that fixture is probably creating discomfort.
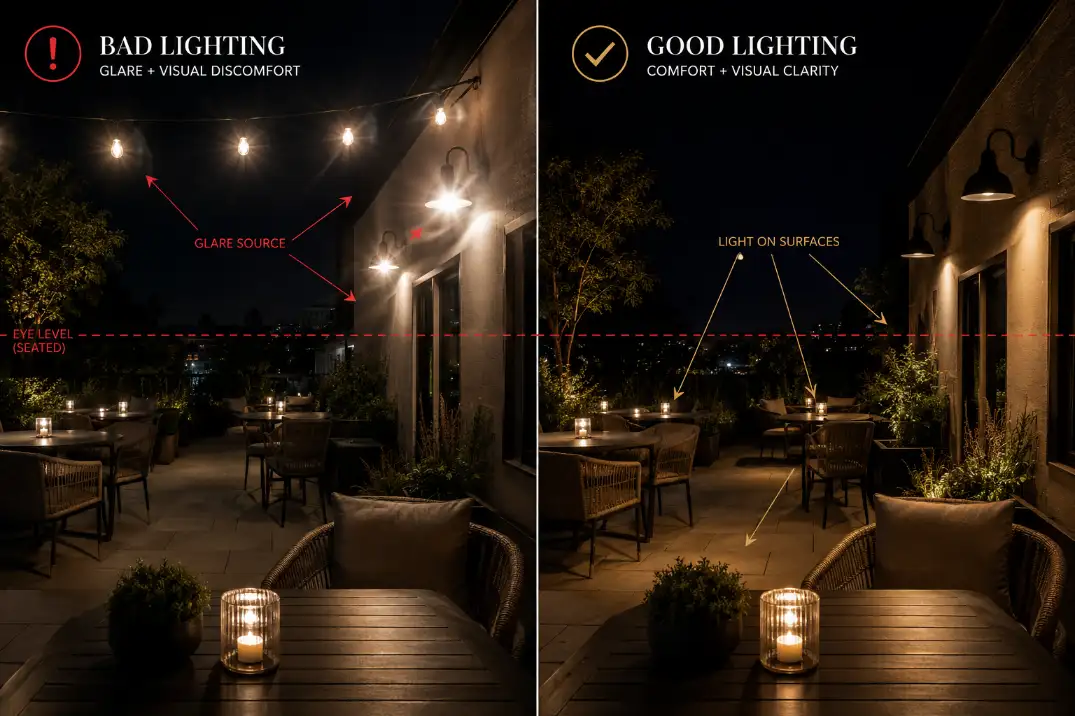
Brightness means the surfaces are overlit
A patio is too bright when the table, floor, walls, and furniture look washed out even though the bulbs themselves are hidden. That is a different problem. Over-brightness may call for lower output or dimming. Glare usually needs shielding, repositioning, or a different beam angle first.
This distinction matters because dimming the wrong fixture can make the patio darker without making it more comfortable.
Contrast makes one bad fixture feel worse
A single bright point against a dark yard feels stronger than the same fixture in a softly lit setting. After your eyes adjust to the dark for 10 to 20 minutes, a visible bulb can make nearby step edges, chair legs, and patio transitions harder to read.
That is the part many homeowners underestimate: glare is not just annoying. It can reduce visibility around the exact places people need to move safely.
The Fastest Way to Diagnose Patio Glare
Sit where people actually sit
Do not judge patio lighting from the back door. Sit in the dining chair, lounge chair, or sectional corner where people spend time. From normal seated eye height, roughly 40 to 48 inches above the patio surface, no primary light source should shine directly into your eyes.
You should see the effect of the light, not the source itself. That is the difference between lighting that photographs well and lighting people actually want to sit under.
Walk the route into the patio
Glare often starts before anyone reaches the seating area. A path light aimed sideways, a step light facing outward, or a low floodlight near a gate can hit the eye before the patio is even visible.
For walkways and steps, low shielded fixtures usually work better than taller exposed ones. If the patio connects to a slope, side path, or raised step, the same glare problem may continue into the approach route, especially when fixtures were chosen for brightness rather than placement. A more deliberate look at path lighting for steps, slopes, and walkways can keep the whole route from feeling harsh before anyone reaches the seating area.
Patio Lights That Commonly Make Glare Worse
Exposed string lights over small seating areas
String lights can look cozy, but they are not automatically comfortable. They work best when bulbs are small, warm, spaced sensibly, and mounted high enough that they do not sit directly in the main sightline.
On an 8-by-10-foot patio, two tight rows of exposed bulbs can feel busier than one well-shielded wall fixture or pendant.
If bulbs cross directly over chairs, keeping them around 8 to 10 feet above the patio surface usually feels better than hanging them low over people’s heads. If that height is not possible, move the run outside the main seating zone instead of adding more bulbs.
Pro Tip: If string lights make people squint, do not replace them with brighter string lights. Raise them, reduce the number of bulbs, or move them outside the main sightline.
Clear glass sconces near chairs
Clear glass outdoor sconces often look good during the day and fail at night. If the bulb is visible from a chair, the fixture is decorative first and comfortable second.
A frosted lens, recessed bulb, partial cutoff shade, or downward-facing sconce usually performs better near seating. The goal is not to hide every fixture. It is to hide the bright point that pulls the eye away from the patio surface.
Solar floods used as ambience
Solar floods are often bought as an easy fix because they are inexpensive and simple to install. But a small floodlight aimed across a patio is still a floodlight. It may help with cleanup or security, but it rarely creates comfort.
A warm color temperature can soften the mood, but it cannot fix a wide beam aimed into faces. A 2700K flood pointed at the seating area is still the wrong tool for relaxed patio lighting.
Unshielded path lights
Path lights with glowing tops can create a dotted runway effect. They may mark the edge of a walkway, but they also put bright points directly in the view.
For most patio approaches, staggered shielded path lights spaced roughly 6 to 8 feet apart are calmer than a tight row of visible glowing fixtures. The exact spacing depends on the fixture and path shape, but if the eye notices the lights more than the walking surface, the layout is too fixture-focused.
Fixture Choices by Glare Risk
| Fixture type | Common glare mistake | Better use | Fix before replacing |
|---|---|---|---|
| Exposed string lights | Bulbs hang low over seating | Ambience outside main sightline | Raise, reduce, or relocate the run |
| Floodlights | Used as comfort lighting | Security or short task use | Put on a separate switch |
| Clear glass sconces | Bulb visible from chairs | Door or wall accent lighting | Use frosted, shielded, or downward fixtures |
| Step lights | Beam points outward | Low stair and edge visibility | Recess or aim downward |
| Path lights | Glowing tops dominate the view | Route guidance | Use capped, shielded fixtures |
| Uplights | Beam crosses seating area | Trees, walls, planting features | Aim away from faces and windows |
The product choice matters, but placement still decides the result. A good fixture installed at the wrong height can feel just as harsh as a cheap one.
The Mistakes That Create Harsh Patio Lighting
Mounting fixtures in the face-height zone
Wall lights beside doors, pergola posts, outdoor kitchens, and seating walls often land in the most uncomfortable range: high enough to be seen, low enough to hit the eye. Around conversation areas, bright lenses between about 42 and 66 inches from the patio surface deserve extra suspicion.
For comfort, a fixture near seating should either sit high enough to clear the sightline or be shielded so the beam goes down. Light aimed at horizontal surfaces is usually more useful than light aimed across faces.
This is also why a backyard can have several expensive fixtures and still feel hard to use. The lighting plan can fail at the layout level, not the product level.
If the whole yard feels bright in some areas and useless in others, the problem may be broader than one patio fixture, similar to the patterns covered in backyard lighting plans that make spaces hard to use.
Putting all the light overhead
Overhead lighting can work over a dining table, but it becomes harsh when it is the only layer. The floor stays dark, faces look shadowed, and the brightest object in the scene is often the fixture itself.
Comfortable patios usually have light at different heights: low light for movement, downward light for dining or steps, and soft side light from walls, planters, or nearby planting beds. The goal is not to make every square foot equally bright. The goal is to make the useful parts readable without making the eyes work.
Letting reflections do the damage
Reflected glare is easy to miss because the fixture may not look wrong at first. Light bouncing off pale concrete, glossy pavers, wet stone, glass tabletops, stainless grill lids, or sliding doors can hit the eye from below or from the side.
A wet surface can make a modest fixture feel much more noticeable. In humid parts of Florida or along coastal California, patios that stay damp into the evening can be more glare-prone than the same layout in a dry climate. The fixture did not change; the surface did.
The 5-Minute Test Before You Buy New Patio Lights
Before replacing fixtures, test the patio at night with the lights already installed.
- Turn on the patio lights and wait at least 10 minutes.
- Sit in every main chair, not just the best one.
- Cover one suspected light with your hand, a piece of cardboard, or a towel for 5 seconds.
- Notice whether your eyes relax immediately.
- Repeat with each fixture, then adjust the worst offender first.
This test often reveals that one light is causing most of the discomfort. Fixing that source usually does more than adding another decorative fixture.
What Actually Makes Patio Lighting Feel Comfortable
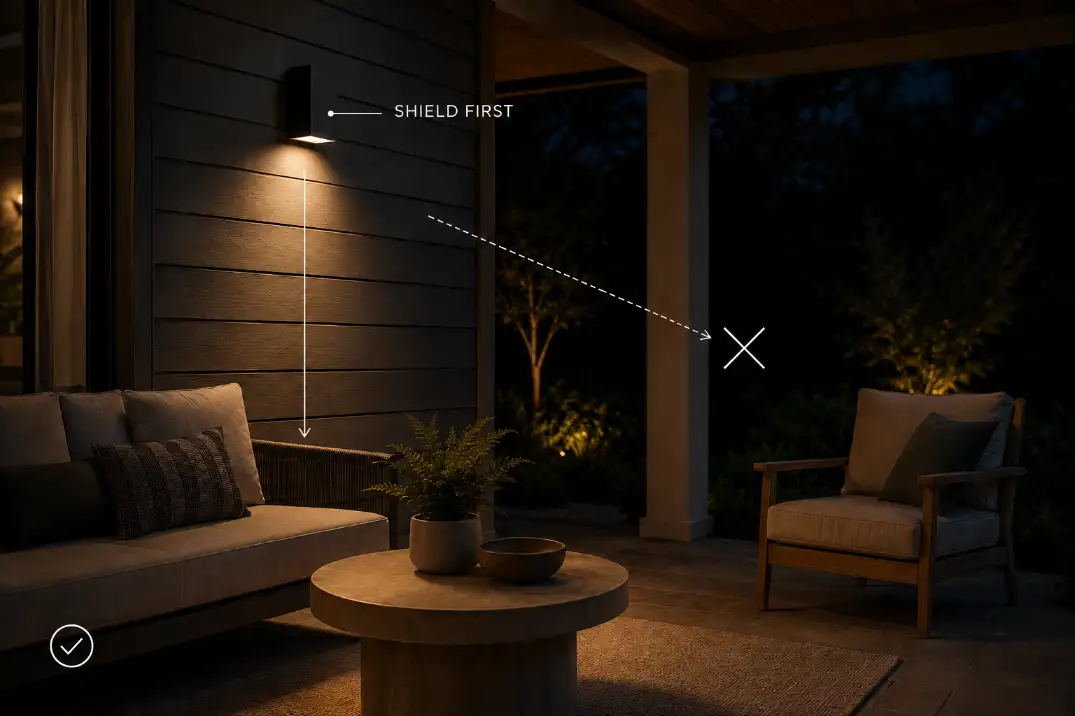
Shield first, dim second
Dimmers are useful, but they are often applied too early. If the bulb is visible, dimming reduces the intensity of the symptom without fixing the mechanism. The patio may become dimmer and still feel irritating.
The better order is to block direct view of the bulb or lens, aim the beam toward the surface that needs light, then reduce output if the patio still feels too bright.
Use warmer light after the beam is controlled
Warm white light, commonly around 2700K to 3000K, usually feels more relaxed than cool white light on a patio. Cooler 4000K to 5000K light can make concrete, siding, and pale furniture feel stark, especially in seating areas.
But color temperature is a finishing decision. A warm exposed bulb still produces glare. A cooler, well-shielded fixture may be easier to live with than a warm bulb shining straight into your face.
Separate task light from atmosphere
Cooking, dining, steps, and cleanup need clearer light. Lounging does not. When one switch controls everything, people either tolerate glare during conversation or stumble through dim task areas.
A grill or prep zone may need stronger downward light for 20 to 30 minutes. The seating area may only need low, indirect light for the rest of the evening. If your patio has more than one job, one fixture type should not be expected to solve all of them.
This is where furniture placement matters. A fixture that works for a dining layout may be wrong after the table is replaced with a sectional. For smaller patios, patio furniture layout by size can help clarify where the light actually needs to land.
When the Standard Fix Stops Working
Lower-lumen bulbs, warmer bulbs, and dimmers can help only after the light is aimed correctly. They stop making sense when the bulb is visible, the fixture sits in the main sightline, or the beam is aimed across the patio.
At that point, reducing brightness can make the patio harder to use while leaving the glare in place. That is how outdoor spaces become both dim and uncomfortable.
Use this order instead:
- Hide the direct source.
- Redirect the beam.
- Reduce output.
- Add task lighting only where a specific activity needs it.
This matters most in covered patios, narrow side-yard patios, and pergolas, where light has fewer places to spread. In a tight space, one poorly aimed fixture can dominate the entire view.
What Changes Under Different Patio Conditions
Small patios punish visible bulbs faster
Small patios give glare less distance to soften. On an 8-by-8-foot or 10-by-12-foot patio, a visible bulb may sit only 4 to 7 feet from someone’s face. That is close enough for even modest fixtures to feel aggressive.
In tight spaces, fewer visible points usually work better than more decorative bulbs. One controlled wall fixture can outperform several exposed lights if the seating area is close.
Dark yards make bright points feel brighter
A patio bordered by a dark lawn, fence, or planting bed has strong contrast. The eye adapts to the darkness, then every exposed bulb feels sharper. Soft perimeter lighting can help more than adding brightness over the patio itself.
The goal is to reduce the black-hole effect beyond the seating area. If you are planning more than a single fixture change, the best backyard lighting layout for patios at night gives a better frame for balancing movement, seating, and edges.
Windows and neighbors reveal bad aim fast
A fixture that feels tolerable from the patio may still shine into a sliding glass door, a second-story bedroom, or a neighbor’s yard. This is especially common with floods, uplights, and clear-lens wall fixtures near fences.
If you can stand at the property line or inside the house and see a bright fixture face, the aim is too exposed. Shielding and downward direction improve comfort on the patio while also reducing light spill outside the area that actually needs illumination.
Questions People Usually Ask
Are dimmers enough to fix patio glare?
Sometimes, but only when the fixture is already aimed well. A dimmer reduces output; it does not hide a bare bulb or redirect a bad beam. If the glare source is visible from a chair, shielding or relocation matters more.
Should patio lights point up or down?
Most primary patio lights should point down or toward useful surfaces. Uplighting can work on trees, walls, and planting features, but it should not cross seating areas, windows, or common sightlines.
Is glare worse with LED patio lights?
LEDs are not automatically worse, but small, intense LED points can feel harsher when exposed. LEDs work well outdoors when the fixture diffuses, shields, or aims the light properly. The issue is usually fixture design and placement, not LED technology itself.
The Bottom Line
Comfortable patio lighting is not about making the space brighter. It is about keeping light out of people’s eyes while putting enough of it on steps, tables, walkways, edges, and task areas.
If the patio feels harsh, find the one fixture everyone notices first. Fix that before changing the whole system. Glare tends to have a ringleader, and removing that source often makes the rest of the lighting feel more intentional.
For broader responsible-lighting guidance, see the DarkSky outdoor lighting principles.