The best path lighting for backyards with steps, slopes, or tight walkways is usually a low-voltage LED system with shielded fixtures, plus dedicated step or hardscape lights wherever the grade changes. The goal is not to make the yard brighter. It is to make the walking route readable from 6–10 feet away without glare.
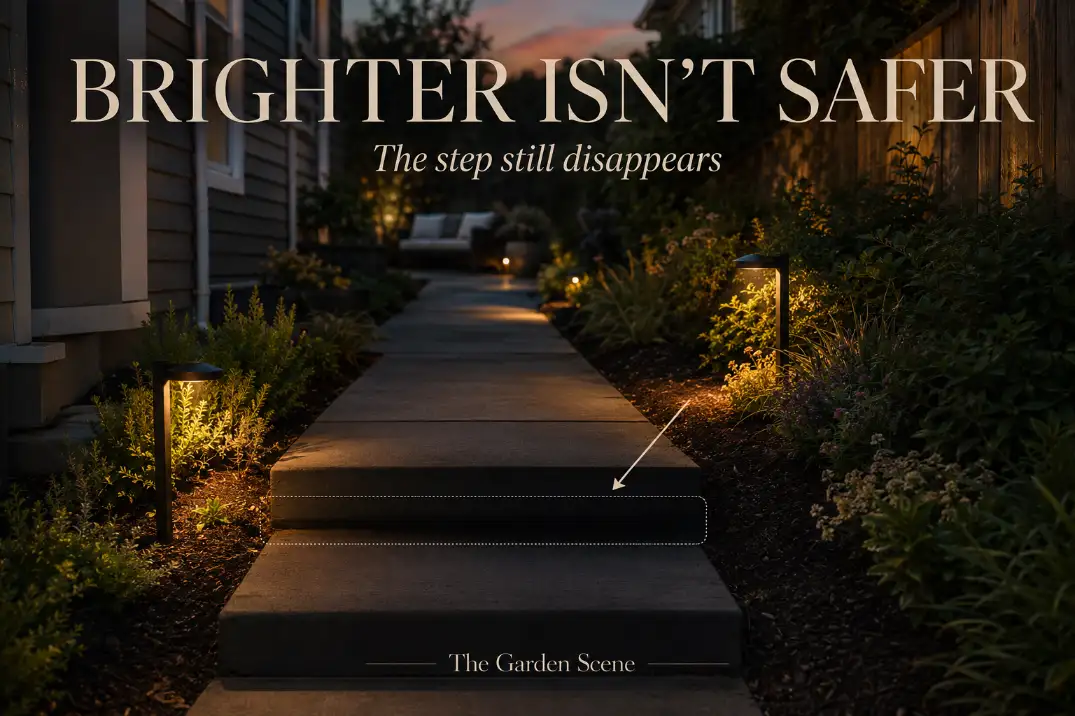
Check three things first: whether every step edge is visible from both directions, whether any dark gap lasts longer than one normal stride of about 2.5–3 feet, and whether the fixture shines into your eyes when walking uphill or downhill. If those checks fail, a brighter bulb is rarely the best first fix.
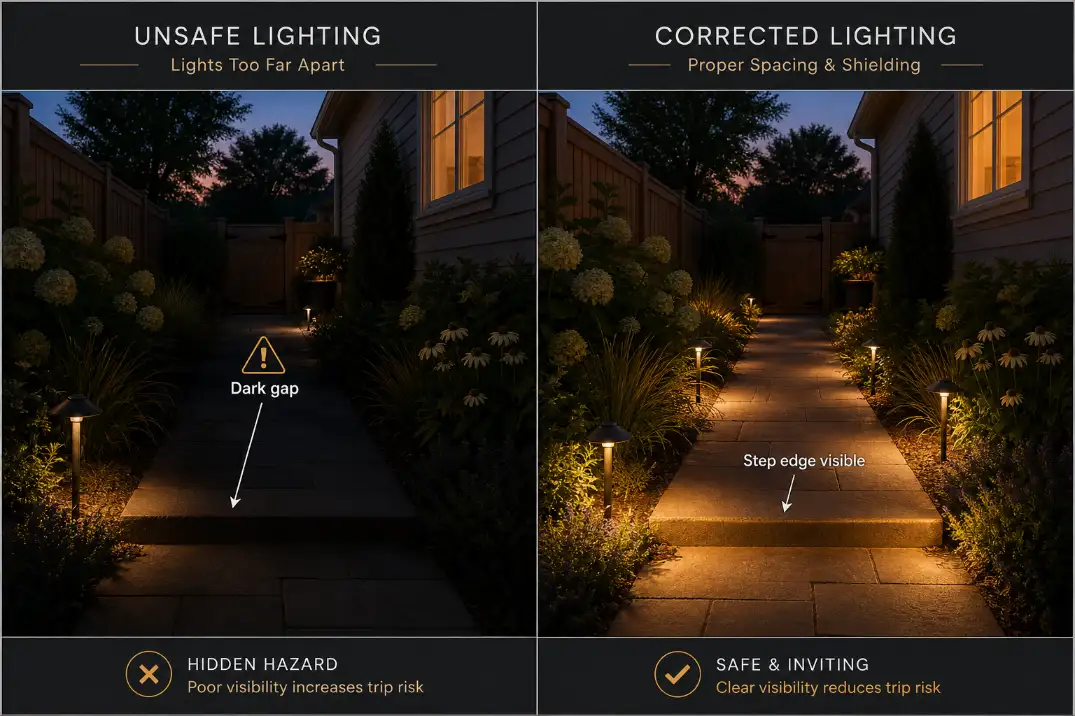
A flat garden path can often handle 8–10 feet between fixtures. A narrow walkway with steps, curves, or slope usually needs useful light points closer to 5–8 feet apart, especially at turns, gates, landings, and grade changes. That is where generic path lighting advice often breaks down.
Best path lighting choices by backyard problem
The strongest setup depends on what makes the route difficult. A shaded side-yard path does not need the same solution as three patio steps or a sloped gravel walkway.
| Backyard condition | Best lighting choice | Why it works | Usually avoid |
|---|---|---|---|
| 1–3 backyard steps | Low-voltage step lights or hardscape lights | Defines the tread edge directly | One path light beside the stairs |
| Sloped walkway | Shielded low path lights or downward bollards | Reduces uphill and downhill glare | Exposed bulbs or tall lantern-style lights |
| Tight 24–36 inch side path | Wall, fence, or post-mounted downlights | Keeps fixtures out of the walking space | Stake lights that narrow the route |
| Shaded path under trees or fences | Wired low-voltage LEDs | Performs consistently without sun exposure | Solar lights as the only safety lighting |
| Loose gravel or uneven pavers | Surface repair first, then low grazing light | Reveals texture after the route is stable | Adding more lights to an unstable path |
| Occasional garden route | Solar markers or low-output path lights | Enough for wayfinding | Expensive wiring if the route is rarely used |
The most reliable default for daily-use backyard routes is low-voltage lighting. Solar can still make sense for low-risk wayfinding, but it is often a weak choice for steps, shaded side yards, trash-bin routes, basement stairs, or paths guests use at night.
If the backyard is already awkward in daylight, lighting should be treated as part of a wider access fix, not a cure-all. A route that feels confusing, narrow, or broken up may need the kind of broader night-use planning covered in Backyard Lighting Plans for Hard-to-Use Spaces.
What people usually misread first
Most bad path lighting is not caused by buying the wrong style. It is caused by putting light in the wrong place.
Brightness is not the same as visibility
A backyard can look nicely lit and still be hard to walk through. That happens when the lighting creates a soft glow across plants, mulch, walls, and paving but fails to show the edge of the walking surface.
The symptom is dimness. The mechanism is poor contrast. Your eye needs to separate the path, the drop-off, the step edge, and the surrounding bed. If all of those surfaces are washed with the same soft light, the scene may look pleasant from the patio door while still feeling uncertain underfoot.
This is especially common with pale concrete, tan pavers, gravel, and light-colored stone. Those surfaces can reflect enough light to look bright without giving the foot clear placement cues.
Solar lights are often overestimated
Solar path lights are easy to like because they are cheap, fast, and cable-free. They are also the category most often asked to do a job it cannot reliably do.
Many inexpensive solar lights fade after 3–5 hours, especially when the panel sits under tree canopy, along a fence, beside shrubs, or on the north side of a house. In summer they may seem fine. In fall, winter, or after several cloudy days, the same path can become patchy.
That does not make solar useless. It makes it better for low-risk marking than for safety-critical footing. Use solar lights where failure would be annoying, not where failure would hide a step, slope, gate latch, or narrow turn.
Pro Tip: If a path is used every night, choose wired low-voltage lighting first. If it is used occasionally and has no steps or drop-offs, solar can be enough.
Specs that matter more than style
Fixture style affects the look of the backyard. Specs decide whether the route works after dark.
Shielding and beam direction
For steps, slopes, and tight walkways, shielded light is usually more important than high output. A shielded fixture directs light downward or sideways onto the walking surface instead of into someone’s face.
This matters most on slopes. When someone walks uphill, their eye line drops closer to the fixture head. A lamp that seems gentle from the patio can become glare when viewed from below. Fully exposed bulbs, decorative lantern-style path lights, and bright unshielded stakes often create this problem.
On steps, beam direction should reveal the tread edge. A fixture that lights the plants beside the stairs may do very little for the stair itself. A side-mounted step light, recessed hardscape light, or low path light aimed across the tread usually gives better footing information than a bright fixture pointed upward.
Lumens and color temperature
For many residential path lights, about 100–200 lumens per fixture is enough when the beam is controlled. Dark stone, wet wood, black mulch, or dense shade may need the upper end of that range, but output should not be the first lever you pull.
Color temperature matters too. Around 2700K gives a warm residential look that usually feels comfortable. Around 3000K can help on darker surfaces or step areas where a little more clarity is useful. Cooler light can feel harsh in small backyards, especially near pale walls, light concrete, or reflective patio surfaces.
The most common wasted upgrade is replacing every lamp with a brighter one while leaving the same bad spacing. If the dark zone falls between fixtures, brighter light may create hotter bright spots and deeper-looking shadows.
Material and weather exposure
Backyard path lights take more abuse than they appear to. They get hit by hoses, sprinklers, pets, kids, mowers, string trimmers, freeze-thaw movement, and wet soil.
Plastic fixtures and thin stakes can be acceptable for simple solar markers, but they are weak choices along a daily walking route. Powder-coated aluminum is common and affordable, though finish quality varies. Brass and copper cost more but usually age better, especially in damp, coastal, or high-irrigation areas.
In humid Florida yards, coastal California gardens, and rainy Pacific Northwest sites, corrosion and dirty lenses can show up faster. In northern states, freeze-thaw cycles can tilt stakes or expose wires after winter. Outdoor-rated fixtures and waterproof connectors are not decorative details; they decide how long the system stays consistent.
Layout rules for steps, slopes, and tight walkways
Good path lighting is placed by risk, not by equal distance.
Put light where decisions happen
Even spacing looks neat in a product diagram, but real backyards are rarely that clean. The important light points are the first step, last step, gate latch, curve, landing, slope transition, patio edge, and narrow pinch point.
A straight open path can often use wider spacing. A curved or sloped route needs closer visual cues. When lights are placed every 5–8 feet in higher-risk areas, the route reads more continuously without needing excessive brightness.
This is also why a row of identical lights can still fail. It may light the border but not the movement through the space. The person walking does not care whether the fixtures look symmetrical; they need to know where the next foot should land.
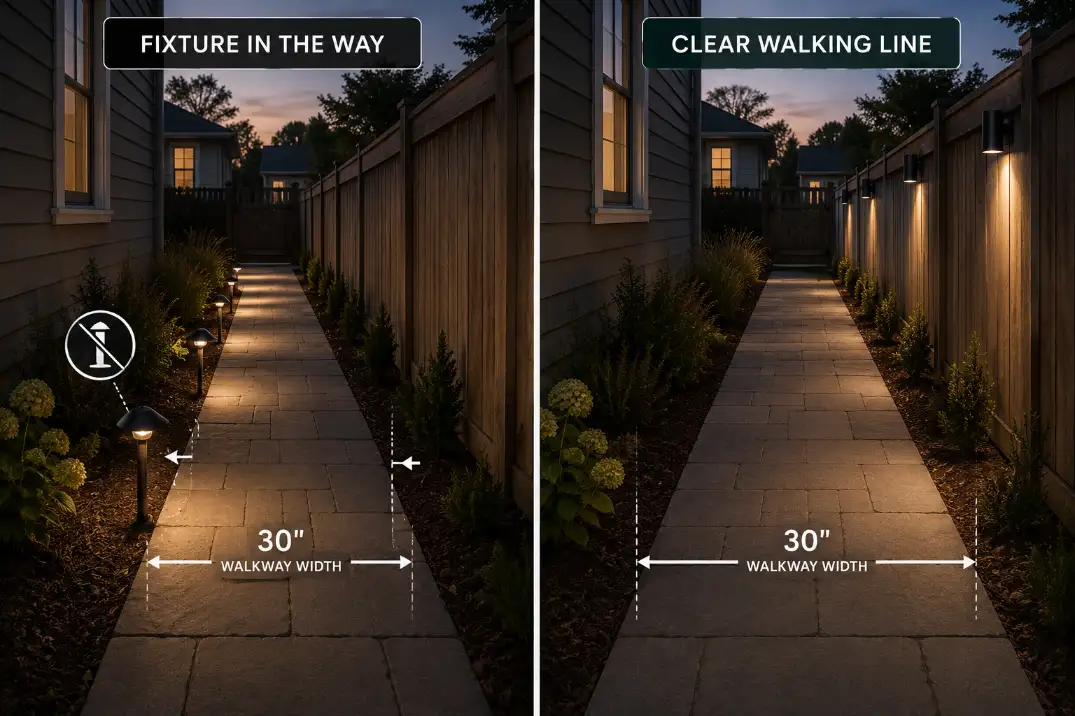
Keep fixtures out of the walking envelope
On a tight walkway, the fixture can become part of the hazard. A stake light set too close to the edge gets kicked, tilted, clipped by hoses, or swallowed by plants. Leave at least 6 inches between the fixture and the active walking edge when possible. More clearance is better if kids, dogs, trash bins, or garden carts use the route.
This matters most on 24–36 inch walkways. A light head that projects only a few inches can still make the passage feel cramped. If the path already feels narrow, use wall-mounted downlights, fence-mounted lights, or post-mounted fixtures instead of stakes.
The same clearance logic applies near doors and patio transitions. If a walkway connects directly to a sliding door, grill area, or seating zone, lighting should not create another obstacle in the path. Similar flow problems show up in Patio Layouts With Sliding Glass Doors and Walkways, where a small obstruction can change how usable the whole space feels.
Plan for plant growth, not just installation day
A fixture that works in April can be blocked by July. Ornamental grasses, hostas, perennials, and low shrubs can all swallow path light beams during the growing season.
If the fixture head sits below mature plant height, the lighting plan depends on regular pruning. That may be fine along a formal front walk, but it often fails in casual backyard beds. For paths already crowded by planting, fix the crowding before adding more lights. Otherwise the route becomes narrower and the light becomes less useful at the same time.
When plants are already pushing into the walkway, the better fix may start with trimming, relocation, or bed-edge adjustment. The problem is not just visual clutter; it is physical clearance, which is why Backyard Plants Crowding Paths and Seating is closely tied to lighting performance.
When low-voltage wiring is worth it
Low-voltage lighting is worth it when the route is used often, shaded, sloped, or connected to a daily task. That includes back doors, side gates, trash storage, basement entries, hot tubs, detached garages, and steps between patio levels.
Daily-use paths need consistency
A low-voltage LED system runs from a transformer, commonly 12 volts, and gives much more consistent output than solar. That consistency matters when the lighting is not just decorative.
For a short, simple path, a DIY low-voltage kit may be enough. For a longer route, multiple stair areas, or fixtures spread across different zones, planning becomes more important. Poorly planned cable runs can cause weaker light at the far end, especially if too many fixtures are placed on one long run.
The practical fix is not complicated: avoid treating the whole backyard as one line of lights. Separate runs, proper cable gauge, waterproof connectors, and a correctly sized transformer all matter more than squeezing in another fixture.
Controls should match the route
Timers and photocells work well for general path lighting because they turn lights on when the yard is dark. Motion controls can be useful for side-yard routes, trash areas, and gates where all-night lighting is unnecessary.
Do not overcomplicate every path with smart controls. The best control is the one people do not have to think about. For most difficult backyard routes, automatic dusk-to-evening operation is more useful than a phone-controlled scene that someone forgets to turn on.
Pro Tip: Put steps and main access routes on the most reliable control. Decorative garden accents can be on a separate zone or lower priority.
What fails first after installation
A path lighting plan can look good on the first night and still age poorly. The first failures are usually small physical changes, not dramatic electrical problems.
Fixtures tilt before they break
Stake lights often tilt after mowing, watering, pets, freeze-thaw cycles, or someone brushing past them. A tilted fixture changes the beam angle, which can create glare or leave the walkway darker than intended.
Check fixture alignment after the first heavy rain, after lawn service, and at the start of each season. A 30-second adjustment can restore a light pattern that otherwise looks like a product failure.
Lenses and beams get blocked
Pollen, irrigation overspray, dust, mulch splash, and coastal salt can dull lenses. In humid or irrigated backyards, a light that looked crisp in spring may look weak by late summer simply because the lens is dirty or the beam is partly blocked.
Plant growth is the bigger issue. A beam blocked by foliage is not underpowered; it is obstructed. If the same fixture needs trimming every 2–3 weeks during peak growth, the planting and lighting are fighting each other.
Connectors are a hidden weak point
Buried or damp wire connections fail quietly. The symptom may be one dim fixture, a flickering run, or several lights that stop working after storms. This is why waterproof connectors are worth using from the start, even on small DIY systems.
Do not assume the visible fixture is always the problem. If several lights on the same run behave badly after rain, the connection or cable layout deserves attention before replacing fixtures.
When lighting is not the real fix
Lighting can reveal a path. It cannot make a failing path safe.
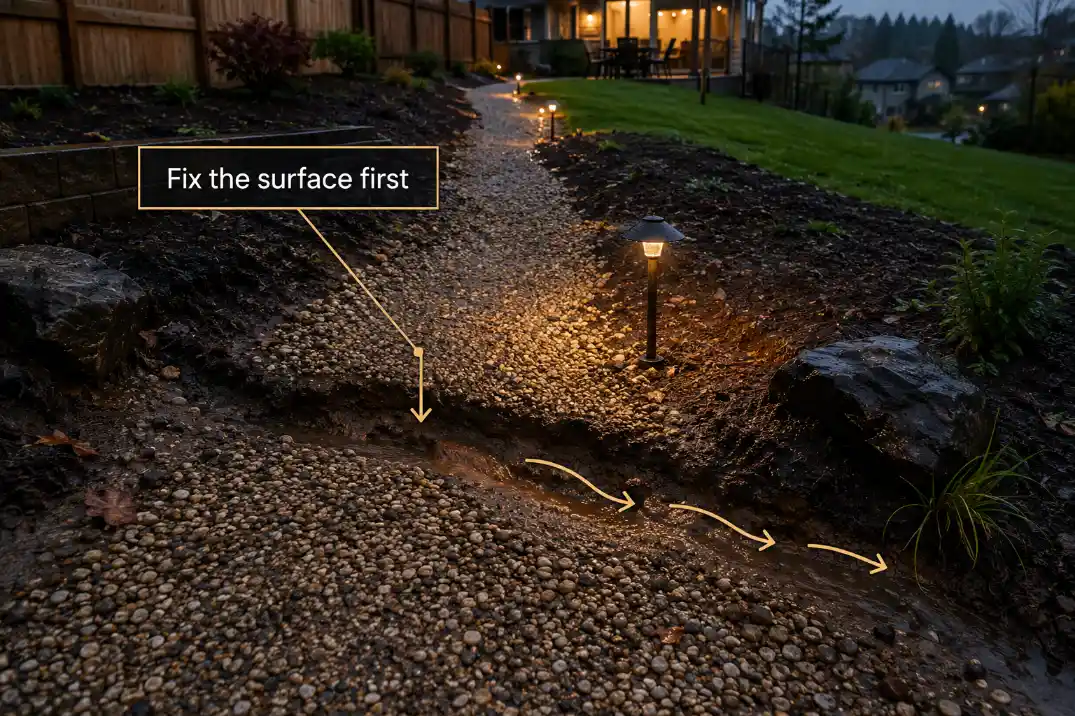
Surface movement comes first
If pavers rock, gravel shifts, or stepping stones move under normal foot pressure, the surface should be repaired before more lighting is added. A path that moves more than about 1/4 inch underfoot is not mainly a lighting problem.
This distinction matters because better lighting may make the path look more finished while the footing still feels uncertain. On steps and slopes, that false confidence can be worse than obvious darkness.
Uneven walking surfaces are especially risky after rain or freezing weather. A slick or unstable path needs surface correction, drainage work, edging, compaction, or replacement before lighting can do its job well.
Drainage and erosion can outrank lighting
Sloped routes often fail because water cuts across them. Small ruts, washed-out gravel, exposed edging, and loose stones can all hide in shadow at night.
If stormwater crosses the path after heavy rain, the lighting plan should follow the drainage fix. Otherwise the route changes over time, and the lights keep illuminating a surface that is getting worse. In those cases, the better order is similar to the repair logic in Fix Slope Drainage and Erosion in the Right Order: stabilize the route first, then light it.
Quick diagnostic checklist before buying fixtures
Use this before replacing lights or adding more of them:
- Can each step edge be seen clearly from both directions after dark?
- Are any dark gaps longer than one normal stride, about 2.5–3 feet?
- Do any fixtures shine into your eyes when walking uphill or downhill?
- Is the walking surface stable, with less than about 1/4 inch of movement?
- Are plants likely to block the beam within one growing season?
- Does the fixture reduce usable walkway width on a tight path?
- Is the route used daily, or only for occasional garden access?
If two or more answers point to glare, blocked beams, unstable footing, or poor step visibility, do not start with brighter bulbs. Start with placement, shielding, surface repair, or a different fixture type.
What path lighting usually costs
Cost depends less on the number of lights and more on reliability, materials, wiring, and installation difficulty.
Basic solar markers for low-risk paths often fall around $40–$150 for a small set. They are quick, but they are not the best choice for shaded steps or daily access routes.
A basic DIY low-voltage kit often lands around $150–$500, depending on fixture count, transformer size, and cable length. This is often the best value range for a simple backyard path.
Higher-quality brass, copper, or better-sealed fixtures with a stronger transformer can move the project into the $500–$1,500+ range. That cost can make sense where the path is used daily, exposed to moisture, or difficult to access after installation.
Professional design and installation for steps, slopes, multiple zones, trenching, controls, and premium fixtures can run $1,500–$5,000+. That is not necessary for every backyard, but it becomes more reasonable when the lighting has to solve access, safety, and durability problems at the same time.
The point is not to spend as much as possible. It is to avoid spending twice: once on decorative lights that look good for a month, and again on the system the path actually needed.
Final recommendation
For most backyards with steps, slopes, or tight walkways, choose shielded low-voltage LED path lighting and add dedicated step or hardscape lights where elevation changes occur. Keep light warm, controlled, and placed at risk points rather than spaced mechanically.
Use solar only for simple, low-risk routes. Use wall or post downlights where stake lights would narrow the path. Repair loose gravel, rocking pavers, washout, or crowded planting before assuming more lighting will solve the problem.
The condition people overestimate is brightness. The condition people underestimate is glare. The best path lighting does not make the backyard look like a runway; it makes the next step obvious without calling attention to itself.
For broader official guidance on outdoor lighting controls, see the U.S. Department of Energy.