
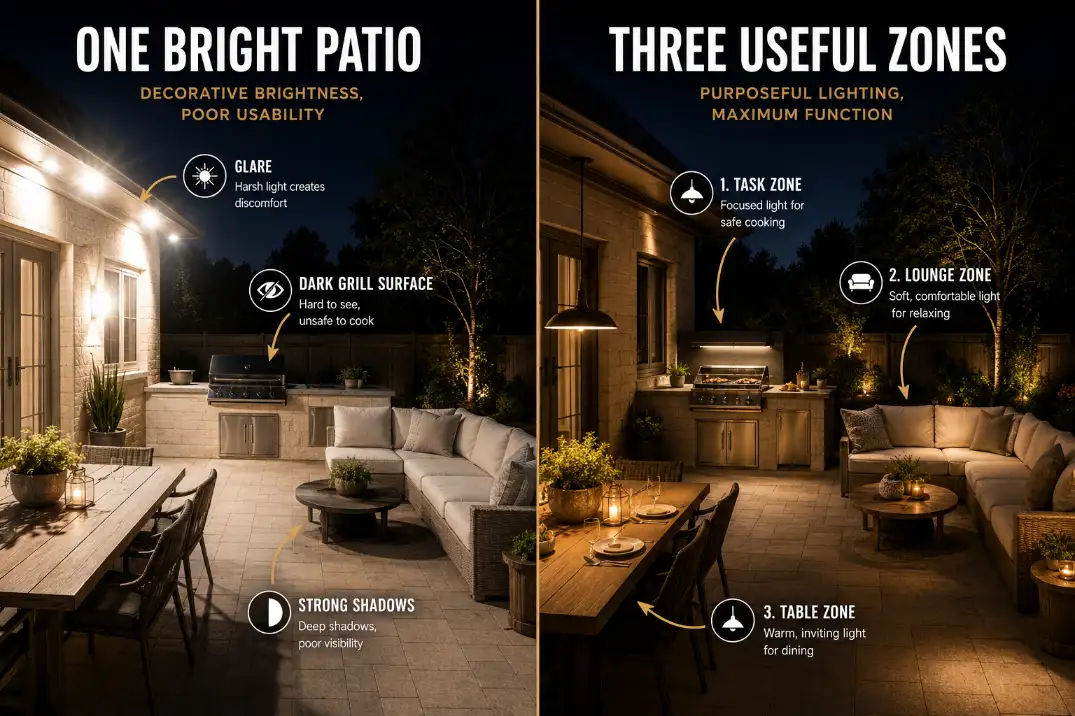
Outdoor lighting works best when dining, lounge, and grill areas are treated as separate jobs, not one evenly bright patio.
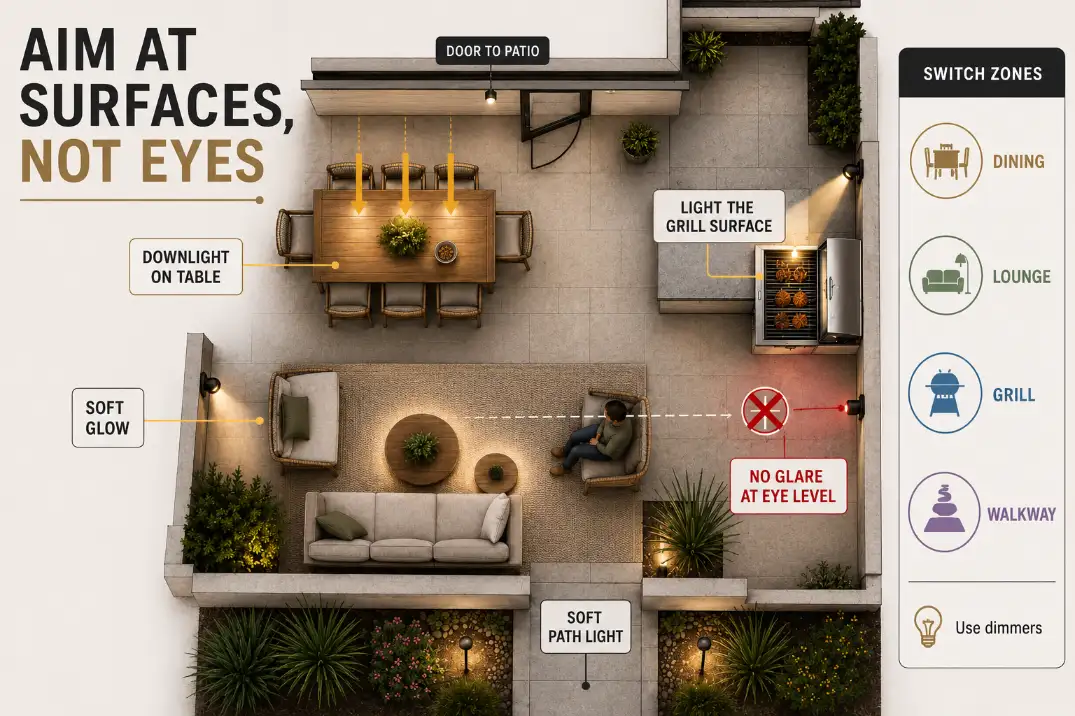
Start with three checks: can people see food without looking into a bulb, can someone walk from the door to the table without stepping into darkness, and can the cook see the grill surface without casting a shadow over it?
Dining usually needs about 10–20 foot-candles on the tabletop, lounge seating often feels better around 2–5 foot-candles, and grill prep may need 20–30 foot-candles because heat, knives, smoke, and food doneness require clearer visibility.
This is different from general backyard brightness. A patio can look bright from the house and still fail where people actually eat, sit, cook, and move.
The problem is rarely a lack of fixtures. More often, light lands on walls, eyes, or empty floor instead of the table, side tables, walking edges, and grill surface.
The Simple Rule: Light the Job, Not the Whole Patio
The best patio lighting plans are not perfectly even. They are selective. A dining table, lounge chair, grill, and walkway do not need the same brightness, fixture type, or switch behavior.
Dining needs tabletop clarity
A dining zone should make plates, glasses, serving dishes, and faces readable without turning the table into a stage. The best light lands downward or slightly across the tabletop.
Pendant lights, umbrella lights, shielded sconces, and carefully placed string lights can all work if the source is not shining directly into seated eyes.
For most outdoor dining setups, a fixture centered about 30–36 inches above the tabletop is easier to control than a high exposed bulb run stretched across the whole patio.
When the light sits too high or too far away, it spreads into faces and nearby darkness instead of doing the useful work at the table.
Lounge lighting should stay lower than dining light
Lounge areas fail when they are lit like work areas. People leaning back in deep chairs do not need bright overhead light. They need enough glow to find a drink, see a table edge, read a phone briefly, and recognize faces without squinting.
If a bare bulb is visible from seated eye height, roughly 42–48 inches above the patio surface, from 8–12 feet away, it will usually feel harsher than its wattage suggests.
On compact patios, lighting a small patio without clutter often depends more on shielding and placement than on adding another fixture.
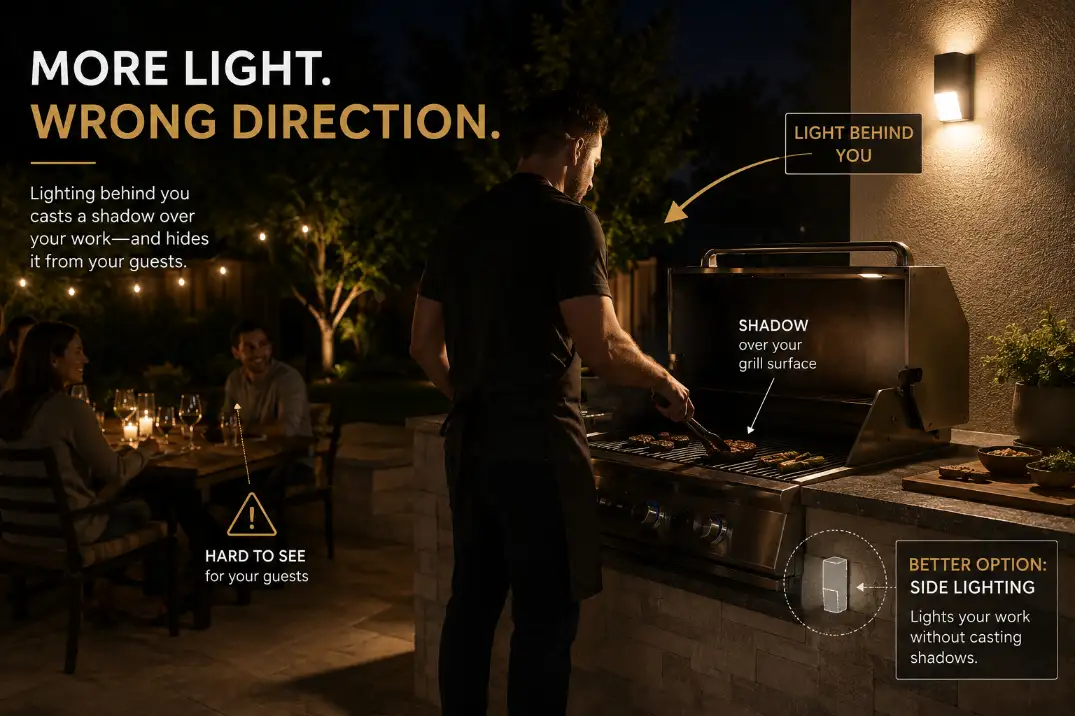
Grill lighting needs direction more than mood
The grill is the least forgiving zone. A cook needs to see the grate, controls, side shelf, hot surfaces, and the route back to the table.
The light should come from the front or side of the cook, not from directly behind them. A wall fixture behind the grill often creates the exact shadow that makes the cooking surface harder to read.
A grill light can be brighter than the dining or lounge light without making the whole patio harsh. The trick is beam control. A focused task light aimed at the grill and prep surface is usually better than a floodlight that washes across the table, fence, and neighbor’s window.
Best Fixture Types by Zone
A useful lighting plan does not require expensive fixtures everywhere. It requires the right fixture behavior in the right place.
| Zone | Best fixture types | What the fixture should do | Avoid |
|---|---|---|---|
| Dining table | Pendant, umbrella light, shielded sconce, dimmable string lights | Put warm light on the tabletop | Bare bulbs across seated faces |
| Lounge seating | Low lanterns, shielded sconces, step lights, planter lights | Create soft visibility with low glare | Bright overhead floodlights |
| Grill station | Adjustable task light, recessed downlight, grill-mounted light | Aim at grate, controls, and prep shelf | Light behind the cook |
| Main route | Path lights, step lights, low wall wash | Mark edges every 6–8 feet | Relying on dining light for circulation |
| Door threshold | Shielded entry light | Show handle, landing, and step change | Overpowering the patio from the wall |
The mistake is not choosing the “wrong style.” It is asking one fixture to do three jobs. A decorative string-light run may help ambience, but it is rarely enough for grill task lighting. A bright entry sconce may help the back door, but it can make the lounge feel exposed.
Pro Tip: If one light has to stay on because one activity still needs it, that light probably belongs on its own switch or dimmer.
What People Usually Misread First
Outdoor lighting problems are easy to misdiagnose because patios often photograph better than they function. A camera sees glow. People notice glare, shadows, and awkward transitions.
Brightness is not the same as comfort
The most common overestimate is total brightness. A 1,000-lumen wall light can still be a poor patio light if it points outward, sits near eye level, or creates a hard contrast between a bright wall and a dark floor.
A lower-output shielded fixture may feel better because the useful light lands on the surface people actually use.
The better question is not “Is the patio bright enough?” It is “Is the right surface bright enough from the right direction?” Plates, grill controls, walking edges, step transitions, and side tables matter more than general glow.
Shadows are symptoms, not the mechanism
A dark grill grate, dim step, or gloomy table is the symptom. The mechanism is usually blocked light, wrong angle, or high contrast.
If the cook’s body casts a shadow over the food, a brighter bulb may not solve it. A side-mounted task light or a smaller beam from the opposite angle may do more.
For walking routes, the same logic applies. A path can look lit from the house and still have invisible edges where the eye moves from a bright patio to a darker lawn.
If the dining, lounge, and grill zones connect by steps or slopes, path lighting for steps, slopes, and walkways matters more than making the seating area brighter.
Symmetry often wastes fixtures
Four matching lights can look polished and still perform badly. Patios rarely use space evenly. A grill, dining table, door swing, walkway, and lounge grouping all create different visual needs.
Symmetry may make the plan look tidy, but it often leaves the grill too dim and the lounge too harsh.
This is where the standard fix stops making sense. If the patio already has several lights and still feels wrong, adding matching fixtures usually repeats the failure.
The next improvement should be aiming, shielding, dimming, or separating controls.
How to Build the Zones Without Overlighting
A strong patio lighting plan usually has three layers: task light where people do something specific, low guide light where people move, and soft ambient light where people sit. Accent lighting can help, but it should not carry the whole patio.
Keep dining warm and controlled
For most US patios, 2700K–3000K light feels more natural around dining and seating than cooler 4000K light. Cooler light can make food and skin tones look harsher, especially against pale concrete, white siding, or reflective pavers.
In humid Florida backyards, wet surfaces can make glare from cool fixtures feel sharper after evening rain. In dry Arizona yards, the problem is often the opposite: exposed bulbs look extra harsh against a dark, open background.
The solution in both cases is not simply warmer light. It is warmer light aimed at the table, with the source shielded from direct view.
Let the lounge be darker than the table
A lounge zone should not compete with the dining area. It should feel like a lower pool of light. Side tables need visibility, but chair cushions do not need full coverage.
If the lounge sits near a fence or wall, a soft downward wash can define the area without shining into people’s faces.
This is also where small changes can outperform new fixtures. Shielded bulbs, lower-output lamps, warmer color temperature, and better aiming can make a patio feel more relaxed without changing the layout.
For spaces that already feel harsh at night, patio lighting glare mistakes should be addressed before adding another decorative light.
Aim grill light at the work surface
The grill zone deserves the most precise light. A small adjustable downlight, shielded sconce, or under-cover task fixture aimed at the grate and prep shelf usually beats a wide flood.
The fixture should not shine toward the dining table, neighboring windows, or the cook’s face when the grill lid opens.
If the grill sits under a covered patio, this gets more important. Smoke, steam, dark finishes, and roof shadows can make the cooking surface hard to read even when the surrounding patio looks bright.
For outdoor cooking layouts where traffic, prep space, and seating overlap, patio layout for grill, prep, and dining often determines whether separate lighting zones can work at all.
What Changes by Patio Type
The same zoning rule applies everywhere, but the weak point changes with the patio.
Small patios need fewer visible sources
On a small patio, the eye is close to every bulb, sconce, and lantern. That makes glare more obvious. The winning move is usually fewer visible light sources, better shielding, and separate low-level route lighting. One bright overhead light can flatten the whole space and still leave the grill or table poorly lit.
Covered patios need shadow control
Covered patios often look easier to light because they offer ceilings, beams, and walls for fixtures. But roof shadows, smoke, and dark ceiling finishes can make grill zones harder to read. Recessed or surface-mounted downlights should be aimed at useful surfaces, not scattered evenly just because the ceiling allows it.
Larger patios need control more than output
Large patios often fail because every zone is tied to one switch. The result is too much light when people are relaxing and not enough light where someone is cooking or walking. On larger layouts, separate controls matter as much as fixture choice.
What Changes If You Cannot Add New Wiring
Not every patio can be rewired easily. That does not mean the lighting plan has to be random. It means permanent fixtures should handle the most important safety and task needs, while flexible fixtures support comfort.
Use plug-in and low-voltage lighting strategically
Plug-in string lights, rechargeable table lamps, low-voltage path lights, and movable lanterns can all help, but they should not be treated equally.
Battery table lamps can improve dining. Low-voltage path lights can define circulation. Plug-in café lights can add atmosphere. None of those should be the only serious light over a hot grill.
If hardwiring is limited, prioritize fixed power where the job is hardest to fake: door thresholds, covered cooking areas, and permanent grill stations. Lounge and decorative lighting can be more flexible.
Solar lights are markers, not task lights
Solar fixtures can be useful along a garden edge, side path, or low-risk route. They are less reliable as the main dining or grill light. Output often drops after cloudy weather, and many small solar lights are better at marking a line than lighting a surface.
A practical threshold is simple: if the area involves food prep, heat, stairs, or knives, do not rely on weak solar output as the only light. Use solar for orientation, not precision.
Outdoor-rated still needs judgment
Outdoor-rated fixtures are not all equal in real conditions. An uncovered dining area needs fixtures suitable for direct exposure.
A covered patio may still see wind-driven rain, coastal moisture in California, or humid air in the Southeast. Grill zones add heat, grease, smoke, and cleaning residue.
Do not treat a roof as full protection if the fixture sits near the open edge of the patio. A fixture that survives under a deep porch may not perform the same way beside a grill or on a wind-exposed pergola.
When the Lighting Problem Is Really a Layout Problem
Lighting cannot fix every patio problem. Sometimes the light is being blamed because the zones physically overlap too much.
The grill needs working room first
If there is less than about 3 feet of clear working room in front of the grill, the lighting problem may actually be a layout problem. The cook may be standing in the only walkway, blocking the light, or forcing guests to pass too close to heat and smoke.
In that situation, a brighter fixture only makes the conflict more visible. The better fix may be shifting the grill, narrowing the dining setup, or moving lounge seating out of the cooking path.
On small patios, small patio grill placement near the dining area can matter more than fixture choice.
One fixture cannot cover a mixed-use patio
A single wall light expected to cover more than 12–16 feet of mixed-use patio usually creates uneven results. It may brighten the wall and door while leaving the table, grill, or outer seating edge underlit. Worse, the eye adapts to the brightest point, making darker areas feel even less visible.
This is why patios can feel both too bright and too dim. The problem is not total output. It is contrast.
The Three Lighting Scenes That Make Zones Work
Zones matter most when the patio changes use during the evening. The best setup lets the light shift with the activity instead of forcing every fixture to stay on.
Cooking mode
Cooking mode should prioritize the grill and prep area. The grill task light is on, the dining table is moderately lit, the lounge is low, and route lighting is active. This mode may only be needed for 30–45 minutes, so it should not force the whole patio to stay bright all night.
Dinner mode
Dinner mode moves attention to the table. The grill light can turn off or dim down, tabletop light becomes the main source, and route lighting stays low but readable. The lounge should remain secondary unless people are already moving away from the meal.
Late-night mode
Late-night mode should be the quietest. After 10 or 11 p.m., many patios only need low lounge light and safe movement to the door. Full dining and grill brightness usually becomes light trespass, especially near bedroom windows, fences, or neighboring homes.
For larger patios where seating, walking, and cooking areas feel disconnected, the best backyard lighting layout for patios at night can help separate movement lighting from social lighting.
Quick Diagnostic Checklist
Use this before buying more fixtures:
- From a seated position, can you see bare bulbs or hot spots within 8–12 feet?
- Does the dining table have clear light on plates without harsh light in faces?
- Does the cook’s body cast a shadow over the grill grate or side shelf?
- Are steps, edges, and door thresholds visible after the patio lights are dimmed?
- Can the lounge area stay darker than the dining area without becoming unsafe?
- Do any lights shine into neighboring windows, bedroom windows, or the street?
- Can cooking, dinner, and late-night sitting use different light levels?
If three or more answers are no, the problem is usually zoning, not fixture style.
Questions People Usually Ask
Should all patio lights use the same color temperature?
Usually, yes within a narrow range. Keeping most outdoor living lights around 2700K–3000K makes the patio feel intentional. The grill task light can be slightly clearer if needed, but jumping from warm dining lights to cool blue-white grill light often makes the zones feel mismatched.
Are solar lights enough for dining, lounge, and grill zones?
Solar lights can help mark edges and low-risk routes, but they are rarely dependable as the main dining or grill light. Use them for orientation, not for cooking, stairs, or the only path back to the house.
Do I need separate switches for every zone?
Not always, but the grill and lounge should not be forced to behave the same way. At minimum, separate the brightest task lights from the softer social lights. A patio that can move from cooking to dinner to late-night sitting will feel more comfortable with fewer lights on.
The Best Setup Is Usually Less Even Than You Think
The best lighting zones for dining, lounge, and grill areas are not equal. Dining needs warm clarity on the table. The lounge needs lower, softer light that does not stare back at seated guests.
The grill needs focused task light from the right direction. Walkways and thresholds need quiet guidance so safety does not depend on blasting the whole patio.
The mistake worth avoiding is treating outdoor lighting like room lighting. A patio is not one room after dark. It is a set of tasks, sightlines, and transitions.
Once the lighting follows those jobs, the space usually feels calmer, safer, and more useful with fewer fixtures than expected.
For broader official guidance on reducing glare and light trespass, see the U.S. Department of Energy.