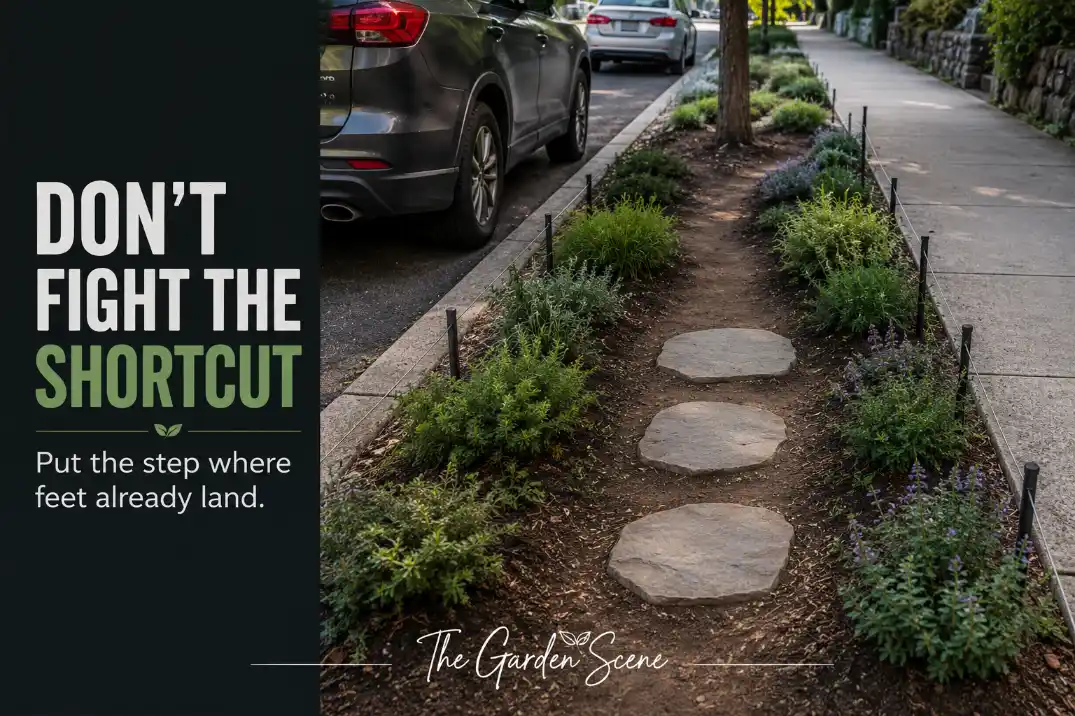
Stepping stone access through sidewalk strips works best when it accepts the route people already use instead of trying to defend every inch of planting.
The first checks are simple: where does someone step out of a parked car, where do they leave the curb, and does the worn line return within 7–14 days after cleanup?
If the path is wider than about 8–12 inches and keeps appearing in the same place, the issue is not weak plants. It is unmanaged access.
The quick solution is to place 2–4 stable stones on the real walking line, keep the tops low and steady, and plant beside the route instead of inside it.
This differs from normal planting decline because the damage forms a repeated path, not random thinning. Replanting alone usually fails within one season when the strip is crossed several times a day.
Why People Cut Through the Strip
The shortcut is usually logical
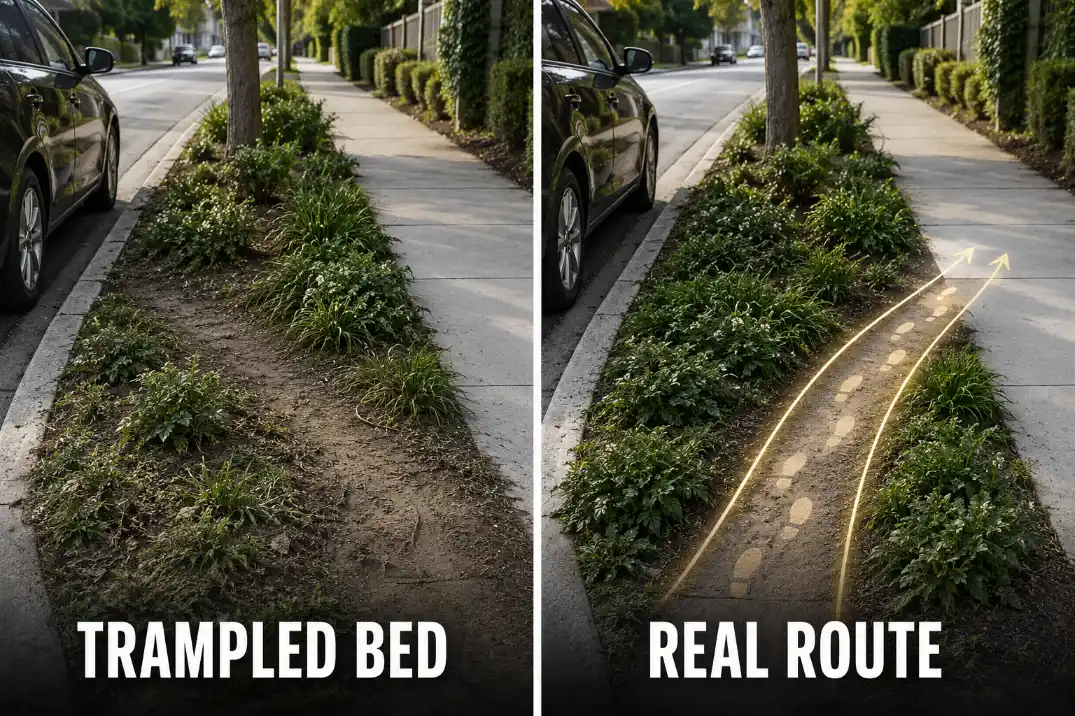
Most sidewalk strip shortcuts are not random. People cross from parked cars, reach a mailbox, avoid a puddle, step around a snow pile, or take the shortest line from the street to the sidewalk. If the planted strip sits between those two points, it becomes a walkway whether the planting plan admits it or not.
That is why a perfect-looking sidewalk strip can fail quickly. A 3-foot-wide bed may seem large enough for plants, but if the most convenient foot route crosses it every morning and evening, the bed is doing two jobs at once. The access job almost always wins.
This is especially true in narrow strips where there is not enough extra width to absorb mistakes. If the planting area is already tight, the route needs to be assigned deliberately, much like the layout logic in Narrow Sidewalk Strip Layouts Under 3 Feet, where every inch has to carry a clear purpose.
Bare soil is the symptom, not the cause
Bare soil is the visible symptom. Repeated pressure is the mechanism. That distinction matters because compost, fresh mulch, or replacement plants may make the strip look repaired for a few weeks, but they do not change where people step.
A useful threshold: if footprints, flattened mulch, or broken stems return within two weeks, stop treating the route as temporary damage. The better move is to harden a small access line and protect the rest of the planting.
Where Access Points Should Go
Design from the car door, not the house view
The strongest access point usually starts where a foot actually lands after someone steps out of a vehicle. That may not be the most symmetrical point from the house. It may be slightly diagonal, closer to a mailbox, or shifted toward the curbside passenger door zone.
This is where many sidewalk strip designs miss the real problem. They place stepping stones where the bed looks balanced from the front porch, then people continue stepping through the plants because the first stone is not where their body naturally moves.
For a short curb-to-sidewalk crossing, a slight diagonal route often works better than a centered straight line. If the crossing is only 30–48 inches long, people will not follow a decorative curve. They will take the direct route.
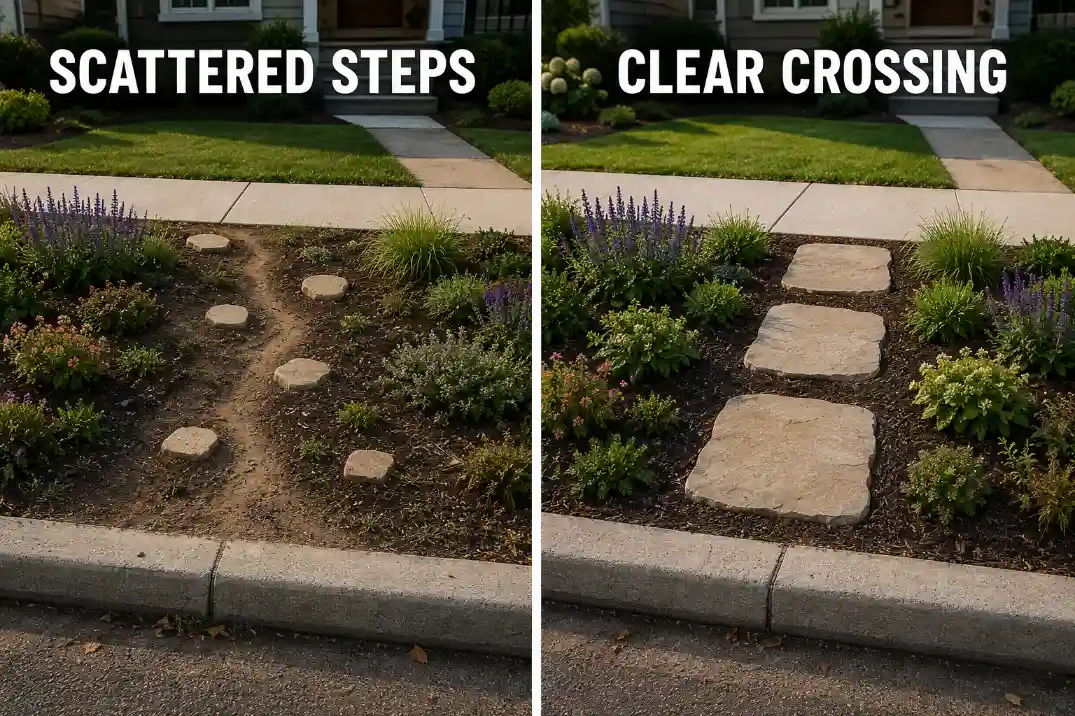
One clear crossing beats scattered stones
A common mistake is scattering small stones through the bed to make the whole strip feel casually walkable. That usually spreads the damage instead of controlling it.
A stronger layout gives people one obvious crossing and makes the rest of the strip visually less inviting to step through.
For most sidewalk strips, stepping stones work well at about 18–24 inches from center to center. Spacing tighter than that can look cluttered in a narrow strip. Spacing wider than about 26 inches often makes people stretch or step off the stone edge.
If foot traffic is already the main stress, the access route should be planned before the plant list. That same priority shows up in Front Yard Plants for Sidewalk Shortcut Traffic: guide the feet first, then ask plants to do the softer visual work.
Pro Tip: Place the first stone where the first foot lands from the curb. If that stone is wrong, the rest of the crossing usually fails.
Stones That Do Not Kill Plants
Use stones large enough for a real step
The stone needs to invite a full foot landing. Small decorative rounds often fail because people land half on the stone and half in the soil. A usable stone is usually at least 14–18 inches across. Rectangular or irregular stones in the 16–24 inch range often perform better because they give the foot more room and reduce edge trampling.
Thickness matters too. Thin decorative pieces can rock, crack, or settle unevenly. Natural flagstone around 1.5–2 inches thick or a stable precast paver designed for foot traffic usually holds up better than thin slate pieces placed directly on soil.
The goal is not to create a garden accent. The goal is to create a confident step.
Keep the edge low, stable, and safe
A stepping stone that rocks is not a charming imperfection. It is a failed access point. In a sidewalk strip, raised or unstable stones can also become a trip hazard, especially near public sidewalks, parked cars, and winter snow removal.
The top of each stone should sit nearly flush with the surrounding surface, with no sharp raised lip. In freezing northern states, check the route after the first winter because freeze-thaw movement can lift edges or loosen the base. In areas where sidewalks are shoveled, avoid jagged stones or raised corners that catch a shovel blade.
Many sidewalk strips sit in a public right-of-way or utility access area. Keep the crossing low, stable, and simple, and check local rules before adding raised edging, fixed barriers, or large hardscape pieces.
Do not ask plants to carry daily foot traffic
Plants can soften a stepping stone route, but they should not be expected to survive direct daily stepping. This is where homeowners often overestimate “walkable plants.” Some groundcovers tolerate light brushing or occasional contact. They do not replace a stable walking surface where people cross several times a day.
Use this distinction:
| Traffic Level | Better Plant Strategy | Avoid | Why It Matters |
|---|---|---|---|
| Occasional brushing | Low sedum, thyme-type groundcovers, dwarf spreaders | Tall brittle stems beside stones | Light contact is different from direct stepping |
| Regular edge pressure | Compact sedges, low grasses, clumping perennials set back | Plants tight to stone edges | Crowns stay out of the scuff zone |
| Daily crossing | Plants beside the route only | “Walkable” plants in the footpath | Hardscape should carry the load |
| Wet or clay strip | Sparse durable planting with clear access | Dense planting over soft soil | Wet pressure compacts faster |
| Winter snow zone | Low plants set away from stones | Plants in shovel or snow-pile areas | Winter cleanup can damage crowns |
Leave a small buffer beside each stone instead of planting right against it. Even 4–6 inches of mulch or gravel along the stone edge can reduce broken stems and give feet a margin for imperfect steps.
Keeping Soil From Compacting
A stone without base still creates damage
Dropping stones directly onto soft soil is one of the fixes that often wastes time. It looks finished on day one, then the stone sinks, tilts, or traps water along the edge. Once that happens, people step around the stone, and the access route gets wider.
A better installation uses a small excavated pocket with about 2–3 inches of compacted crushed stone or paver base beneath the stepping stone, plus a thin leveling layer if needed. The finished stone should feel steady under a full step, not springy or loose.
Do not bury nearby plant crowns while leveling the route. If soil or mulch gets piled 2 inches up around low perennials, the access fix can quietly create a plant health problem even when nobody steps directly on the plants.
Wet soil makes pressure more damaging
Traffic on wet soil causes more lasting compaction than the same traffic on dry soil. In Midwest spring rains, northern thaw periods, or clay-heavy front strips, a few weeks of wet foot traffic can create a compacted channel that sheds water instead of absorbing it.
A simple check helps: after normal watering or rain, the planted area should begin soaking in and drying within a few hours. If the worn path stays slick, shiny, or puddled for 24 hours while nearby soil improves, the route has become more than a cosmetic mark.
For strips where water already moves toward the curb or sidewalk, stepping stones should not create a dam. This overlaps with the practical watering logic in Water a Sidewalk Strip Without Runoff, because a good access crossing still needs to let water move into the soil instead of pushing it along the pavement edge.

Avoiding Awkward Footpaths
The route should not require careful stepping
A stepping stone route fails when it asks people to concentrate. If a visitor has to pause, twist, shorten their stride, or look down carefully, they will usually step beside the stone. The route should feel obvious from both directions.
The best test is a normal-shoe test. Walk from curb to sidewalk while carrying a bag, without overthinking your foot placement. If your foot lands partly off the stone, the spacing or size is wrong. If the route feels decorative but not natural, it will probably be ignored.
For busy strips, design for real use: grocery bags, backpacks, guests, delivery drivers, and kids getting out of cars. That does not mean building a full walkway. It means making the access point stable enough that people do not widen it accidentally.
Stop pretending it is still a planted bed when traffic takes over
Readers often overestimate how much planting can survive and underestimate how much traffic a narrow curbside strip receives. If the crossing expands beyond about one-third of the visible strip area, the routine fix stops making sense.
At that point, stop treating it as a planted strip with a few stones. Treat it as a narrow access walk with planting edges. That may mean a clearer gravel band, a short paver crossing, or a simplified planting layout with tougher plants set farther back.
Material choice matters here. Loose mulch can scatter under repeated steps, while gravel can migrate if the edge is not contained. For strips already struggling with surface movement, Sidewalk Strip Mulch and Gravel Control is often more useful than another round of replanting.
A Strip That Handles Real Traffic
Separate the jobs clearly
The most durable sidewalk strip access design separates jobs. Stones handle pressure. Plants provide softness, color, and curb appeal. Mulch or gravel protects the transition edge.
When those roles blur, the strip starts failing in small ways: tilted stones, muddy gaps, crushed crowns, and mulch dragged onto the sidewalk.
Choose plants that stay low enough not to hide the route. If foliage spills 8–12 inches across the walking line, the crossing feels narrower and people step wider.
Compact grasses, low sedums, tough edging perennials, and small clumping plants usually make more sense than brittle flowering stems right beside the step edge.
Match the crossing to the traffic level
A strip crossed once or twice a week can stay more planted. A strip crossed several times a day needs a clearer hard route. A strip used by delivery drivers, kids, parked-car passengers, and guests may need a more durable curb landing, not just a few attractive stones.
Use this quick check before rebuilding:
- If the worn line is less than 6 inches wide and seasonal, refresh the surface and monitor it.
- If the worn line is 8–12 inches wide and repeats in the same place, add stepping stones.
- If plants keep breaking at the stone edges, widen the landing or add a buffer.
- If stones sink after rain, rebuild the base instead of adding more plants.
- If the route keeps widening past 18 inches, simplify the planting and harden the crossing.
The healthier condition is a narrow, predictable access line with plants intact 4–6 inches away from the stones. The failing condition is a widening bare strip where the original route disappears into general trampling. That comparison matters more than asking whether one plant is technically “stepable.”
Check the route after real use
A new stepping stone route should be checked after the first heavy rain and again after about 30 days of normal use. Rocking stones, muddy edges, exposed base material, or new footprints beside the route show where the design still needs adjustment.
If the strip also faces heat, winter salt, or daily maintenance stress, durable access becomes part of the larger survival plan. A planting that survives summer but collapses under daily stepping still fails as a sidewalk strip. For heavier seasonal wear, Sidewalk Strip Maintenance for Heat and Traffic gives the access route a stronger maintenance context.
Final Takeaway
Stepping stones through a sidewalk strip are not just decoration. They are a way to admit that people need to cross the strip and to keep that crossing from destroying the planting.
The most reliable layout follows the real footpath, starts where feet actually land, uses stones large enough for a full step, supports them with a stable base, and keeps plants out of the pressure zone.
The weak fix is replanting the same damaged route and hoping people stop walking there. The stronger fix is smaller, clearer, and more honest: give feet one good place to land, then let the rest of the strip act like a garden again.
For broader official guidance on how compaction changes soil structure and drainage, see the University of Minnesota Extension.