Last updated: June 27, 2026
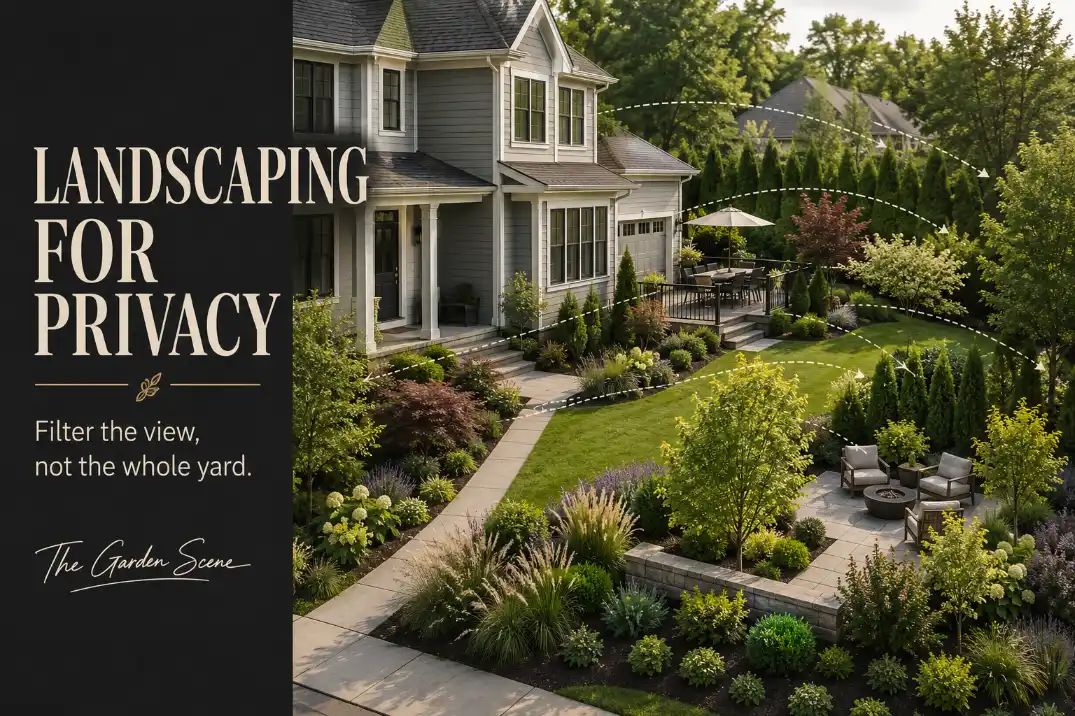
Landscaping for privacy should not start with “what can I plant?” That question comes too late.
The better starting point is: which view am I trying to filter, and how open does this part of the yard still need to feel? A backyard seating area, a front window near a sidewalk, a narrow side yard, and a raised deck all need different privacy logic.
A single hedge line may block one view while making another part of the yard darker, tighter, harder to maintain, or less welcoming.
The strongest privacy plans usually do less than homeowners expect. They interrupt the right sightline, add height only where height matters, keep walking routes open, and leave enough light and breathing room for the yard to still feel usable.
Start With the View You Need to Filter
The first privacy decision is not the plant, fence, or screen. It is the view source.
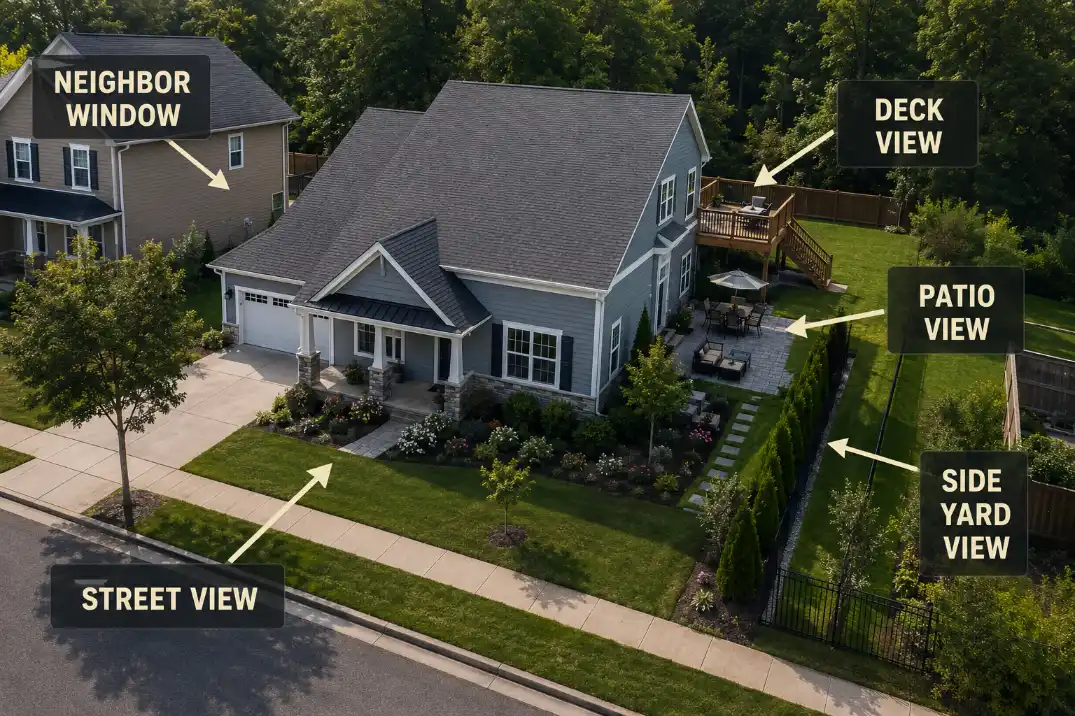
A yard can feel exposed for several different reasons. People may see into a front window from the sidewalk. A neighbor’s second-story window may look down into the backyard. A patio may feel open from one side but not the other.
A deck may need seated privacy without blocking the whole view. A side yard may feel uncomfortable because it is narrow and directly lined up with a neighbor’s windows.
Those are not the same problem.
Separate the view source from the yard zone
A street view usually moves across the front of the property. A sidewalk view is closer and slower. A neighbor-window view is fixed and directional. A deck view is elevated. A patio seating view is lower and more personal.
Backyard openness may not need a wall at all; it may only need one filtered edge that makes the seating area feel anchored.
This matters because privacy landscaping works best when it edits a line of sight instead of closing the whole space. A homeowner dealing with a direct window-to-window view needs a different plan than someone trying to make a patio feel less exposed during dinner.
For deeper handling of that specific window problem, a guide on privacy landscaping for neighbor windows is the better next step than turning this whole parent page into a neighbor-window article.
Front-yard visibility is another separate case. It has to balance privacy with curb appeal, address visibility, front-door readability, and safe visitor access. That is why a front yard should usually be treated as a filtered public edge, not a hidden private room.
Once the view is clear, the next decision becomes much easier: does that view need soft filtering, partial screening, strong screening, or only a small directional interruption?
Match the Privacy Level to the Yard Zone
Every part of the property does not deserve the same privacy level. A backyard seating corner can handle more enclosure than a front walkway. A patio may need side privacy while staying open toward the lawn. A side yard may need a narrow screen that still allows trash bins, gates, hoses, and mower access.
Use the yard zone to decide how much privacy is appropriate before deciding what to plant.
| Yard zone | Common exposure source | Preferred privacy level | What to keep open |
|---|---|---|---|
| Front yard | Street, sidewalk, driveway line | Soft filtering or partial screening | Front door, address, walkway, porch light |
| Backyard | Neighbor yards, open fence lines, upper windows | Partial to strong screening | Lawn access, drainage paths, play space |
| Patio | Side views, dining area exposure, nearby windows | Directional privacy around seating | Door route, chair pullback, grill access |
| Side yard | Neighbor windows, narrow passage, utility area | Narrow directional screening | Gate swing, hose access, bin route |
| Deck | Elevated neighbor views, railing sightlines | Seated or side-focused filtering | Stairs, rail view, door clearance |
| Front windows | Sidewalk, busy road, parked cars | Window-height filtering | Natural light, glass, house visibility |
| Property line | Shared fence, corner lot, open rear edge | Layered or plant-plus-structure privacy | Maintenance reach, airflow, setbacks |
A patio privacy plan should usually protect the people sitting there, not every inch of the patio slab. If the table, chairs, and door route already fit tightly, a dense screen in the wrong spot can make the space harder to use.
In that case, privacy belongs on the exposed side of the seating area, not across the main walking line; a more focused article on patio privacy ideas for secluded seating can go deeper into that seating-specific decision.
Backyards can often handle more layered planting because they have more depth. Front yards usually need restraint. Side yards usually need precision. Decks need height logic because the view starts above ground level.
The zone tells you how much privacy the space can accept before the fix starts creating a new problem.
Choose Filtered Privacy Before Full Blockage
The fastest privacy fix is usually the one homeowners regret first: a flat wall of tall planting along the edge.
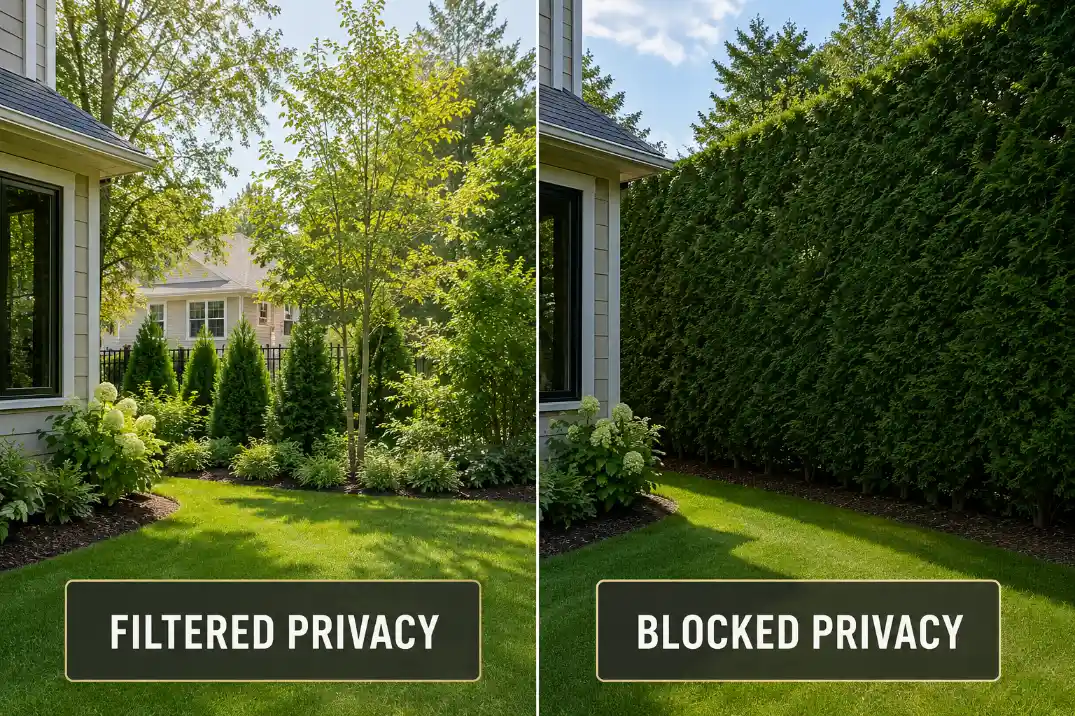
Full blockage has a place. A direct view from a neighbor’s upper window into a hot tub, bedroom window, or dining patio may need a strong screen. But many yard privacy problems are not that severe. The goal is often to slow the eye, break the direct line, or make a seating area feel less exposed.
Comparison Box: Filtered Privacy vs Blocked Privacy
| Filtered privacy | Blocked privacy |
|---|---|
| Interrupts the specific sightline while keeping the yard open | Tries to hide the entire edge or yard |
| Works well near front yards, patios, windows, and walkways | Works best for direct, high-exposure views |
| Uses staggered shrubs, small trees, planters, or partial screens | Uses dense hedges, fences, panels, or solid walls |
| Protects light, access, and curb appeal more easily | Can make entries, windows, and narrow spaces feel closed |
A filtered plan might place mid-height shrubs slightly offset from a front window, add a small ornamental tree to interrupt a view from the street, or use a side-positioned planting group near a patio. A blocked plan might use a tall hedge, fence, or trellis wall where the view is direct and unavoidable.
In front yards, this distinction is especially important. A layout that hides the door, walkway, or address may feel private from inside but confusing from the street. For a deeper front-yard version of that balance, use a focused guide on front yard landscaping for privacy rather than solving the entire front yard here.
The practical rule is simple: block only what truly needs blocking. Filter everything else.
Build Privacy in Layers, Not One Flat Line
Layering is the main reason some privacy landscaping feels natural while other privacy landscaping feels like a green wall.
A flat line puts all the height in one place. It may block a view, but it also creates a hard edge. A layered plan uses different depths and heights so the eye stops moving through the yard without the space feeling sealed off.
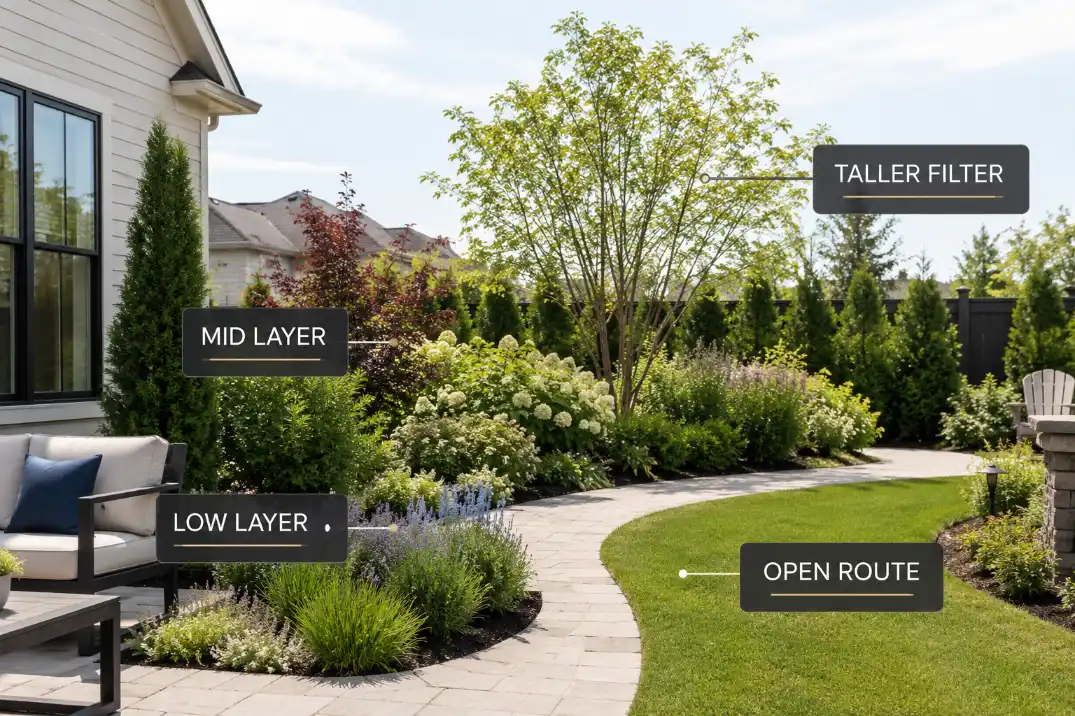
Use low, mid, and taller layers for different jobs
Low planting defines the edge and keeps the base of the layout from looking bare. It does not create real privacy by itself, but it helps the yard feel intentional.
Mid-height shrubs do most of the everyday filtering. They can soften views toward seating, windows, fence lines, and patio edges without needing to become a full hedge.
Taller filters do the directional work. A small ornamental tree, upright evergreen, clumping shrub, or vine-covered structure can interrupt a higher sightline that low and mid-height plants will never touch.
The mistake is expecting one row to do every job. One row has to be tall, dense, and continuous to feel effective. Three layers can be looser because each layer handles a different part of the view.
Stagger the line instead of tracing the property edge
Privacy does not always belong exactly on the property line. In a backyard, the strongest place may be behind the seating area, near the side of the patio, or offset from the main view angle. A planting group closer to the use area can sometimes create more comfort than a hedge forty feet away.
This is why backyard privacy often works better as a layout move than a boundary move. A seating area can feel protected when planting wraps one or two exposed sides, while the lawn and access routes remain open. That approach is especially useful when the goal is backyard privacy without a fence rather than a full property-line enclosure.
Leave room for mature spread
Privacy planting fails when it is designed at nursery size. A shrub that looks neat in a pot may push into a walkway, window, fence, or patio edge once it fills out. The planting depth needs to account for mature width, pruning access, airflow, and the space needed to walk behind or beside the bed.
For main walking routes, keeping roughly 30–36 inches of usable clearance is a helpful practical target where the layout allows it. That does not mean every garden path must be measured like a hallway, but it does mean privacy planting should not slowly eat the route people use every day.
Layering also makes the plan more flexible. If one plant struggles, grows slowly, or needs replacing, the whole privacy screen does not collapse at once.
Decide When Landscaping Needs a Structure Behind It
Plants alone are not always the right first move.
A narrow side yard may not have enough planting depth for layered shrubs. A direct neighbor window may need height faster than young plants can provide. A raised deck may need screening at seated eye level, not just along the ground. An exposed patio may need an immediate side filter while planting grows in.
In those cases, landscaping may need a structure behind it.
Use structure when the view is too direct or space is too tight
A fence, trellis, lattice panel, pergola edge, screen, or low wall can provide the fixed privacy line. Planting can then soften it, interrupt its flatness, and make it feel like part of the yard instead of a hard stop.
This is especially useful in side yards, where every inch matters. A deep shrub bed may make the passage feel cramped, while a narrow vertical screen with careful planting at the base can protect the view and preserve movement.
A focused guide on side yard privacy ideas for tight spaces can go further into that narrow-lot problem without turning this parent page into a side-yard manual.
Structure also helps when the privacy need is immediate. Young planting may need 2–3 years before it changes the feel of the space. A trellis, panel, or fence section can handle the first season while plants mature.
The caution is that structures are less forgiving than plants. A screen placed in the wrong line can block a gate swing, trap a narrow walkway, shade a window, or create a maintenance strip that no one can reach. The structure should solve the view while leaving the working parts of the yard alone.
Protect Light, Access, Safety, and Maintenance
A privacy plan is not finished when the view disappears. It is finished when the space still works after the view is filtered.
Before adding height or density, decide what must remain open.
Walkways need usable width. Gates need swing room. Driveways need door clearance and visibility. Front entries need a readable path, visible address area, porch light, and enough openness for visitors and deliveries. Windows need privacy without losing all daylight. Patios need chair pullback and a route from the door. Side yards need hose, meter, trash-bin, and maintenance access.
Outdoor lighting also matters. A dense shrub or screen placed directly in front of a wall light, path light, or motion light can create dark pockets instead of comfort. The privacy layer should work with nighttime movement, not hide steps, gates, or changes in surface.
Maintenance is the quiet constraint that gets ignored in early plans. If there is no room to prune the back of a hedge, reach a fence, clean leaves, move a hose, or access utilities, the privacy feature becomes a long-term friction point. That is especially true where planting touches walls, fences, AC units, windows, or narrow side passages.
The safest layout is usually not the densest one. It is the one that blocks the least amount of space while solving the most uncomfortable view.
Where Child Pages Fit Into the Plan
A parent privacy page should not try to solve every privacy condition in full. Its job is to help you choose the right route.
Front yard privacy is about filtering public views while keeping the home readable. The front door, walkway, porch light, and address area still need to make sense from the street.
Backyard privacy is usually about comfort around use zones: seating, dining, play areas, pools, hot tubs, and open fence lines. It can often use more depth than the front yard, but it still has to protect lawn access and maintenance routes.
Patio privacy is more precise. The question is usually not “how do I hide the whole yard?” It is “how do I protect the seated area without blocking the back door, grill, or chair pullback?”
Side yard privacy is a tight-space problem. A screen that steals too much width can make the side yard worse, even if it blocks the view.
Neighbor-window privacy is directional. The screen should interrupt the window-to-window or window-to-seat line instead of surrounding the whole yard.
Deck privacy has a height problem. A ground-level hedge may not protect a raised seating area, and a tall screen may block the view that makes the deck useful. For elevated exposure, a guide on upstairs view privacy in the yard is the better place to handle that angle in more detail.
Plant-layer privacy is the design mechanism that connects many of these child topics. It helps the yard feel less exposed without relying on one dense row or one flat wall.
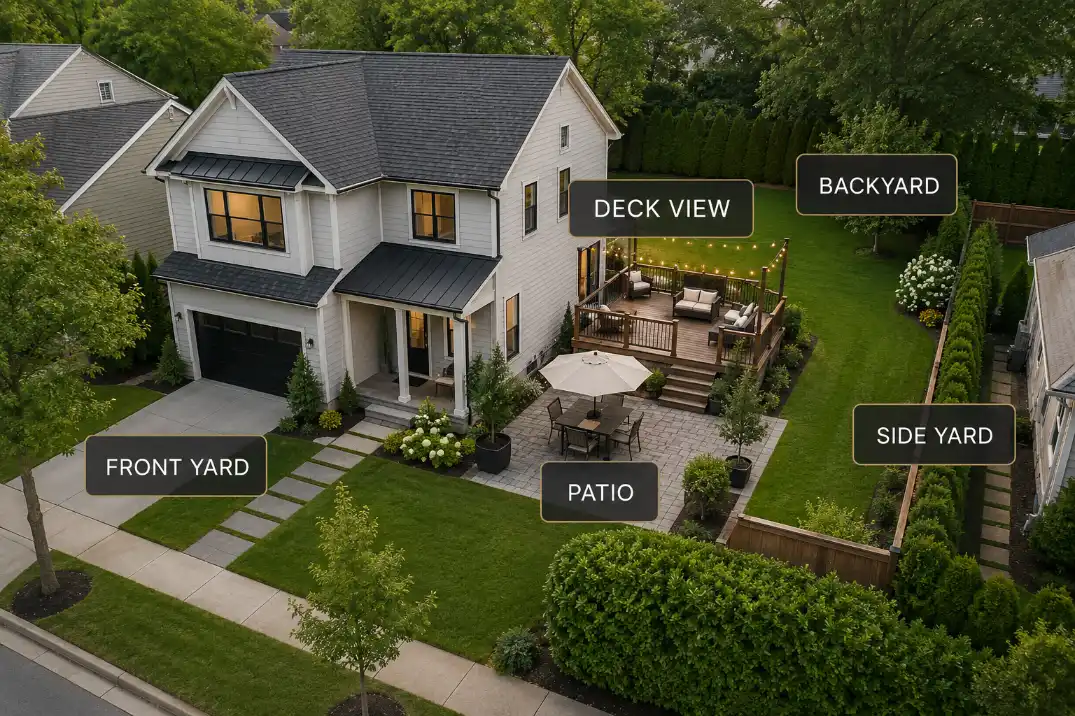
The point is not to make every zone private in the same way. The point is to send the strongest solution to the zone that actually needs it.
Test the Plan Before You Commit to Permanent Planting
Privacy landscaping is hard to judge from a flat plan. A bed may look generous on paper and still miss the sightline from a chair. A hedge may look effective from the street but block too much light from the window. A tree may seem well placed until you check the view from a neighbor’s raised deck.
Test the view before making the permanent move.
Stand where the viewer stands: sidewalk, street, neighbor-facing edge, upstairs window, deck, or side-yard passage. Then stand where you want privacy: patio chair, kitchen window, pool edge, porch seat, deck chair, or backyard dining spot. The line between those two points is the line the landscape needs to edit.
Temporary stakes, a tall cardboard panel, movable planters, or even a helper holding a broom upright can show whether height belongs at the property line, closer to the seating area, near a window, or slightly offset from the view. This simple test often prevents overplanting.
Check the plan at different times, too. Evening light can make windows more exposed from outside. Leaf-out can change the amount of screening in spring and summer. Winter can reveal views that deciduous plants hide during the growing season. Young planting may soften the space in the first season, but mature size determines whether the layout stays usable.
A good privacy plan should pass three tests before installation: it filters the uncomfortable view, keeps the useful route open, and leaves enough light and access for the yard to age well.
For regional plant choices, hedgerow planning, and local growing conditions, use your local extension guidance alongside Penn State Extension’s hedgerow guide.