Last updated: July 2, 2026
A suburban privacy buffer usually fails when the homeowner starts with the property line instead of the view. The fence line feels like the obvious place to begin, but the uncomfortable sightline may cross the lawn from a neighbor’s deck, arrive from a sidewalk at eye level, cut across the driveway, or open directly onto the patio where people actually sit.
That means the first decision is not “What should I plant along the edge?” It is “Where does the view become personal?”
A useful privacy buffer follows a sequence: map the exposure, separate broad openness from repeated sightlines, build planting depth, place height where the view crosses, protect curb appeal, add structure only where plants cannot solve the angle, choose plant forms that fit the site, plan maintenance, and test the result before committing.
Use the steps below as a field walk around the yard, not as a plant list or fence plan.
Step 1: Identify the Primary Exposure Zones
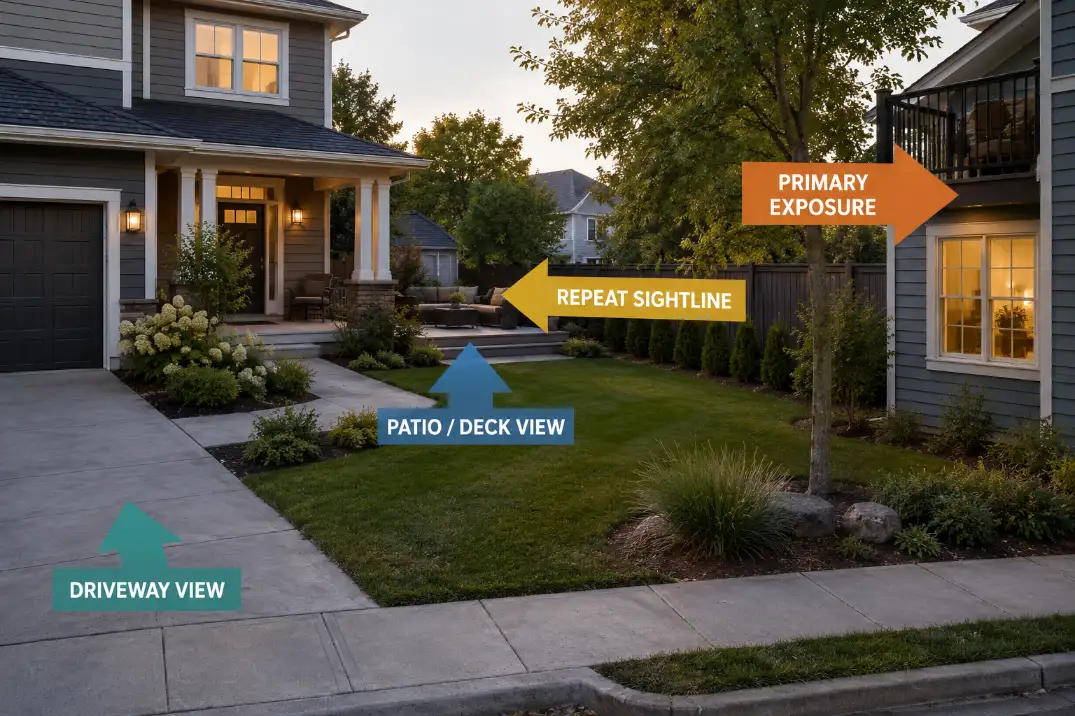
Start by locating where privacy is actually lost. Walk the yard and pause where the space feels exposed: on the porch, at the patio table, beside the deck rail, along the driveway, inside a street-facing window, and near the property line.
The goal is to separate visibility from discomfort. A yard can be visible from several directions and still only need screening in two or three places.
| Exposure zone | What you notice | First planning question |
|---|---|---|
| Street or sidewalk | People see across the lawn while passing | Is the view constant, or only uncomfortable near windows and seating? |
| Neighbor window or deck | The view comes from above or at an angle | Where does the sightline cross the yard before it reaches you? |
| Patio or deck edge | Seating feels exposed during normal use | Does privacy need to sit near the use zone instead of the property line? |
| Driveway corridor | Movement creates a repeated view into the yard | Can planting interrupt the approach without blocking visibility? |
| Property line | The boundary feels pressured or too open | Is the boundary the real privacy line, or only the easiest place to plant? |
This is also where a broader landscaping for privacy plan helps. The whole yard may need a framework, but this page is about building the buffer in the right order.
Step 2: Separate Whole-Yard Exposure From Repeat Sightlines
The second step is to decide whether the yard needs broad softening or targeted interruption. These are not the same problem.
Whole-yard exposure feels general. You step outside and feel as if the space is open from several directions. Repeat sightlines are more specific. They come from the same upstairs window, the same deck rail, the same sidewalk angle, or the same driveway approach again and again.
That difference controls the buffer. Broad openness may need layered planting along a wider edge. A repeat sightline may need one well-placed vertical interruption.
For upper or diagonal views, a deeper guide to privacy landscaping from neighbor windows can help. In this step, keep the task narrower: mark the line of view before choosing the buffer.
Field note: The property line is not automatically the privacy line. It is only the legal edge of the yard. The privacy line is wherever the view needs to be interrupted before it reaches the porch, window, patio, deck, or seating area.
Before moving on, ask one question: am I softening a broad open edge, or stopping a few repeated views?
Step 3: Build the Buffer in Layers, Not One Line
Once the sightlines are clear, build the buffer as depth. A single hedge can look decisive on planting day, but it often creates the wrong kind of privacy: flat, heavy, hard to maintain, and still ineffective against diagonal or upper views.
A stronger buffer usually has three roles.
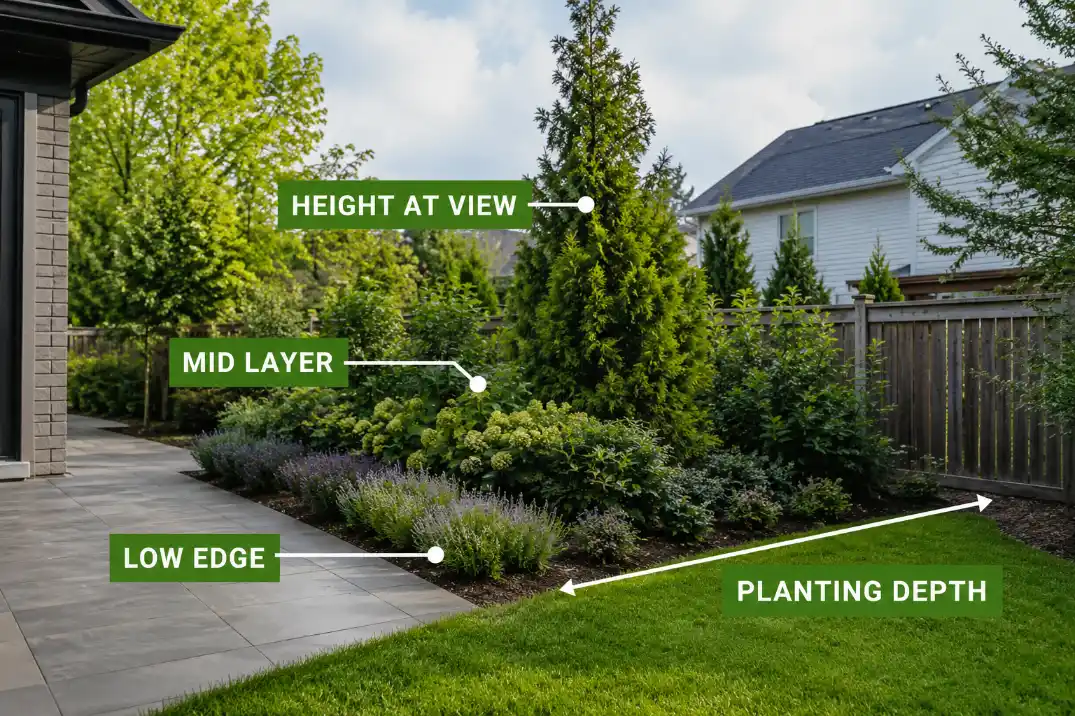
The low edge layer defines the planting bed and softens the lawn, fence line, or patio edge. It does not need to provide full privacy. Its job is to make the buffer feel intentional.
The mid layer carries most of the visual filtering. Rounded shrubs, mixed evergreen and deciduous forms, or medium-height plant masses can break the view without making the yard feel sealed.
The vertical layer is selective. It may be a narrow upright plant, small tree, trellis-backed planting, or taller accent placed only where the view crosses.
Common mistake: One dense line is not a buffer.
A straight row along the property line can feel productive, but it often misses the actual sightline, crowds the edge as it matures, and makes the yard feel smaller. A buffer needs depth, spacing, and staggered interruption, not just more plants in one line.
Step 4: Place Height Where the View Crosses the Yard
Height belongs where it interrupts the view, not automatically where the yard ends.
If a neighbor looks down from a deck, a tall plant at the far property line may sit too low or too far away to block the angle. If people see into a window from the sidewalk, a mid-height layer closer to the house may do more than a tall hedge at the curb. If a patio feels exposed from one diagonal corner, one vertical accent may solve more than a long hedge.
Use flexible distances, not fake precision. In some yards, moving a taller plant 3 to 6 feet inside the property line can matter because it intercepts the view earlier. Around a patio or deck, the most important privacy zone may be within 8 to 15 feet of where people sit, not at the far edge of the lawn.
Before moving on, stand at the source of the view if you can: sidewalk, driveway, deck edge, or upper window. Then look back toward the use area. The right height belongs somewhere along that visual path.
A good vertical interruption does not have to erase the neighbor’s house. It only has to break the direct line that makes your own space feel exposed.
Step 5: Keep Curb Appeal and Entry Readability Open
The buffer should calm the yard without making the house look hidden. This is the boundary check before adding more height.
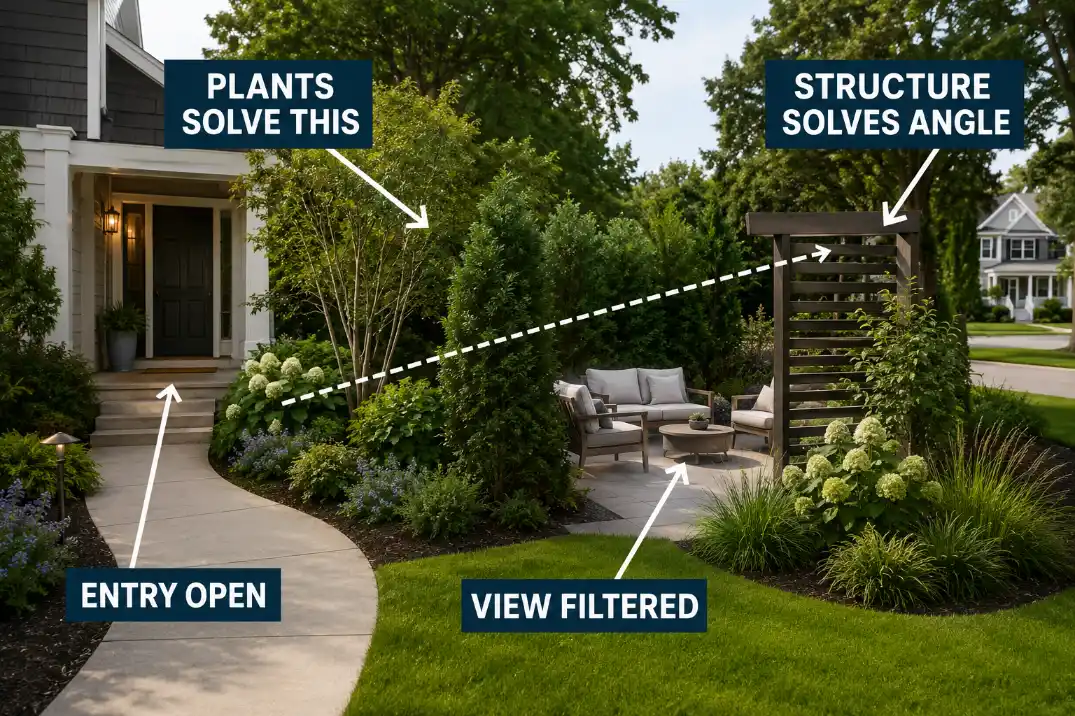
Keep the front door readable. Visitors should understand where to walk, where the entry is, and where the house number or address marker sits. Delivery drivers should not have to guess. A buffer that hides the entire entry may solve one privacy problem while creating a usability problem.
Protect window light too. Screening a window does not always mean planting directly in front of the glass. Often the better move is to interrupt the sightline farther out, so the window remains bright from inside.
Driveway visibility matters as well. Avoid planting that blocks pedestrians, bikes, cars, or the front walk. Privacy near a driveway should usually be lower, staggered, or pulled back from the active edge.
If the front yard is part of the privacy problem, the deeper decision is how to handle front yard landscaping for privacy without blocking the home. In this sequence, the rule is simple: filter the uncomfortable view while keeping the home legible.
Step 6: Add Structure Only Where Plants Cannot Solve the Angle
Structure should enter the plan only after the planting logic is clear. A fence, trellis, slatted panel, pergola post, or planter-supported screen should solve a specific angle that plants cannot handle cleanly.
Use structure when the view is too close, narrow, high, or direct for planting alone. A patio corner exposed to a neighbor’s deck may need a partial vertical element. A paved edge beside a walkway may not have enough soil depth for a full planting bed. A side-yard view may need one trellis-backed screen rather than a long fence.
| View problem | Plant-first move | Structure is justified when |
|---|---|---|
| Patio/deck feels exposed from one side | Add mid-height shrubs near the use zone | Soil depth is limited or the angle is too close |
| Narrow diagonal view crosses the yard | Place one vertical plant where the view crosses | A plant would need to become too wide or too tall |
| Property line feels open | Build layered planting depth | The boundary also needs a defined edge or code-allowed screen |
| Paved porch or walkway edge needs privacy | Use containers or narrow vertical forms | Permanent planting space is not available |
For structural choices beyond planting, route the deeper comparison to privacy fence options for suburban homes. The buffer article should not decide every fence type; it only needs to identify when plants alone stop being the right tool.
Step 7: Choose Plant Forms for Light, Climate, and Mature Size
Plant choice comes after placement because the plant form has to serve the sightline. Start with function, not species.
Use upright or columnar forms where the buffer needs a narrow vertical interruption. Use rounded shrubs where the goal is mid-layer mass. Use small trees when an upper view needs filtering but the ground plane should stay open. Use evergreen forms where winter visibility matters, and deciduous forms where seasonal light, texture, or summer-only screening is enough.
Where the buffer has to work near a porch, patio, walkway, or paved edge, privacy planters for front yards and patios may be the better next decision than forcing permanent planting into too little soil.
The site must come before preference. Light exposure, soil drainage, wind, heat reflection, winter conditions, deer pressure, and mature size all affect whether a plant form will work.
The University of Minnesota Extension advises choosing trees and shrubs based on site conditions such as soil, light, climate, and residential constraints, which is the right kind of filter for a privacy buffer: Planting and transplanting trees and shrubs.
Do not plant for the nursery size. Plant for mature height and spread. A shrub that looks modest in a pot can become the reason the walkway narrows, the window darkens, or the fence line becomes difficult to maintain.
Before moving on, every plant form should answer three questions: what view does it interrupt, what size will it reach, and can it be maintained without turning the buffer into pressure?
Step 8: Plan Maintenance Before Density Becomes Confinement
A privacy buffer should mature into usefulness, not into a wall that needs constant correction.
Plan maintenance before final spacing. Leave access to windows, siding, fences, utilities, gates, and irrigation points. Keep enough room to prune without leaning into the neighbor’s yard or fighting through dense growth. Around walkways and driveways, judge the mature spread, not the planting-day clearance.
Airflow matters inside layered planting. A buffer packed too tightly can trap moisture, thin out in shaded pockets, and become harder to manage as the layers compete. The goal is not a solid green wall everywhere. The goal is filtered depth that stays healthy and usable.
Maintenance note: If the year-five version blocks the walkway, buries the window, hides the entry, or makes pruning impossible, the planting is not low-maintenance privacy. It is delayed confinement.
Before moving to testing, imagine the buffer after several seasons of growth. If the only way it works is constant trimming, reduce density now.
Step 9: Test the Buffer From Porch, Street, Window, and Driveway Views
Testing is where the plan proves whether it solved the right view. Do this before planting or installing structure.
Use temporary stakes, chairs, string lines, cardboard panels, garden carts, or a helper standing in place to simulate height. You do not need exact construction measurements at this stage. You need to see whether the planned layer interrupts the view from the real viewing positions.
Check from the porch while sitting, not only while standing. Check from the sidewalk at normal walking height. Check from the driveway as a person approaches. Check from inside the house looking out. Check from the patio or deck seat where people spend time. If a neighbor-window view is the issue, estimate that upper angle instead of judging only from ground level.
Buffer test checklist
- Can you still read the front door, walkway, and address area?
- Does the buffer interrupt the repeat sightline that caused the discomfort?
- Does the patio or deck feel calmer from a seated position?
- Does the driveway remain safe and visually open enough for movement?
- Does the window keep enough light from inside the house?
- Does the planting depth look intentional rather than crowded?
- Does the buffer still work in the evening or with headlights?
- Is the seasonal or upper-view gap small enough to adjust later?
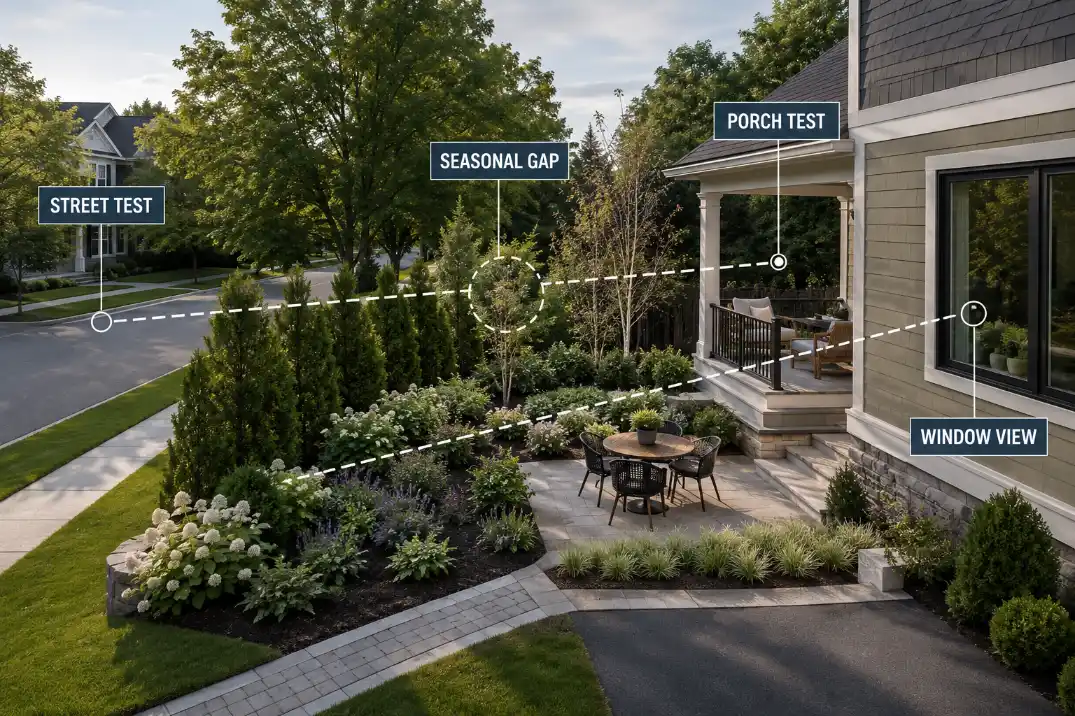
Step 10: Adjust Seasonal or Upper-View Gaps Without Rebuilding the Whole Yard
The final step is proportional adjustment. Do not rebuild the whole yard for one reopened view.
Seasonal gaps often appear when deciduous plants drop leaves, ornamental grasses are cut back, or summer canopy no longer softens a window view. Upper-view gaps happen when the buffer works at ground level but leaves a deck, second-story window, or raised patio angle exposed.
The fix may be small: one narrow evergreen, one vertical accent behind the mid layer, one small tree placed where the upper sightline crosses, or a partial structure only where the gap cannot be handled with planting. Infill should support the existing buffer, not turn it into a heavier wall.
This is why the order matters. When exposure zones are mapped, repeat sightlines are marked, depth is built in layers, and height is placed at the view crossing, the final adjustment stays controlled. You are not guessing. You are tuning a system.
A suburban privacy buffer is finished when the right views are filtered, the entry still reads clearly, the patio or deck feels calmer, and the planting has enough room to mature. The best buffer does not seal off the yard. It gives the yard depth, comfort, and a way to adjust without starting over.