A tight side yard usually fails for one reason: too many jobs are forced into the same narrow lane. It becomes a walkway, storage strip, drainage route, utility zone, plant bed, trash-bin path, and visual buffer all at once.
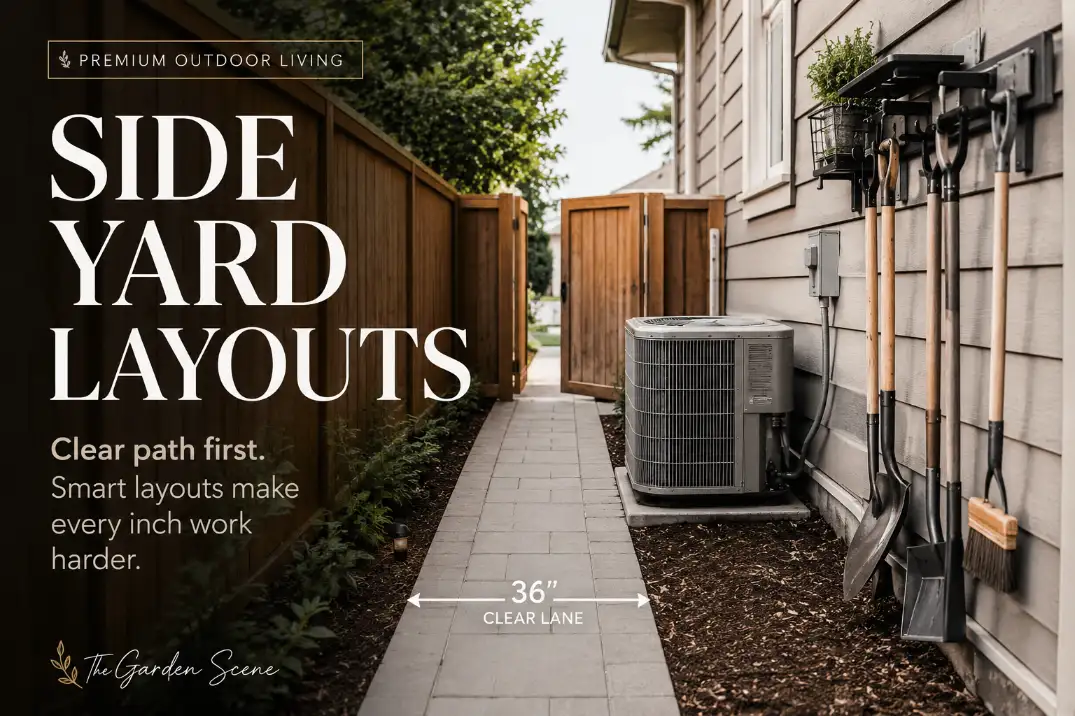
The first checks are simple: measure the narrowest usable passage, test the gate swing, watch where water sits 24 hours after rain, and identify anything fixed that cannot move, such as an AC unit, gas meter, hose bib, cleanout, or downspout.
For most homes, a side yard should keep about 36 inches of clear passage if it needs to function as real outdoor access. Below 30 inches, people start turning sideways, bins scrape edges, and plants get damaged.
This is different from a small patio layout problem. A patio can tolerate pauses, furniture, and visual layers. A side yard has to move people and objects first. The best layout is not the fullest one; it is the one that protects the route and adds only what the route can afford.
Before You Pick a Side Yard Idea, Measure the Real Lane
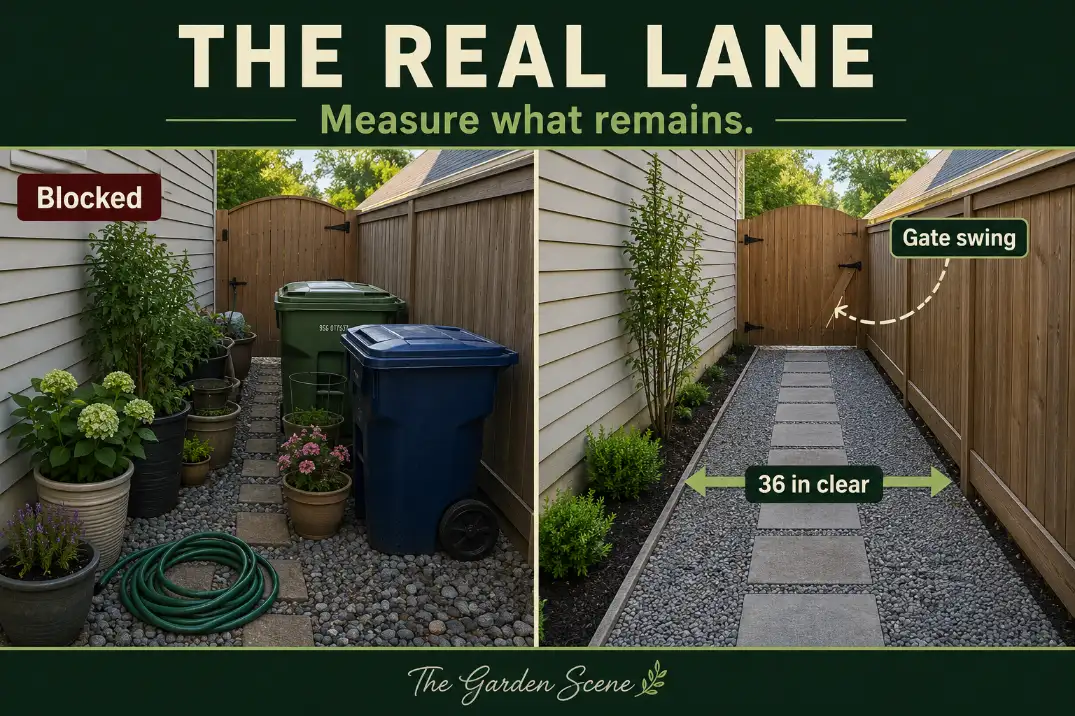
A side yard may look 5 feet wide on paper and still function like a 28-inch corridor. Fence posts, siding projections, downspout elbows, gate latches, hose reels, planters, and shrub growth all reduce the usable lane. That remaining space matters more than the property-line width.
The 36-Inch Lane Is the Starting Point
A 36-inch clear lane is a practical minimum for carrying tools, moving a trash bin, or walking through without brushing both sides. A 42–48 inch lane feels noticeably better if the side yard is the only route for a mower, wheelbarrow, or contractor access.
If the side yard is only 4 feet wide, a 12-inch planter consumes one-quarter of the total width before plants mature. A shrub that spreads another 12–18 inches can turn a clean layout into a shoulder-scraping passage within one growing season.
This is why the strongest side yard layouts usually keep planting, storage, and lighting off the floor or tight to one edge.
A side yard that already feels like leftover space needs the same first move described in Why Side Yards Become Wasted Outdoor Space: decide what must stay open before deciding what can be added.
Gate Swing Is Part of the Layout
A 36-inch gate does not always create a 36-inch opening. Hinges, latch hardware, nearby pots, and a bin parked behind the gate can shrink the real passage.
Open the gate fully, then roll the largest object through it. A trash bin may be 24–30 inches wide, but it still needs hand clearance and a turning zone.
This is where many side yard designs look good in photos but fail in use. The gate area is the pressure point. If the first 3 feet inside the gate are blocked, the rest of the layout cannot save the route.
Best Side Yard Layout Ideas by Width
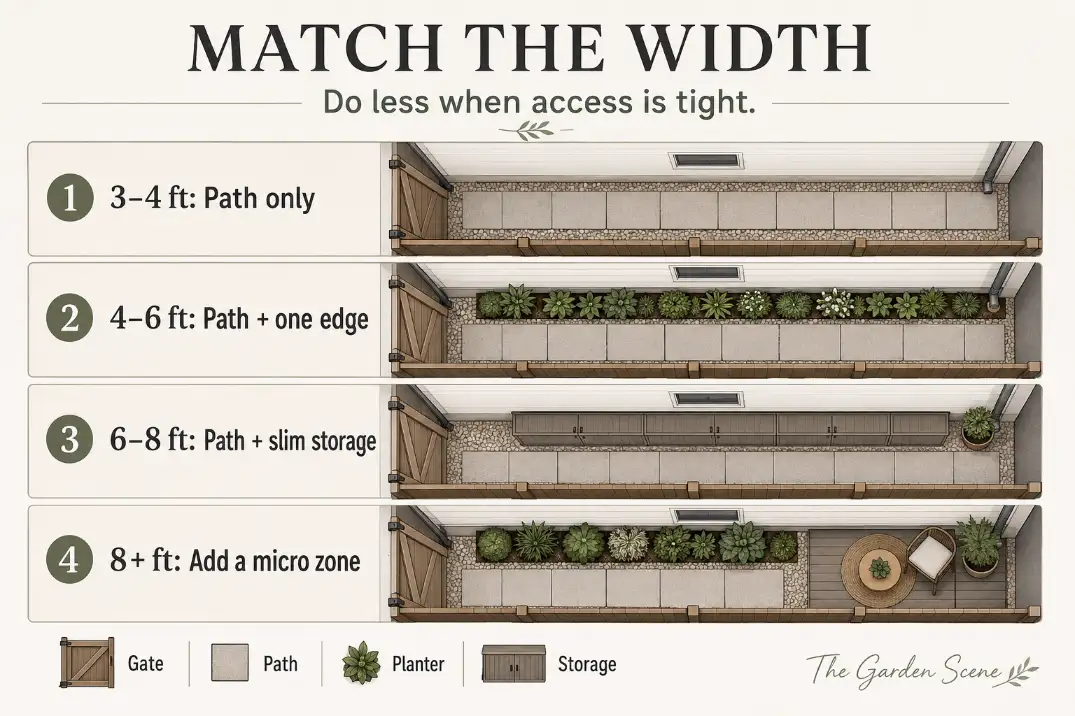
The right idea depends less on style and more on width. A 3-foot side yard and an 8-foot side yard should not be designed with the same expectations.
3–4 Feet Wide: Keep It as a Clean Service Walk
Best when: this is the only route for bins, tools, service access, or backyard entry.
At this width, the side yard should stay simple. Use a continuous hard or compacted surface, keep objects off the floor, and avoid freestanding planters. Wall-mounted hose reels, slim tool hooks, and fence-mounted lighting can work, but even small storage boxes usually steal too much space.
The best layout is a straight service walk with a stable surface and no decorative interruption. It may sound plain, but it is the layout most likely to stay usable after rain, pruning, and weekly trash-bin movement.
Avoid rounded shrubs, loose stepping stones, and wide gravel borders here. They make the path look designed but usually make the route worse.
4–6 Feet Wide: Add One Working Edge
Best when: the side yard needs one extra function, such as planting, storage, or drainage support.
This is the most common useful side yard range. It can support a path plus one narrow edge for planting, storage, or drainage, but not all three equally. Choose the job that matters most.
If the side yard carries bins, keep the edge low and durable. If it is visible from windows, use a narrow planting strip with mature widths under 18–24 inches. If it handles runoff, use a gravel or planted drainage edge, but keep it contained so material does not migrate into the walkway.
A 4–6 foot side yard is where people often overestimate planting space. Nursery plants look small, but mature spread is the real measurement.
6–8 Feet Wide: Combine Path, Planting, and Slim Storage
Best when: you want the side yard to feel finished without losing practical access.
At 6–8 feet, the side yard can do more without becoming cramped. A 36–42 inch path can sit beside a narrow raised planter, a fence-side storage rail, or a slatted utility screen. This width also allows a more intentional garden walk if the area is not the main service route.
Still, the layout should stay one-sided. Planting on both sides often makes the space feel charming for a season and tight by the second year. Keep the path readable, and let one edge carry the design.
8+ Feet Wide: Create a Real Secondary Zone
Best when: the side yard is wide enough to support a small function beside the access route.
An 8-foot or wider side yard can become more than a corridor. It may support a potting strip, dog run, small seating niche, herb wall, storage alcove, or shaded garden walk. But the access lane should still be protected.
The mistake at this width is filling the space just because it is available. Leave a clear through-route first, then place the secondary function beside it.
A side yard used for both storage and seating usually fails unless those functions are separated by layout, not just by intention.
Choose the Surface That Matches the Traffic
The surface decides whether the side yard stays usable after rain, bin movement, freeze-thaw cycles, or heavy foot traffic. The prettiest surface is not always the best one.
| Surface Choice | Best Use | Practical Strength | Common Failure |
|---|---|---|---|
| Concrete walk | Daily access, bins, utility routes | Stable and low-friction | Can send runoff too quickly if poorly sloped |
| Large pavers | Finished path with some drainage flexibility | Easier to repair than concrete | Edges shift if base is weak |
| Compacted decomposed granite | Informal walk, dry climates | Smooth underfoot when installed well | Can rut or wash in heavy runoff |
| Gravel with stepping pads | Low-use service strip | Handles splash and informal drainage | Loose gravel scatters without strong edging |
| Mulch path | Light garden access only | Soft and inexpensive | Breaks down, washes, and tracks onto paving |
Gravel Is Not Automatically the Easy Fix
Gravel is often treated as the default side yard solution because it looks clean on day one. It works best in low-use utility strips or as a contained drainage edge.
It performs poorly when trash bins roll over it every week, dogs run through it, or slope pushes it toward the gate.
For frequent access, large pavers, concrete, or compacted fines often outperform loose stone.
If the side yard has drainage pressure, the comparison logic in Pavers vs Gravel for Backyard Drainage becomes especially useful: the surface should manage water and movement together, not solve one while worsening the other.
Slope Matters More Than Surface Style
A side yard path should move water away from the house, not trap it beside the foundation. A practical target is about 1/4 inch of fall per foot, or roughly a 2% slope, where the site allows. After a normal rain, standing water beside the house for more than 24 hours is a warning sign.
In humid Florida yards, shaded side passages can stay damp long enough for algae and slick buildup. In northern states, freeze-thaw cycles can lift weak edging or shift pavers.
In dry Arizona conditions, loose fines and gravel may move under foot traffic if they are not compacted or contained. The climate changes the failure pattern, but the decision is the same: the path must stay firm, drain predictably, and keep its edges.
Do Not Ignore AC Condensate Mud
If an AC condensate line drips into a shaded side yard, do not treat the mud as a planting problem. Move, extend, or disperse the water first, then choose the path surface.
This small detail matters because condensate can create a chronic wet spot even when the rest of the yard drains normally. Adding gravel over that spot may hide the mud for a few weeks, but the underlying wet zone remains. A side yard with constant AC drip needs water control before surface styling.
Where Storage, Plants, and Utility Screens Go Wrong
Most side yard mistakes come from adding reasonable things in unreasonable places. Storage is useful. Plants are useful. AC screens can improve the view. But in a narrow side yard, each one has to pay rent in inches.
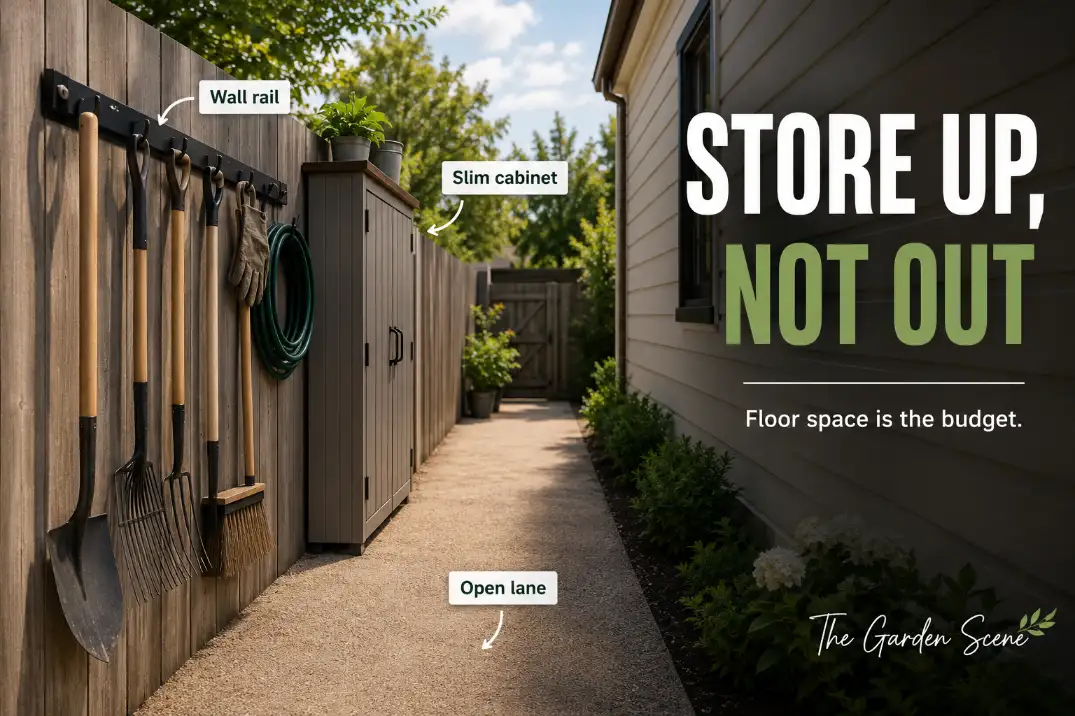
Store Up, Not Out
Floor storage is expensive in a side yard because floor space is the access budget. A 30-inch-deep deck box may be fine on a patio, but in a 5-foot side yard it can take half the passage. Slim wall storage, fence rails, hanging hooks, and shallow cabinets are usually better.
The same principle applies to visual clutter. A side yard can hold tools without looking messy if storage is vertical, shallow, and grouped.
That is the practical logic behind How to Hide Backyard Tools and Supplies Without Adding More Visual Clutter: hiding things is less important than keeping them from spreading across the route.
Screen the AC, But Do Not Box It In
An AC unit can make a side yard look unfinished, but boxing it in is usually the wrong fix. Condensers need airflow and service access. A slatted screen set back from the unit is usually better than dense shrubs or a tight enclosure.
The decision rule is simple: if a technician would have to remove the screen or fight the planting to reach the unit, the screen is too aggressive. In hot climates, blocked airflow is not just a visual issue; it can make equipment work harder.
Plant by Mature Width, Not Purchase Size
A 1-gallon plant can look harmless at the nursery and still become the reason a side yard fails. In tight access areas, mature width matters more than flower color. Plants that mature at 18–24 inches wide are already significant in a 4-foot side yard.
Use upright forms, trained vines, narrow grasses, espaliered shrubs, or raised planters where they keep growth out of the walking zone. Avoid soft, arching plants beside bin routes. They get brushed, broken, and then replaced with something equally wrong.
Pro Tip: In a tight side yard, choose the plant after choosing the clear lane. Reversing that order is how nice planting plans become maintenance problems.
Side Yard Layouts Worth Using
A strong side yard layout has one dominant job. The design can still look polished, but it should not create competing zones in a space that cannot support them.
Clean Service Walk
Best when: the side yard is narrow, heavily used, or the only reliable access route.
Use concrete, pavers, or compacted fines in one straight route. Keep utilities visible, install wall-mounted lighting, and avoid floor objects. It is not dramatic, but it works.
Bin Route With Storage Wall
Best when: trash, recycling, tools, or yard equipment move through the side yard every week.
Build the layout around that movement. Keep the path 36–42 inches clear and place tools on a fence rail or shallow cabinet. A bin route should not include loose stepping stones, deep gravel, or fragile planting at ankle height.
Gravel-and-Paver Drainage Walk
Best when: the side yard needs both access and controlled water movement.
Use stable stepping pads or pavers in the walking line and a contained gravel strip where water splashes or drains. The edge must be strong; otherwise, gravel migrates and the path starts to look unfinished.
If runoff is already moving toward a patio, doorway, or low bed, the side yard surface should not be chosen in isolation.
The same sequencing explained in Backyard Drainage After Adding a Patio or Walkway applies here: fix where the water goes before upgrading what the path looks like.
AC Utility Corridor With Slatted Screen
Best when: the side yard contains an AC condenser, utility meter, hose bib, cleanout, or service panel.
Keep the access lane clear, use a slatted or partial screen rather than a solid wall, and leave room for maintenance. This layout should look organized without pretending the utility equipment does not exist.
One-Sided Green Edge
Best when: the side yard is visible from windows or a gate but still needs to stay passable.
Keep planting to one side, use restrained mature widths, and let the opposite side stay clean. The result feels intentional without squeezing the passage.
Narrow Dog or Mud Route
Best when: pets use the side yard regularly or the area becomes worn after rain.
Prioritize washable surfaces and durable edges. Mulch often tracks indoors, loose gravel scatters, and delicate groundcovers wear out quickly. Pavers, compacted fines, artificial turf with proper base, or concrete can work better depending on drainage and cleaning needs.
Match the Layout to the Width
A width-based guide prevents the most common mistake: copying an idea from a wider side yard into a narrow one.
| Side Yard Width | Best Layout Move | What to Avoid | Why It Works |
|---|---|---|---|
| 3–4 ft | Straight service walk | Floor planters and loose objects | Keeps access from collapsing |
| 4–6 ft | Path plus one narrow edge | Planting and storage on both sides | Gives one function room to work |
| 6–8 ft | Path plus slim storage or planting | Oversized cabinets or shrubs | Adds function without blocking movement |
| 8+ ft | Path plus secondary zone | Filling the whole width | Creates purpose while preserving access |
What People Usually Misread First
A side yard often looks bad because of clutter, but clutter is not always the root issue. The real problem is usually that movement, water, and storage are competing in the same place.
“It Looks Too Narrow”
Sometimes it is too narrow. More often, the usable lane has been chopped up by small interruptions. A hose on the ground, a leaning rake, a misaligned paver, a protruding downspout elbow, and a pot near the gate can make a 5-foot side yard feel like a 2-foot squeeze.
Remove interruptions before assuming the space needs a full redesign.
“The Plants Keep Getting Damaged”
That usually means the planting is in the movement lane. Replacing damaged plants with tougher plants wastes money if people, bins, dogs, or tools still brush through the same spot. Move the planting edge, raise it, narrow it, or remove it from the route.
“The Path Gets Dirty Fast”
Mud, mulch, and gravel on the path are usually symptoms of poor edging or water movement. Sweeping helps for a day. Fixing the edge or drainage solves the reason material keeps moving.
If the side yard is used at night, avoid stake lights that narrow the passage or create ankle-level obstacles. Fence-mounted or wall-mounted fixtures are usually cleaner, especially where the route bends or slopes.
For more complex access routes, Path Lighting for Steps, Slopes, and Walkways is a better fit than decorative garden lighting.
When the Pretty Fix Stops Making Sense
The standard side yard fix is to add gravel, stepping stones, plants, and a few solar lights. That can work in a low-use garden strip. It stops making sense when the side yard is the main outdoor access route.
If the path narrows below 30 inches in multiple places, remove or relocate objects before adding new materials. If the gate does not open fully, fix the gate zone before designing the middle of the corridor.
If water sits near the house more than 24 hours after rain, solve drainage before installing a prettier surface. If utility equipment is blocked, simplify before screening.
The most reliable side yard layouts are selective. They do not try to make every inch decorative. They make the side yard easier to pass through, easier to maintain, and less likely to fail after the first season.
Quick Side Yard Layout Checklist
- Keep about 36 inches of clear passage where possible.
- Use 42–48 inches when bins, mowers, or wheelbarrows need easier movement.
- Test the gate with the largest object that uses the route.
- Check for standing water 24 hours after rain.
- Redirect AC condensate before covering muddy spots with gravel.
- Keep AC units, meters, hose bibs, and cleanouts reachable.
- Use wall storage before floor storage.
- Choose plants by mature width, not nursery size.
- Fix edging and slope before upgrading surface materials.
The Best Side Yard Layout Is the One That Protects Access
A tight side yard does not need more features. It needs fewer conflicts. The strongest layouts protect the walking lane first, handle water second, and add storage, planting, lighting, or screening only where those choices do not steal the route.
That is why a simple 36-inch path with one clean edge can outperform a more decorative side yard filled with gravel, pots, trellises, and lights. In a narrow access space, usefulness is the design upgrade.
Once the lane works, the side yard can look polished. If the lane fails, every attractive detail becomes something to step around.
For broader official guidance on clear walking routes, see the U.S. Access Board accessible route guide.