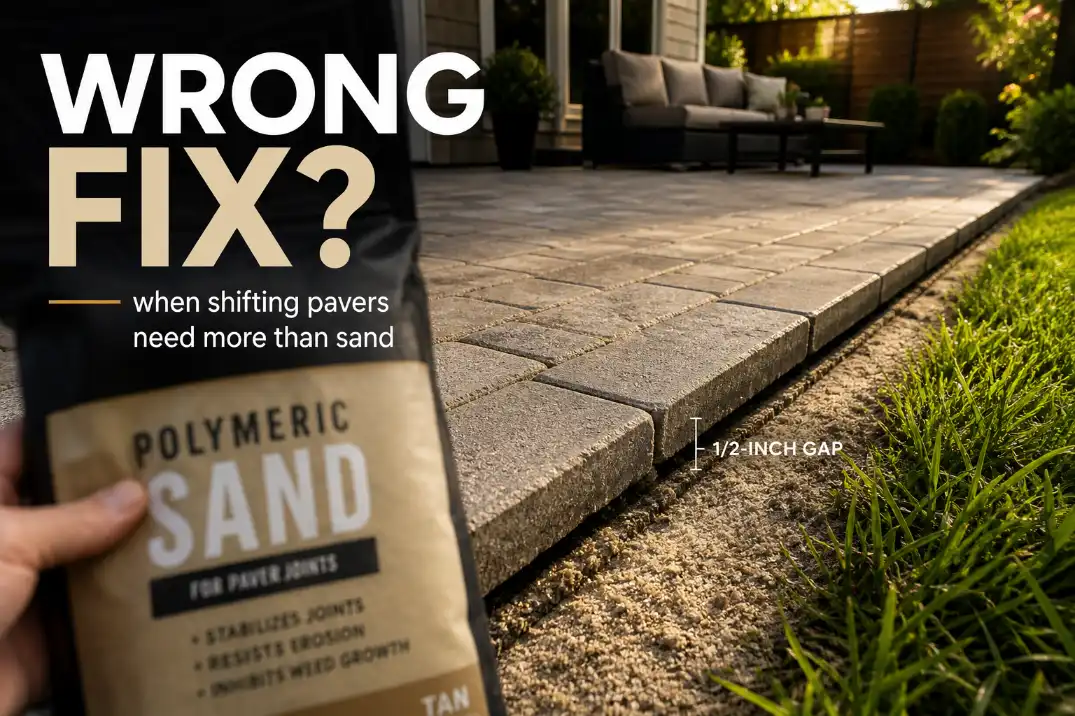
If your patio pavers are shifting, the best product is not automatically polymeric sand. Polymeric sand is the right first buy when the pavers are still flat, the edge is secure, and the joints have simply emptied out.
If the edge row is spreading, pavers rock underfoot, or the same joints wash out after every storm, a better bag of sand will not fix the real failure.
Start here: flat pavers with hollow joints need polymeric sand; spreading edges need paver edge restraint; low or rocking pavers need leveling sand and repair tools; repeated washout needs drainage correction before more joint material.
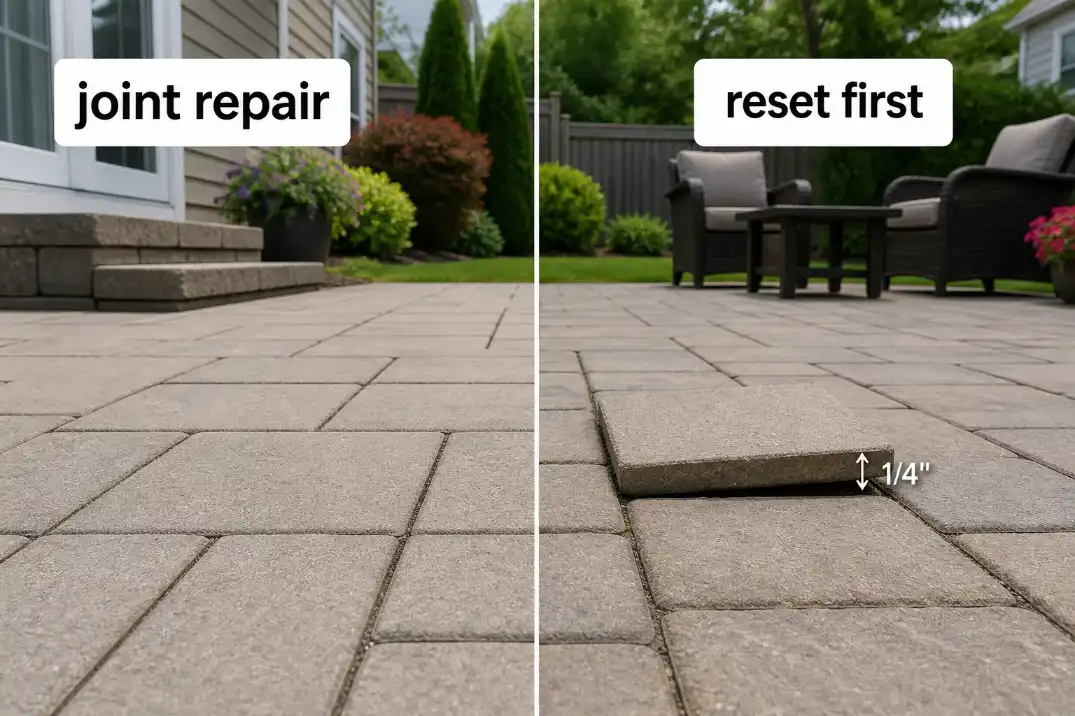
If a paver moves less than about 1/8 inch under foot pressure, joint repair may be enough. If gaps have opened beyond 1/2 inch or several pavers have dropped more than 1/4 inch, diagnose the support problem before buying sand.
For the most common light-shifting patio — flat pavers, open joints, no spreading edge — polymeric sand is the first product category to browse. It renews the joint lock without turning a small maintenance repair into a bigger patio rebuild.
BEST FIRST BUY FOR STABLE PAVERS
Polymeric Sand for Pavers
Best for patios where the pavers are still level but the joints are hollow, sandy, or washing out lightly.
It fits this condition because the patio already has enough structure; the joints need renewed locking support.
Look for joint-width compatibility, haze-resistant labeling, surface compatibility, coverage per bag, and a realistic 24–72 hour weather window.
🔴 SHOP polymeric sand for pavers
Quick Buying Map for a Shifting Patio
A shifting patio usually fails in one of four ways. The visible symptom may be loose sand, but the right product category depends on what is actually moving.
Flat pavers, empty joints
Start with polymeric sand if the pavers are still supported, the border is not drifting, and the joint material has simply eroded or loosened over time.
Edge row spreading outward
Start with paver edge restraint if the outside row is creeping into lawn, mulch, gravel, or a planting bed.
One or two rocking or sunken pavers
Start with leveling sand and repair tools if individual pavers are low, rocking, or creating a small trip lip.
Same joints washing out after rain
Pause before buying joint sand if the same line keeps washing out or stays damp for 24 to 48 hours after rain.
What Type of Polymeric Sand Should You Browse?
Polymeric sand is a joint-filling product mixed with binding agents. It is swept into clean paver joints, settled or compacted into place, then activated with water. Once cured, it helps resist minor joint movement, weeds, insects, and light washout.
The buying mistake is treating every bag as interchangeable. The formula should match the joint width, surface texture, weather window, and age of the patio.
Narrow-joint polymeric sand
Choose this for newer or tighter concrete paver patios where the joints are still consistent and generally under 1/4 inch. It is usually the simplest choice when the surface is flat and the problem is ordinary joint erosion.
Skip it if the joints are wide because the pavers are drifting apart. Narrow-joint sand cannot correct lateral movement.
Wide-joint polymeric sand
Older patios often have wider, less perfect joints. Wide-joint polymeric sand is the better category when the joints are stable but no longer tight enough for a standard narrow-joint formula.
This does not mean every large gap is ready for wide-joint sand. If the gap is wide because the edge row moved, restraint comes first.
Haze-resistant polymeric sand
Haze-resistant formulas are worth browsing when the patio surface is dark, textured, porous-looking, or highly visible from the house. Haze often comes from poor cleanup, damp pavers, or leftover material on the face of the paver, but the right formula gives DIY repairs more margin.
Fast-setting or rainfast formulas can help when the weather window is tight, especially in humid areas or regions with frequent afternoon storms. They are not a shortcut for wet joints, poor drainage, or rushed surface cleanup.
Older patios with widened but stable joints usually need a wide-joint formula rather than a generic narrow-joint bag. Just make sure the joints widened from age and erosion, not because the edge row is drifting outward.
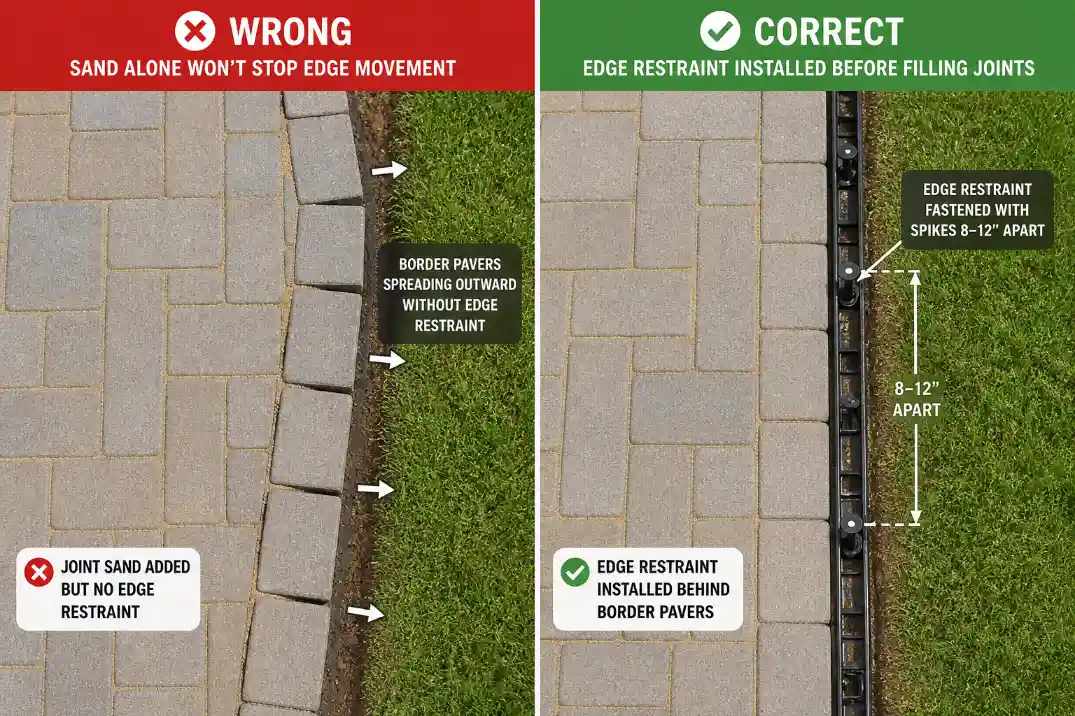
When Edge Restraint Beats Better Sand
If the outside row of pavers is drifting into lawn, mulch, gravel, or a planting bed, the patio is losing side support. The joints near the border widen first, then the edge starts creeping outward. This is often misread as a sand problem because loose joint material is the part you see first.
The real mechanism is lateral movement. Polymeric sand can fill a gap, but it cannot work like a buried brace. If the patio has a weak edge, thin base, or poor restraint from the start, the same failure pattern described in why cheap backyard pavers start shifting, staining, or loosening sooner than expected can show up after only a few seasons.
Rigid vs flexible restraint
Straight exposed patio edges usually benefit from rigid restraint. Curved patios may need flexible restraint, but it should still hold its shape once spiked and backfilled. Very light edging that waves under pressure can make the repair look tidy while allowing the border to move again.
Spike spacing and backfill matter
For a problem edge, spike spacing around 8 to 12 inches is a better buying filter than appearance. Loose soil, freeze-thaw climates, and edges near mower traffic may need longer spikes and firmer outside backfill. If the soil outside the restraint is soft, the restraint can lean outward even when the product itself is decent.
If the edge row is spreading, browse edge restraint before sand. Once the border is held in place, polymeric sand has a real chance to stay tight.
BEST FIX FOR SPREADING EDGES
Paver Edging and Spikes
Best for patios where the outside row is drifting into grass, mulch, gravel, or planting beds.
It fits this condition because the patio needs both a shape-holding edge and anchoring support before the joints can stay locked.
Look for edging strips or restraint pieces sold with long spikes, close anchoring intervals, and compatibility with your paver thickness.
🔴 SHOP paver edging and spikes
When Leveling Sand and Repair Tools Come First
A rocking or sunken paver is not a joint problem. The joint may look messy, but the repair starts below the paver.
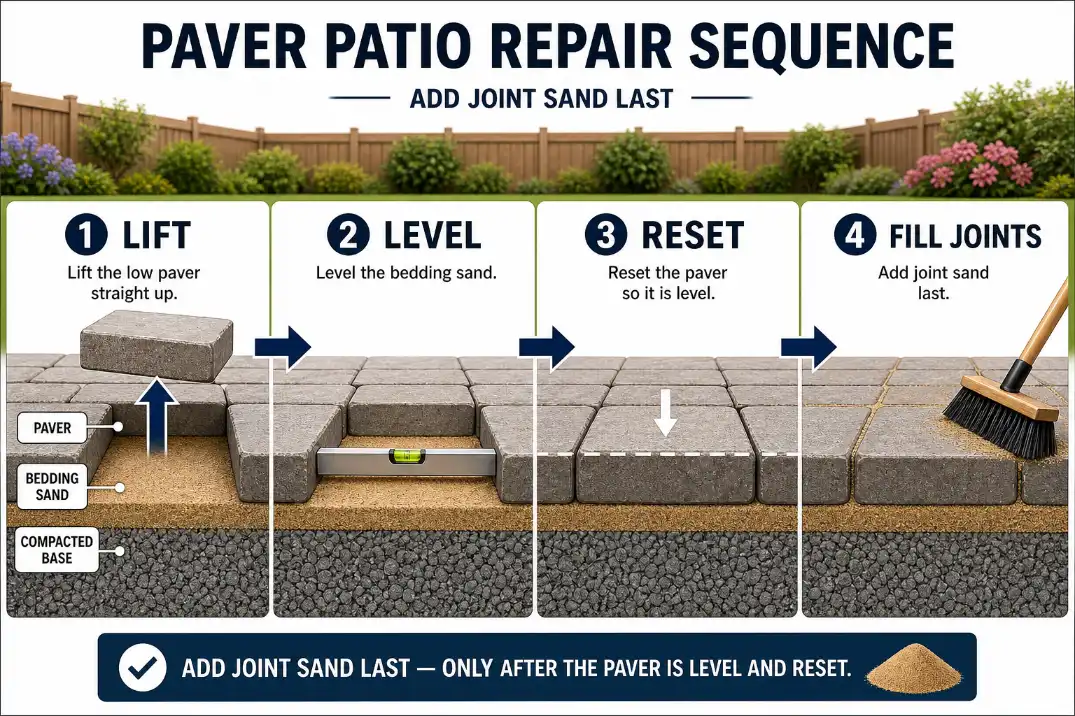
For one or two low pavers, the useful categories are leveling sand, a hand tamper, a rubber mallet, a screed board, and a joint-filling product for the final step. Lift the affected pavers, remove loose bedding, add a thin leveling layer, reset the pavers, then refill the joints.
If the patio has needed repeated fixes, this is where the “cheap repair” can become misleading. A surface that keeps dropping or spreading may have already crossed the line where cheap pavers stop being a smart backyard choice because the support system, not the surface finish, keeps demanding attention.
Small dips are repairable
If a paver has dropped about 1/4 to 1/2 inch, a localized reset may work. The key is keeping the leveling layer thin and even. Bedding sand is not meant to be a deep filler.
Large settlement is not a small-product repair
If a wider patio area has dropped, or if you need around 2 inches of loose sand to bring pavers back up, the issue is probably base settlement. That may require compactable paver base gravel, geotextile fabric in weak soil, and mechanical compaction. At that point, a small bag of sand is not the main solution.
For isolated low or rocking pavers, leveling products should come before polymeric sand. Joint sand should finish the repair, not carry it.
BEST BUY FOR ROCKING PAVERS
Paver Leveling Sand and Repair Tools
Best for isolated pavers that sit low, rock underfoot, or create a small trip lip.
It fits this condition because the paver needs to be reset before the joint can perform properly.
Look for clean leveling sand, a hand tamper, rubber mallet, screed board, and joint-compatible finishing sand.
🔴 SHOP paver repair tools
When Not to Buy Polymeric Sand Yet
Some patios do not need a better joint product yet. They need water, base, or cleanup issues handled first. This is the part most product roundups gloss over, and it is where a lot of wasted repairs start.
Water is washing through the same joints
If sand disappears from the same path after every storm, water is probably controlling the repair. Warning signs include damp joints that stay wet longer than 24 to 48 hours, algae in low spots, or water running across the patio during rain.
A practical surface target is about 1/4 inch of fall per foot away from the house or toward a safe drainage point. If the patio is flat, back-pitched, or receiving downspout water, polymeric sand becomes a temporary patch.
If the washout started after a hardscape change, the next purchase should wait until you understand the kind of backyard drainage issue that can appear after a patio or walkway project.
Water is pooling near the house
Do not use joint sand to disguise a moisture problem against the structure. If pooling is happening near the foundation side of the patio, the drainage decision matters more than the joint product. In that case, water pooling against the house changes the patio repair decision because the priority shifts from cosmetic joint repair to water direction.
Old joint material is contaminated
If the old polymeric sand is crusty, mossy, dusty, or only partly removed, new material may bond poorly. The better first purchase may be a joint scraper, stiff brush, shop vacuum, or careful cleaning attachment. Do not buy premium sand just to place it over old failure.
Regular Sand vs Polymeric Sand vs Leveling Sand
Regular joint sand is cheaper and easier to install, but it washes out more easily and does not lock joints the same way. It may be acceptable for low-risk areas where movement, weeds, and washout are not major concerns.
Polymeric sand is better when the pavers are stable and the goal is stronger joint performance. It costs more and is less forgiving, but it is the better category for patios where joint washout, ants, weeds, or minor surface looseness keep returning.
Leveling sand belongs under the paver, not as the final joint-locking product. It helps correct small height problems during reset work. Treating it like polymeric joint sand is a category mistake.
If you are considering a bigger surface change rather than a small repair, the comparison between pavers and gravel for backyard drainage can clarify whether your current surface is helping or fighting the yard’s water movement.
Pre-Buy Checklist
Before choosing a repair product, check these signals:
- Pavers are flat and move less than 1/8 inch: polymeric sand is reasonable.
- Joints are wider but stable: browse wide-joint polymeric sand.
- Edge row is spreading outward: edge restraint comes before sand.
- Pavers sit more than 1/4 inch low: leveling repair comes before joint repair.
- Several pavers have settled more than 1/2 inch: base repair may be needed.
- Same joints wash out after rain: diagnose runoff before buying sand.
- Rain is expected within the curing window: wait instead of rushing.
- Old joint material is dirty or crusted: clean the joints before refilling.
Final Verdict: Buy in the Order the Patio Fails
For shifting patios, the best product path is usually not complicated, but it has to be sequenced correctly. Use polymeric sand when the pavers are stable and the joints are empty.
Use wide-joint polymeric sand when an older but stable patio has larger joints. Use edge restraint when the border is spreading. Use leveling sand and repair tools when individual pavers are low or rocking.
Delay polymeric sand when water, base settlement, or contaminated old joint material is still controlling the failure.
The right order is: stop movement, restore level, manage water, clean the joints, then lock the surface.
That order makes the buying decision sharper and keeps you from spending more on a better bag of sand when sand was never the product that could fix the patio.
For broader paver installation and jointing guidance, see the Concrete Masonry & Hardscapes Association application guide.