Garden inspiration fails most often when a beautiful idea is copied before the yard’s real limits are understood.
The problem is usually not style. It is translation: the photo hides scale, door swings, sun timing, drainage, plant maturity, storage routes, and the way people actually move through the space.
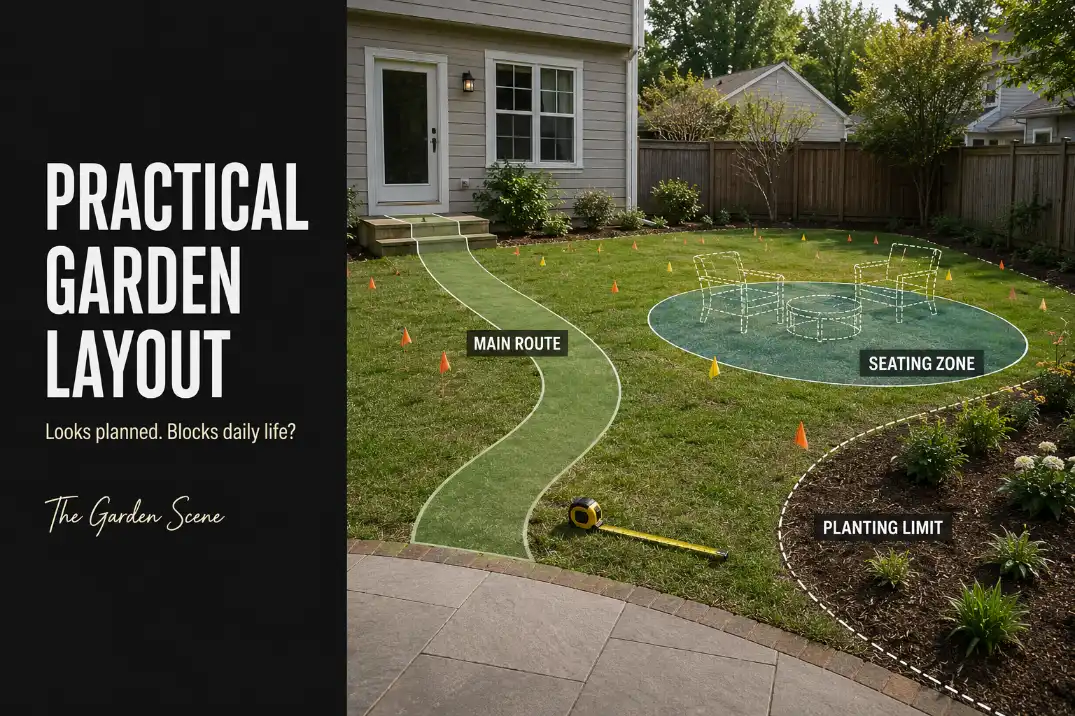
Before choosing a pergola, path, bench, or planting bed, check whether the main route can stay close to 36 inches wide, whether active seating still has 30–36 inches of pull-out room, and whether the layout works for at least 48 hours of normal use.
That is the difference between a garden that looks good on installation day and one that still feels usable after 30 days.
A copied layout can look “finished” while quietly blocking the hose, narrowing the gate route, trapping heat near the seating area, or putting plants where people naturally walk.
The 3-Part Inspiration Filter
Use this quick filter before copying anything from a garden photo:
- Route test: Can people still move through the yard without squeezing, stepping into beds, or moving furniture first?
- Site test: Does the idea survive sun, drainage, slope, gate access, and everyday maintenance?
- Growth test: Will the layout still work after plants reach mature size in 2–3 growing seasons?
The goal is not to copy the photo. The goal is to extract the useful relationship from it and rebuild that idea around your yard.
Start With Movement and Access Routes
A practical garden layout starts with the routes that already exist. Most yards have a daily movement pattern before any design is added: back door to patio, driveway to gate, hose bib to planting bed, storage area to lawn, trash bins to curb, seating to kitchen, and sometimes a pet or kid route across the same space.
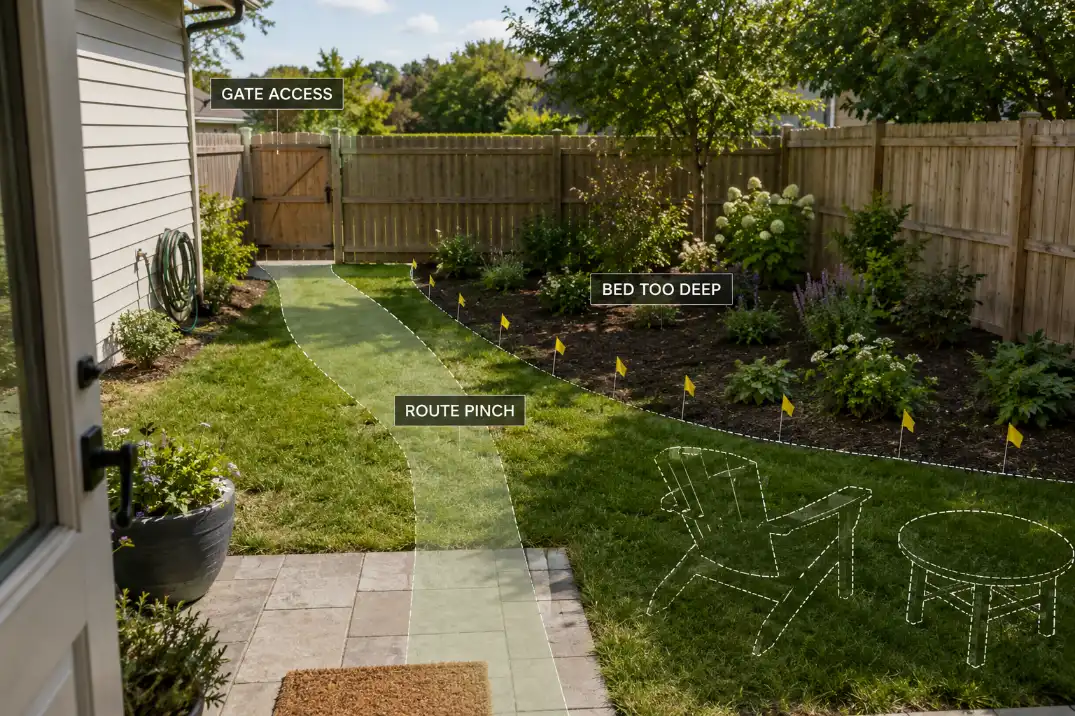
These routes matter more than the first feature you want to add. If the inspiration photo suggests a deep curved bed but your main route runs through that exact area, the bed is not a design improvement. It is a conflict wearing a prettier shape.
Mark the route before drawing the garden
Use marking flags, string, chalk, a garden hose, or temporary planters to outline the path people already take. A main route should usually stay near 36 inches wide.
A secondary route can sometimes work at 24–30 inches if it is only used occasionally and not for carrying bins, tools, trays, or chairs.
The important distinction is that route space is not leftover space. It is part of the layout. Once that is clear, many inspiration ideas become easier to judge.
A bench can move. A planter can shrink. A curved bed can flatten. The walking route should not be sacrificed first.
This is where many copied designs start to fail, especially when the original photo came from a larger, flatter, less-used yard.
If the layout in the photo already feels tight when imagined with a trash bin, mower, or hose moving through it, the problem is not your yard’s lack of charm. It is a mismatch, similar to the issues in Why Garden Inspiration Photos Don’t Fit Every Yard.
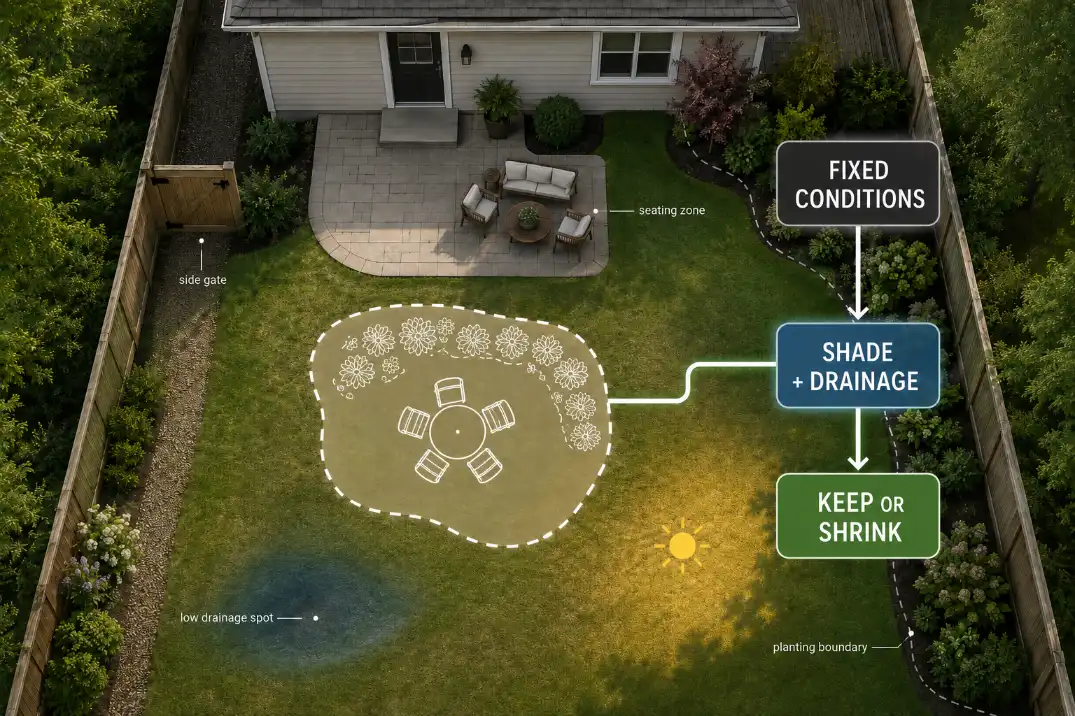
Map fixed conditions before adding shapes
Before drawing new beds or seating zones, mark the things that cannot easily move: back door, side gate, driveway edge, utility meter, hose bib, existing trees, drainage low spots, AC unit, fence openings, and any window or door view that matters.
This is the base map before inspiration enters the plan. It keeps the design grounded in the real yard instead of letting a photo decide where routes, beds, and seating should go.
A simple base map does not need to be professional. Even a rough sketch with measurements can prevent expensive mistakes.
Measure the width of the patio, the distance from the door to the lawn edge, the gate opening, and the usable flat space. A plan that ignores fixed points often looks good only because the hard parts were left out.
Translate the Inspiration Photo Into Site Rules
The strongest way to use garden inspiration is to ask what the photo is doing, not what object it contains. A photo may show a gravel path, a bench, a layered planting bed, a privacy screen, or a small dining corner.
The useful part is usually the relationship: shade over seating, planting along a boundary, a view framed from the door, or a path that slows the eye without blocking access.
Copy that relationship. Do not automatically copy the size, shape, or material.
Copy the relationship, not the feature
A large pergola in an inspiration photo may really mean “shade over the main seating area.” In your yard, that may become a smaller umbrella, a shade sail, a tree canopy, or a seating shift to the cooler side of the patio.
A wide cottage-style border may really mean “soften the fence line.” In a narrow yard, that could become a 24-inch planting strip instead of a 5-foot-deep bed.
This filter keeps the idea alive without forcing the wrong scale. It also prevents a common waste of money: buying the hero piece from the photo before proving the yard can support it.
Identify what the photo hides
Most inspiration photos hide the practical friction. They rarely show the side gate, the drainage dip, the afternoon sun angle, the storage box, the HVAC unit, the dog path, the neighbor’s window, the trash-bin route, or the chair being pulled out.
Those missing details decide whether the layout works. A seating nook may look perfect in the photo but fail if it sits in full western sun from 3 p.m. to 6 p.m. in Arizona or Texas. A dense planting edge may look lush but stay damp too long in humid parts of Florida or the Southeast. A gravel path may look relaxed but scatter downhill if the yard has even a mild slope and no edging.
That is why Garden Inspiration for Real Yards matters inside this cluster: the best idea is not the most photogenic one, but the one that survives your yard’s real constraints.
Reject ideas that need perfect conditions
Some inspiration ideas only work when the site is wide, flat, lightly used, well-drained, and already shaded. If your yard is narrow, sloped, exposed, heavily used, or full of fixed access points, the idea may need to be reduced or rejected.
A practical rejection is not a failure. It is good editing. If an idea needs a 12-foot-wide open zone and your usable width is 8 feet, forcing it will usually create a cramped layout.
If a plant combination needs moist, rich soil but your front yard has shallow topsoil and reflected driveway heat, the photo is not giving you a plan. It is giving you a mood.
Define Functional Zones Before Choosing Features
Once routes and site limits are clear, divide the yard into functional zones. This should happen before choosing the decorative features.
A functional zone has a job. Dining. Sitting. Walking. Planting. Screening. Playing. Working. Storing. Watering. Maintaining.
When zones are not defined first, attractive features compete for the same area and the yard starts to feel cluttered even if every individual choice looks good.
Separate feature zones from working zones
Feature zones are the parts people notice: seating, planting beds, water features, trellises, containers, pergolas, fire pits, or focal plants.
Working zones are less glamorous but more important: access paths, drainage routes, utility access, trash-bin movement, hose reach, mower clearance, and door swing space.
Working zones should usually win the first round of decisions because they are harder to fix later. Moving a chair is easy. Moving a paved path, mature hedge, built-in bench, or deep bed is not.
| Inspiration Feature | Hidden Site Check | Keep, Shrink, or Reject? |
|---|---|---|
| Deep curved planting bed | Mature plant width plus path clearance | Shrink if the route drops below 36 inches |
| Seating nook | Shade timing and chair pull-out space | Keep if it works for 30 days of normal use |
| Gravel path | Slope, runoff direction, and edging | Reject or redesign if water crosses it |
| Focal planter | Door swing, view line, and walking route | Move to an edge if it blocks flow |
| Dense privacy planting | Airflow, trimming access, and mature spread | Layer lightly instead of overplanting |
This kind of decision table is more useful than asking whether the idea is “pretty.” Pretty is not enough. The layout has to survive the site.
For broader yard planning, Backyard Layout Ideas for Functional Outdoor Living is a better next step than collecting more reference photos, because it keeps every zone tied to actual use.
Do not let one zone take over
A common overestimate is how much seating the yard needs every day. A common underestimate is how much clear space makes that seating feel comfortable.
If one feature consumes more than half of the usable flat area, it needs to justify that space. A dining table used twice a month should not control the whole layout if the yard is used daily for pets, kids, gardening, or quiet sitting.
A large planting island may look generous in a photo but feel like an obstacle if it forces every route to bend around it.
Clear space is not a blank area waiting to be filled. It is what keeps the design usable.
Create a Clear Focal Point
A focal point should organize the layout, not merely decorate it. This is where copied inspiration often becomes expensive.
The homeowner picks the arbor, fountain, specimen tree, planter, bench, or fire feature first, then tries to make the rest of the yard obey it.
That order is backwards. A focal point should answer two practical questions: where is it seen from, and what does it help organize?
Choose the view that actually matters
Most yards have one or two important viewing positions. Common ones are the kitchen window, back door, patio seating, driveway arrival, front walkway approach, or main gate.
If the focal point cannot be seen from the place people naturally pause, it may not do much for the layout.
The focal point also does not need to sit in the center. In many U.S. suburban yards, center placement creates more problems than it solves.
It can split the lawn, crowd the route, interrupt chair placement, or force planting beds into awkward shapes.
A better focal point is often slightly off-center: a small tree in the far corner, a vertical planter near a blank fence, a bench along the side edge, or a framed planting moment visible from the back door.
Avoid the expensive object trap
Buying a more dramatic feature rarely fixes a weak layout. A larger planter, taller trellis, bigger fountain, or stronger color accent may make the mood board feel complete, but it will not fix a blocked route, poor shade placement, or seating that faces the wrong way.
The symptom may be “the garden needs a focal point.” The mechanism may be that nothing in the yard is organizing movement or view lines. Those are different problems.
A real focal point makes the yard easier to understand. If it forces people to walk around it, blocks the only clear path, or needs constant trimming to remain usable, it is not anchoring the layout. It is absorbing space.
Leave Room for Daily Activities
A layout can look good in a still image and still fail during ordinary use. That is why the everyday movements deserve a direct test.
Carry a laundry basket through the route. Pull out the chairs. Open the gate. Stretch the hose to the farthest planting area. Walk from the seating zone to the back door at night.
Bring a tray outside. Move a trash bin through the side route. These small actions reveal problems that a flat inspiration image cannot show.
Test the movements that happen every week
A practical test takes 15–20 minutes. It should include the movements that happen weekly, not just the movements that happen when guests visit.
If you have to step into a planting bed, move a chair, lift a hose over furniture, or turn sideways to pass through the route, the layout is not ready.
A temporary setup that feels slightly tight will usually feel worse once plants grow, cushions appear, storage needs return, and seasonal tasks start.
This is the same failure pattern behind Backyard Zoning Mistakes That Hurt Outdoor Flow. The yard usually does not fail because it lacks enough features. It fails because the zones interrupt each other.
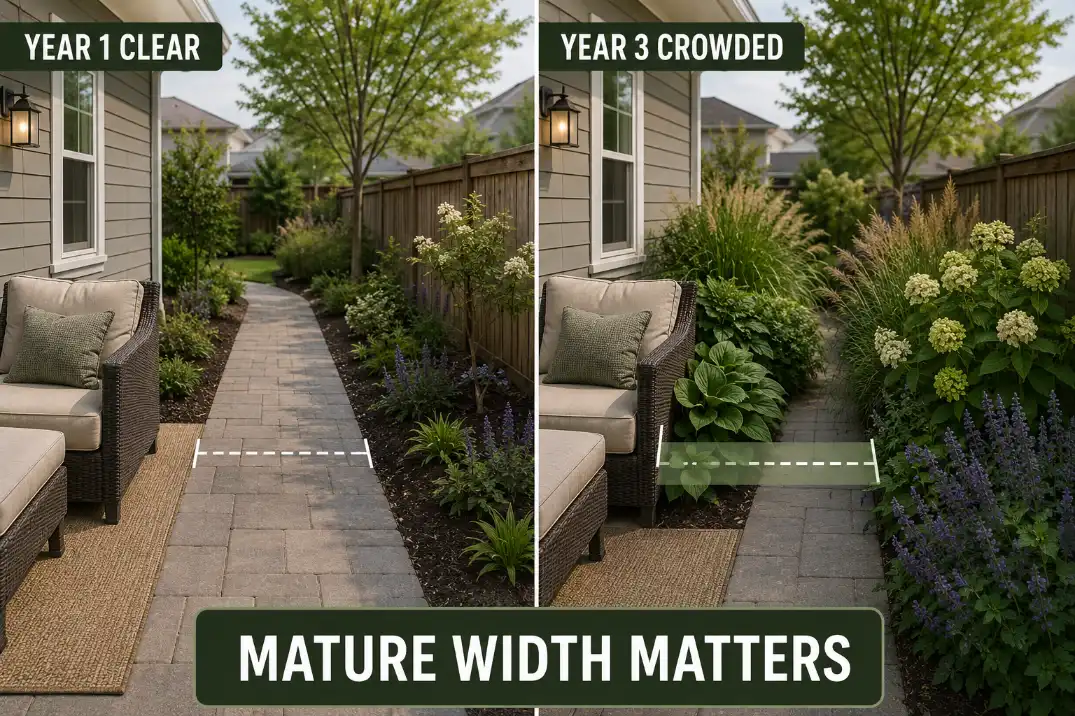
Leave growth room for plants
Plants are easy to underestimate because they are bought small. A 1-gallon shrub can look harmless at the nursery and still become a 3- to 4-foot-wide obstruction in a few growing seasons.
Ornamental grasses can look airy in year one and crowd a walkway by year three. A vine can soften a fence and still swallow a narrow gate if the support is too close to the access route.
Use mature width, not purchase size. Along paths and seating edges, keep plants at least 12–18 inches back from the usable edge unless they are low, soft, and easy to brush past. In tighter yards, that gap matters more than the plant label suggests.
A planting bed that looks full on day one is often too full for year three. The better layout may look slightly restrained at installation and settle into balance later.
Balance Seating, Planting, and Open Space
A garden layout usually fails from imbalance before it fails from bad taste. Too much seating makes a yard feel like a furniture showroom.
Too much planting makes it hard to move and maintain. Too much open space can feel unfinished if there is no edge, shade, or reason to pause.
The decision order should stay firm: movement first, zones second, focal point third, planting and furniture last.
Keep seating tied to a reason
A seating area should have a clear reason to exist. Morning coffee. Reading shade. Watching kids. Eating near the kitchen. Sitting away from street noise. Cooling down in the evening. If the reason is vague, the seating often ends up in the wrong place.
A pair of chairs in full afternoon sun may photograph well but sit unused. A bench facing a blank fence can feel staged. A dining set too far from the kitchen may become outdoor storage instead of a place to eat.
If the seating zone has already passed the route, shade, and pull-out test, then product choice starts to matter.
For a compact corner that truly works as a reading spot, Best Outdoor Reading Chairs for Patio Corners fits better after the layout is proven, not before.
Let open space do visible work
Open space gives the eye a break and keeps the yard flexible. In a small garden, one clear open area often does more for comfort than several tiny decorative pockets.
A healthier layout might keep a simple open center, with planting and seating organized around the edges. A failing layout fills every corner and leaves only narrow strips for movement.
The difference may be only 3–4 feet of open width, but it changes whether the yard feels calm or crowded.
When the last open space has to disappear for the design to work, the design is probably asking too much from the yard.
Test the Layout Before Installing Anything Permanent
A practical garden layout should be tested before it becomes expensive. This is the step that separates a useful inspiration adaptation from a copied design.
Use a 48-hour mockup when possible. Mark bed lines with a hose or flags. Put folding chairs where seating would go. Use boxes or buckets to stand in for planters. Mark the path edge. Then live with the layout for two normal days.
Use clear failure thresholds
The test does not need to be complicated. It just needs firm boundaries.
If the main route falls below 30 inches at any pinch point, the layout should be simplified. If chairs cannot pull out without blocking the only path, the seating zone is too large or in the wrong place.
If the hose or trash bin cannot move without rearranging furniture, the layout is not ready. If the bed edge already feels close before plants mature, it will almost certainly feel crowded later.
A design that only works when everything is perfectly tucked in is not practical. Real yards have cushions, tools, watering cans, toys, leaves, guests, pets, and seasonal clutter.
Simplify before you shrink the route
When the test feels tight, simplify the feature first. Reduce bed depth. Choose one seating zone instead of two.
Move the focal point to the edge. Use fewer containers. Keep the open center. Narrow the decorative idea before narrowing the daily route.
This also applies where patio and garden zones overlap. If the back door, chairs, and planting edge all compete for the same few feet, Patio Layouts for Back Doors and Seating can help refine the transition before permanent materials lock the mistake in place.
Run the final layout check
Before installing edging, pavers, trellises, permanent beds, or built-in seating, check the layout one last time:
- Does the main route stay close to 36 inches wide?
- Does any pinch point drop below 30 inches?
- Can chairs pull out without blocking the only path?
- Can the hose, mower, storage box, or trash bin move without rearranging the space?
- Will mature plants shrink the layout within 2–3 growing seasons?
- Does the design still work during shade shifts, rain, heat, and evening use?
The best garden inspiration does not give you a finished plan. It gives you a useful starting point. A practical layout comes from editing that idea until it fits the yard’s routes, zones, views, climate, and daily habits.
For broader official guidance on landscape design considerations, see the University of Florida IFAS Extension.