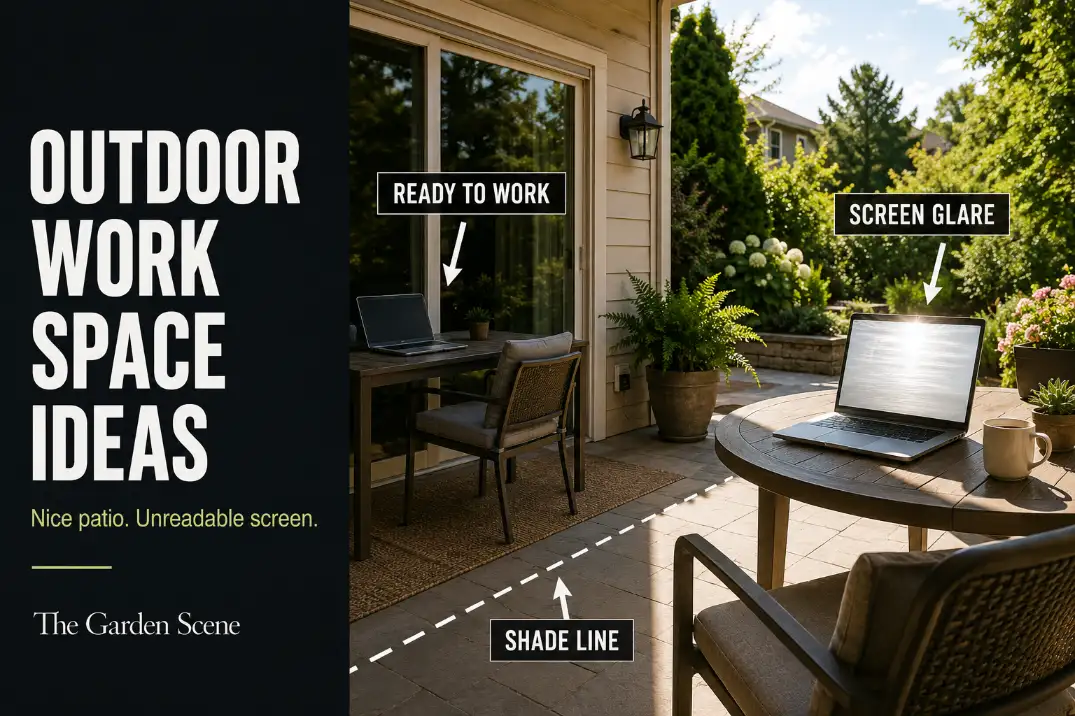
An outdoor work space on a patio usually fails before the chair ever feels uncomfortable. The first weak point is often the screen: bright sky, a white fence, open lawn, or pool reflection can make a laptop hard to read even when your body is shaded.
The next checks are seating height, power access, and whether Wi-Fi holds through a 20-minute call.
A useful patio work zone is not just a nice outdoor corner with a laptop added. It needs a 28–30 inch work surface, a 17–19 inch seat height, and a 30–36 inch clear route between the door, chair, and yard.
That is different from a reading nook or lounge setup, where leaning back is fine and glare matters less. For work, the setup has to protect the screen, support posture, keep cords off the walking route, and feel fast enough to use without rebuilding the patio every morning.
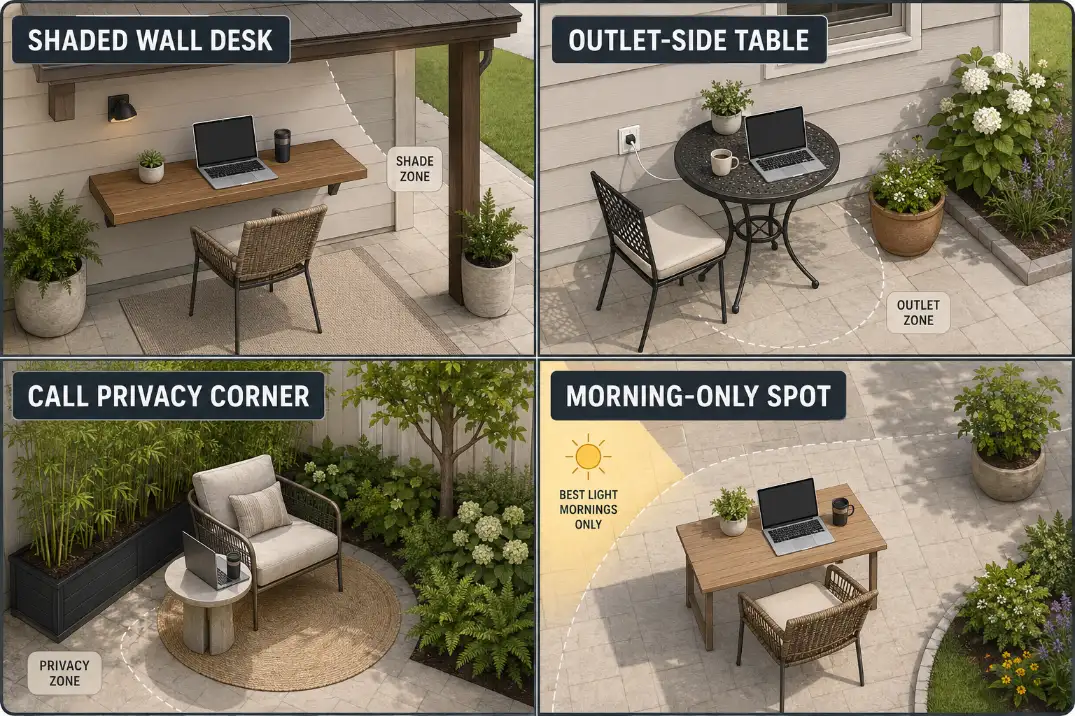
Most patio work spaces fall into one of four usable models: a shaded wall-side desk, an outlet-side bistro table, a protected call corner, or a morning-only laptop spot. The right choice depends less on style and more on which weak point your patio solves first.
Shade the Screen First
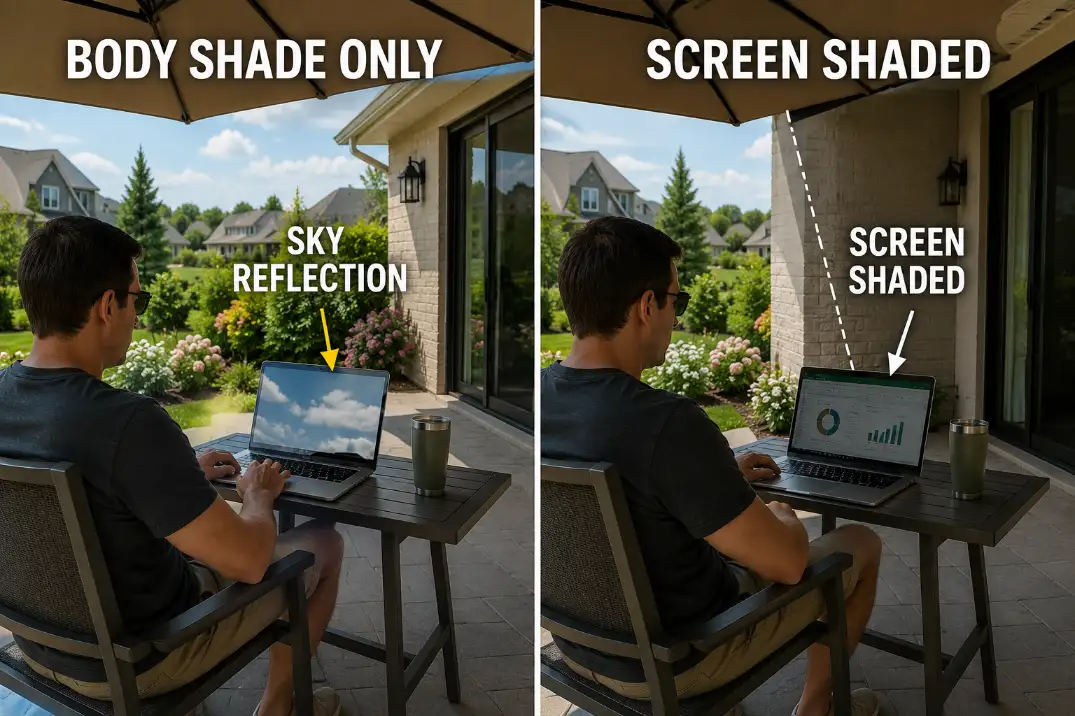
Body shade is not the same as screen shade
The most common mistake is shading the person while leaving the laptop exposed to reflection. An umbrella can cover your shoulders and still let the screen face a bright lawn or open western sky. That setup may look comfortable from the house, but the screen becomes the failure point.
The quick test is simple: sit where you plan to work, open a dark document or browser page, and look for reflected sky. If the reflection is clearer than the text, the shade is not doing the right job.
Moving the chair 1 foot rarely fixes that. Rotating the table 90 degrees or moving the screen just inside the shade line usually matters more.
For patios where the shade source cannot be drilled into the house, No-Drill Patio Shade Ideas fits this problem better than adding another decorative umbrella in the wrong spot.
Shade also protects the device
Screen shade and device shade are connected. If direct sun lands on the keyboard and laptop body for 15–20 minutes, the setup can become uncomfortable even if the screen is barely readable.
In hot patios, especially during long afternoon exposure, the work zone should keep direct sun off both the screen face and the laptop surface.
This is why the best work position is often not the deepest shade. It is the spot where the screen faces away from the brightest opening while air can still move around the chair.
A covered patio can still feel harsh if the screen faces a white fence or open concrete. A lighter shade edge with the screen turned away from glare may work better.
If the patio needs movable shade rather than permanent cover, Best Patio Umbrellas for Shade in Small Backyards is most useful after you know where the screen needs protection, not before.
Afternoon glare is usually worse than people expect
People often test the patio once, usually in the morning, and assume it works. But a west-facing patio can change completely by 3 or 4 p.m. Low sun hits the laptop from the side, the keyboard reflects light upward, and the screen becomes harder to read than it was at noon.
If you plan to use the patio for real work, test it at two times: around 10 a.m. and again around 3 p.m. If only one time works, design the setup around that use window instead of pretending the patio is an all-day office.
Work Needs Different Comfort
Lounge comfort collapses during work
A patio lounge chair can feel comfortable for coffee and still fail for a 45-minute work block. The issue is not softness. It is working angle. If the seat is too deep, your hips slide back, your shoulders round, and the laptop drops too low. That creates a posture problem even if the chair feels expensive.
For laptop work, the better chair lets your feet rest flat and your elbows stay close to a 90-degree bend while typing. A supportive dining-style chair often beats a deep outdoor lounge chair because it holds the body closer to the work surface.
This is the point where buying more cushions usually wastes time. Cushions can soften pressure, but they do not fix a table that is too low or a chair that tilts the body away from the laptop.
If posture is already the weak point, Outdoor Seating Height Mistakes is the more useful fix path than styling the corner.
The table should be boring enough to use
A work table does not need to be large. It needs stable depth and the right height. About 24 inches of usable depth is enough for a laptop, small notebook, mouse, and drink.
A narrow decorative side table usually fails because the laptop sits too close to the edge or forces your wrists into a bad angle.
Dining height usually works better than lounge height. A 28–30 inch table with a steady chair gives the setup a real work posture. A low coffee table may look relaxed, but it turns the laptop into lap work with a better background.
| Patio work element | Better working range | Failure sign |
|---|---|---|
| Work surface height | About 28–30 inches | Wrists bend upward or laptop sits below chest level |
| Seat height | About 17–19 inches | Knees sit too high or feet do not rest flat |
| Table depth | About 24 inches usable depth | Laptop crowds the edge or drink competes for space |
| Screen test | Check around 10 a.m. and 3 p.m. | Screen reflects sky more than text |
| Call test | At least 20 minutes | You keep muting one repeated noise source |
| Setup speed | 60–90 seconds | You avoid using the space unless conditions are perfect |
Power, Signal, and Cord Routes
Let the outlet decide the work zone
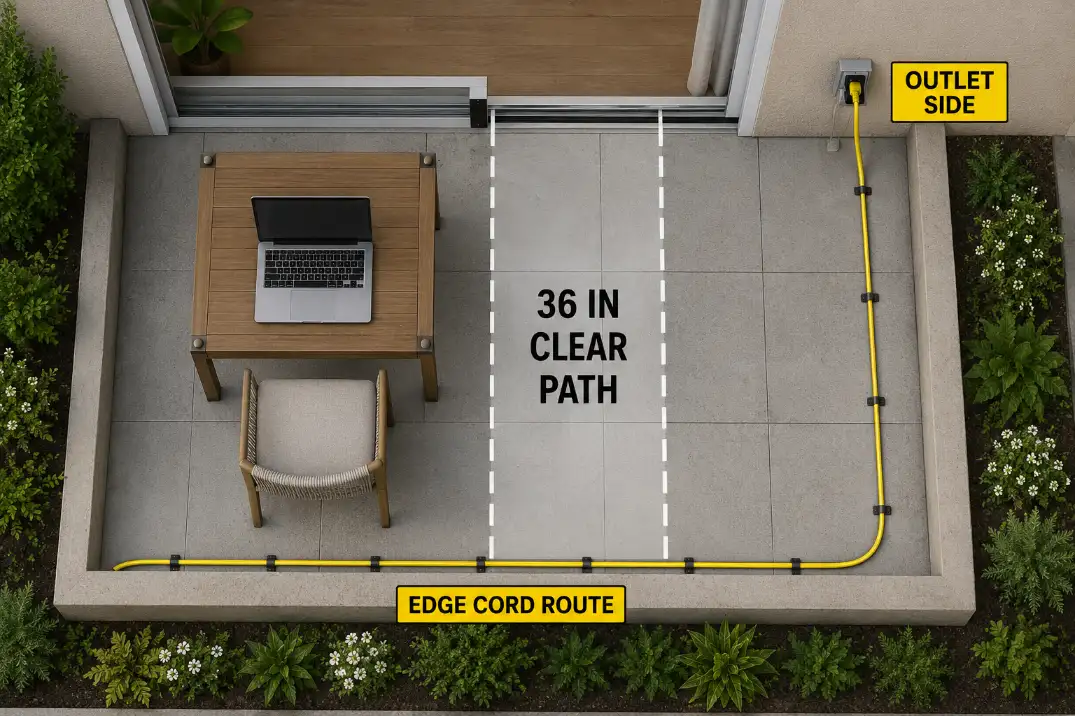
Power access is not a small detail. It often decides whether the patio work space gets used more than once. The best position is usually near a GFCI-protected outdoor outlet, with the cord running along a wall, planter edge, or furniture edge instead of across a walking route.
If the outlet is more than 10–12 feet away and the cord has to cross the main path, the work zone is probably in the wrong place. That is not a cord-organizing problem. It is a layout problem.
A cable across a sliding door, step, or chair route may feel acceptable one afternoon, but it stops making sense if you work outside several times a week. The patio should still have a 30–36 inch clear route after the laptop, chair, charger, and side table are in place.
Wi-Fi is part of the layout
A patio can pass the furniture test and still fail the work test if the signal drops during calls. Do not judge this by loading a website once. Sit in the actual chair and run a 20-minute video call or streaming test. If the audio stutters, the camera freezes, or the call only works when the door is open, the patio is not ready for regular work.
The fix may be as simple as moving the chair closer to the house wall. But if the best shaded spot is far from the router, you may need a stronger signal plan before investing in furniture. Power and signal should be solved before privacy screens, rugs, or extra decor.
This is also where clutter starts. When chargers, extension cords, outdoor pillows, notebooks, and small tables keep spreading into the route, the work setup begins stealing function from the patio. Reduce Patio Clutter Without Losing Function is useful when the work zone keeps turning into a pile of “temporary” pieces.
Avoid the permanent temporary setup
The weakest patio office is the one that is always half-built: charger left outside, cord tucked under a rug, laptop table blocking the door, cushions carried in and out, and a chair that has to be moved every time someone walks through.
A better setup has one table that can stay in place, one chair that supports typing, and a cord route that connects in less than 60 seconds. That matters more than making the patio look like a full office. Outdoor work succeeds when the setup is easy to start and easy to clear.
Noise and Call Privacy
Start with the loudest repeated source
Noise control is not about making the patio silent. It is about breaking the most disruptive repeated source. A mower passing for 10 minutes is annoying but temporary.
A pool pump 6 feet away, an HVAC unit cycling every 15 minutes, or traffic noise from the same open side of the patio can make the space feel unusable for calls.
The symptom is “this patio feels distracting.” The mechanism is usually a direct sound path between a fixed source and your microphone. That distinction matters because adding plants near the chair may make the space look calmer without changing the call quality much.
Plants, planters, and soft surfaces help most when they support a better layout. They are less useful when they are asked to solve a direct mechanical noise path by themselves.
For outdoor call zones, Outdoor Noise Buffer Ideas is more relevant than simply adding more greenery around the chair.
Privacy should protect your back, not close the patio
Call privacy is partly visual. A patio may be quiet enough, but if your back faces a sidewalk, shared driveway, upstairs window, or neighbor’s deck, the space can still feel exposed. The best privacy screen is usually behind or slightly beside the chair, not directly in front of the view.
That keeps the outdoor feeling intact while protecting the work posture. If the screen blocks the entire yard, the patio starts feeling like a small cubicle. If it only blocks the main sightline over your shoulder, it supports calls without taking over the space.
Movable screens, tall planters, and fence-corner seating can work well when they stay outside the 30–36 inch route and do not trap heat around the chair.
For renters or HOA-limited patios, Temporary Patio Privacy Ideas can support a call zone without turning the patio into a permanent enclosure.
A Setup You Will Actually Use
Build around the first 90 seconds
The best outdoor work space is not the most complete one. It is the one you can start using quickly. A strong test is the first 90 seconds: can you sit down, open the laptop, connect power if needed, see the screen clearly, and begin work without moving three pieces of furniture?
If the answer is no, simplify. Rotate the table. Remove the extra chair. Move closer to the outlet. Shift the screen away from the bright lawn. Use one stable work surface instead of a styled cluster of small pieces.
Small changes usually beat a full patio redesign because the failure is often one broken work condition, not the whole outdoor space.
Use the two-hour test before upgrading
A patio work space does not need to replace an indoor office for eight hours. It should support the way you actually plan to use it. A practical threshold is a 2-hour block: one focused work period, one call, and one short break without needing to move everything back inside.
If the setup feels fine for 15 minutes but you abandon it before an hour, do not start with decor. Check screen glare, chair height, heat buildup, Wi-Fi, and cord route first. Those are more likely to change the outcome than another rug or side table.
Know when the patio is the wrong office
Some patios are better as short-task zones. If the patio gets direct afternoon sun for 4–5 hours, has no safe power route, sits beside a repeated mechanical noise source, and has no stable Wi-Fi, forcing it into a full outdoor office will create more friction than value.
That does not mean the patio is useless. It may be perfect for morning email, a 20-minute planning session, or one call in mild weather. A good outdoor work space is not the one with the most accessories. It is the one that matches the task without making the patio harder to live in.
Quick usability checklist
- Test the laptop screen at 10 a.m. and 3 p.m., not just when the patio looks shaded.
- Keep the work surface near 28–30 inches high if typing is part of the setup.
- Use a chair that keeps feet flat and elbows near a natural typing angle.
- Leave 30–36 inches of clear route between the chair, door, and main patio path.
- Keep power along an edge, never across a step, doorway, or chair route.
- Run a 20-minute call test before adding privacy screens or more furniture.
- Keep setup and cleanup close to 60–90 seconds if you want to use the space often.
For broader official heat safety guidance before working outside in hot weather, see the CDC Heat and Health guidance.