Patio laptop glare is usually not a simple lack-of-shade problem. The more common failure is that your body feels shaded while the screen still catches side light, reflected light, or a bright background behind the laptop. That is why turning up brightness often helps for 5 minutes and then fails again once the sun moves.
The fastest way to reduce patio laptop glare is to fix the screen’s light path before buying more shade.
Start with three checks: look at the screen from your seated eye height, check whether pale concrete or a light tabletop is glowing around the laptop, and test the same seat at 10 a.m., 1 p.m., and 4 p.m. If the screen is still hard to read after 15–20 minutes in shade, the problem is probably light direction, not laptop quality.
Heat, weak Wi-Fi, and glare can show up together outside, but they are not the same problem. Heat makes the laptop uncomfortable or causes dimming; glare makes the display unreadable even when the laptop itself is working normally.
Shade Is Not Always Enough
Body shade can still leave the screen exposed
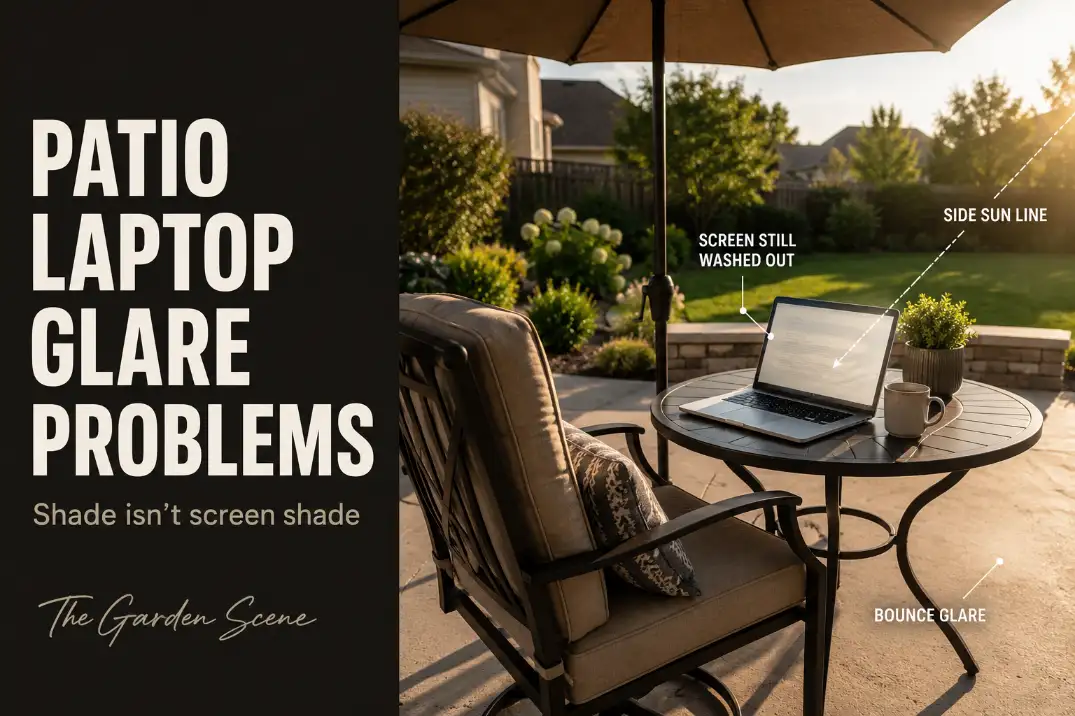
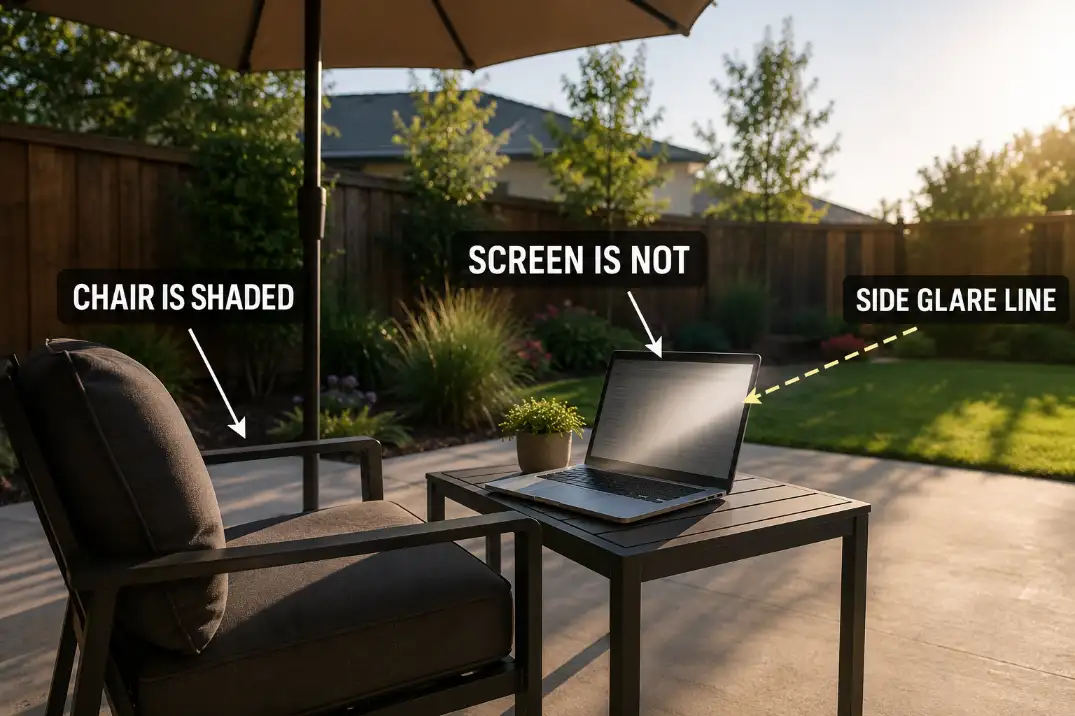
The biggest misread is assuming that if your head and shoulders are shaded, the laptop is protected too. A laptop screen is a vertical, reflective surface. It can catch light from the side, from behind you, from a white wall, or from a bright slab even when the seat itself feels comfortable.
That is why a patio can look usable at first glance and still fail as a work spot. A broad shade zone helps comfort, but it does not automatically control the line between the sun, the screen, and your eyes.
If the entire patio feels poorly shaded, the larger problem may belong with Patio Shade Problems That Make Outdoor Spaces Hard to Use, but laptop glare needs a tighter screen-level test.
The first useful test is screen shade
Sit where you would actually work, open the laptop to your normal angle, and look for the brightest thing around the screen. If the screen is darker than the patio floor, a white tabletop, a stucco wall, or the sky behind it, your eyes will keep fighting the contrast.
A useful threshold: if you need maximum brightness for more than 20–30 minutes just to read normal text, do not treat brightness as the solution. Many basic 250–300 nit glossy laptop screens can struggle badly outdoors.
A brighter 400–500+ nit display helps, but it still cannot beat direct sun, pale hardscape glare, or a screen facing the wrong direction.
Screen Angle and Sun Direction
The sun moves faster than the setup feels
A patio work spot can be usable at 9:30 a.m. and frustrating by 10:45 a.m. The sun moves about 15 degrees per hour, which is enough to change whether light hits the laptop glass, the table surface, or the wall behind the screen.
This is why a “good morning spot” often fails for a two-hour work block. You are not just choosing a shaded location; you are choosing a screen angle that has to survive a moving light source.
Use rotation before buying accessories
The strongest first move is usually rotation, not more gear. Try turning the laptop and chair so the screen face sits roughly 60–90 degrees away from the strongest light direction. You want the sun beside the work zone, not shining toward the screen or directly behind your line of sight.
This same logic matters when building a broader patio work area. A nice table near the door may look convenient, but if the screen faces the brightest side of the yard, the setup will underperform.
For layout-level planning, Outdoor Work Space Ideas for Patios is more useful than simply searching for a brighter laptop.
What better screens can and cannot fix
A brighter laptop, matte display, or anti-glare film can reduce the frustration, but none of them changes the patio geometry. If the screen faces a bright sky, white wall, or sunlit slab, you are asking the display to overpower the environment.
Screen brightness is a backup, not the first fix. If rotating the chair makes the screen readable at half to two-thirds brightness, the laptop was not the main problem. If every direction still requires full brightness, the work zone needs stronger shade control or a different seat.
| Patio signal | What it usually means | Best first move |
|---|---|---|
| Chair is shaded but screen looks silver | Side light is hitting the display | Rotate the chair and laptop 60–90 degrees |
| Eyes feel comfortable but text is faint | Screen contrast is failing, not comfort | Block the screen line, not just overhead sun |
| Glare gets worse every 30–60 minutes | Sun angle is moving into the screen path | Test the seat at three times of day |
| Laptop works only at full brightness | Placement is overpowering the display | Move the setup before buying accessories |
| Fan races or display dims suddenly | Heat may be joining the glare problem | Add airflow and get the laptop out of direct sun |
Light Surfaces Bounce Glare
Pale patios can become the light source
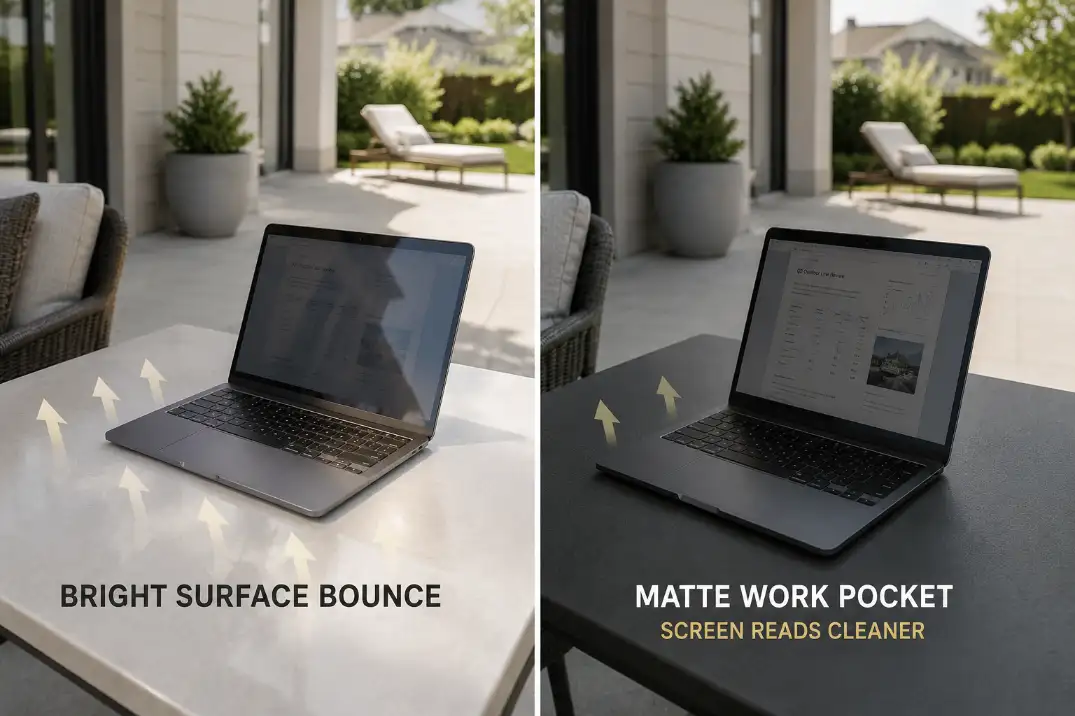
Light concrete, white pavers, pale gravel, glass tables, glossy tile, and bright stucco can bounce enough light upward to wash out a laptop screen. This is easy to underestimate because nothing looks “wrong.” The patio is clean, bright, and attractive. The problem is that the screen is sitting inside a reflective bowl.
This is especially noticeable on open south- or west-facing patios, desert-style yards with pale hardscape, and coastal patios with bright walls. Even when the laptop is technically under shade, the area around it may still be brighter than the screen.
The 30-second surface test
Place a dark towel, matte tray, dark placemat, or piece of cardboard under and behind the laptop for 30 seconds.
If the screen becomes easier to read, the patio surface is part of the glare problem.
That does not mean the whole patio surface is wrong; it means the work zone needs a darker, less reflective pocket.
Avoid the common waste of time here: buying a screen filter before testing the surface. A matte screen protector can soften sharp reflections, but it can also reduce perceived contrast. If the glare is coming from a bright slab or wall, the filter is treating the symptom, not the mechanism.
Umbrellas Can Miss the Screen
Overhead shade often arrives from the wrong direction
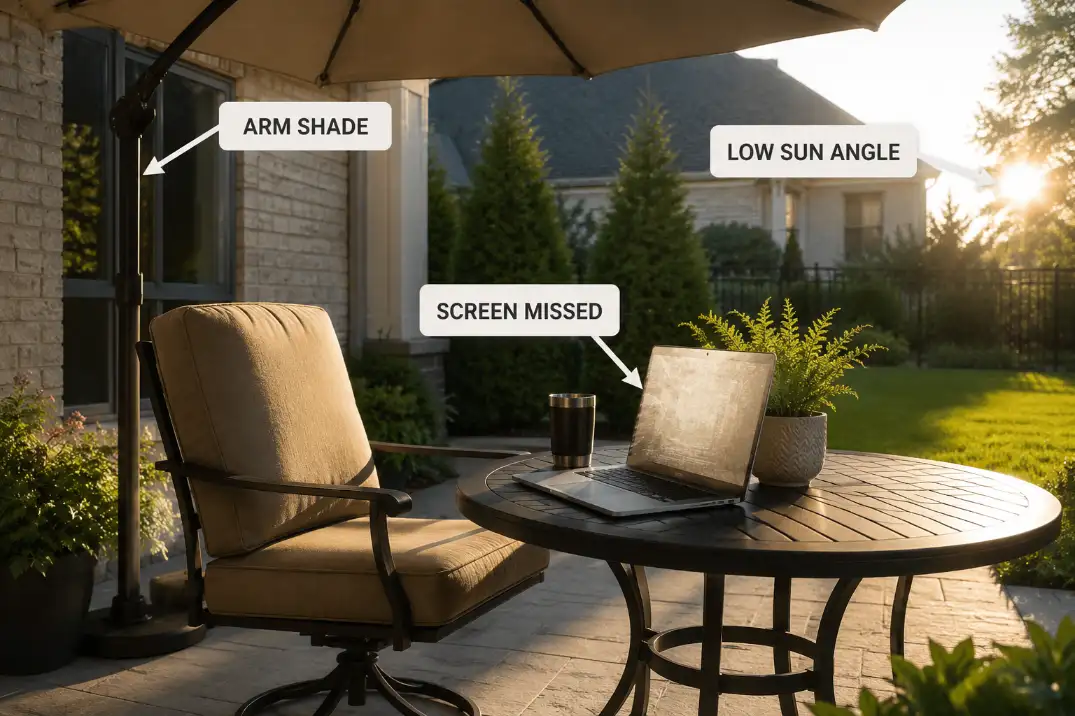
A patio umbrella may shade your shoulders while missing the screen face completely. This happens most often in late afternoon, when the sun is low and angled. A 7.5- to 9-foot umbrella over a small table can still leave the laptop exposed because the light is entering from the side, not from above.
Bigger is not always better. A larger umbrella can crowd a small patio, block movement, and still fail if the pole location, tilt, and canopy reach do not match the sun path.
If you are comparing shade products for a compact work zone, Best Patio Umbrellas for Shade in Small Backyards is most useful when you judge the umbrella by screen shadow, not just seat coverage.
When vertical shade beats overhead shade
For laptop glare, a side screen, shade panel, exterior curtain, tall planter, or wall-adjacent seat can outperform overhead shade. The goal is not to darken the whole patio. The goal is to interrupt the light path that reaches the screen.
Buying Check: Before replacing an umbrella, place the laptop where it will actually sit and see whether the screen face is shaded for at least 30 minutes.
If only your arms are shaded, the umbrella is solving the wrong part of the setup.
A practical rule: if the umbrella shadow covers your arms but not the laptop screen, stop adjusting the chair by inches.
Either tilt the umbrella, move the table 3–6 feet, or add a vertical shade element on the glare side. Repeating tiny adjustments usually turns into a workday nuisance.
Walls and Windows Reflect Light
Reflections can appear only at certain hours
Walls and windows create glare problems that feel random. A neighbor’s window, sliding glass door, white fence, or pale house wall may reflect light toward the laptop for only 30–45 minutes, then disappear. That short window is still enough to ruin a call, writing block, or outdoor work session.
The mistake is looking only for direct sun. If the laptop screen suddenly becomes hard to read while the seat remains shaded, look behind you and to both sides. Look for the bright rectangle first; the laptop may only be reflecting what the patio is throwing at it.
Fix the reflector before moving the whole patio
Sometimes the fix is small: close an interior blind, lower an exterior shade, shift the laptop so the window is no longer behind your shoulder, or place the seat beside a darker background. When the glare comes from a reflected patch, moving even 2–4 feet can matter more than adding a large canopy.
This is also where patio shade planning should protect movement, not just comfort. A shade sail, umbrella, or screen that blocks the only clean walkway can make the setup annoying after the first week.
If the fix starts crowding doors, chairs, or routes, use the same access logic as Add Patio Shade Without Blocking Walkways.
Make the Seat Work First
The laptop should follow the usable seat
The best patio laptop spot is not always the prettiest corner. It is the seat where you can look straight at the screen, keep the keyboard close, avoid squinting, and stay comfortable for at least a 15-minute test.
If you need to twist the chair, hunch forward, or tilt the laptop steeply just to read email, the location is failing.
Use the seat as the anchor. Keep 24–36 inches of clear space behind the chair if it sits near a door or walking path. Keep the screen close enough that you are not leaning forward, but not so close that you are collapsing your posture over the keyboard.
Glare that forces bad posture is not just a visibility issue; it turns the outdoor workspace into something you will avoid.
Quick diagnostic checklist
- Test the same seat at 10 a.m., 1 p.m., and 4 p.m. before calling it a reliable work spot.
- Rotate the laptop 60–90 degrees from the strongest light direction before adding new shade.
- Put a dark matte surface under and behind the laptop for 30 seconds to check bounce glare.
- Look for reflected light from windows, white walls, pale fences, or glass tabletops.
- Stop relying on screen brightness if full brightness is needed for more than 20–30 minutes.
- Move the seat if glare forces neck bending, squinting, or repeated laptop angle changes.
- Keep shade fixes from blocking the door, chair pull-back zone, or main patio path.
The fix order that saves the most time
Do not start with the most expensive change. Start with the change that tests the mechanism.
First, rotate the seat and laptop. Second, calm the bright surface around the screen. Third, create a darker background behind the laptop. Fourth, add side shade if low-angle sun is the trigger. Only after that should you consider a laptop hood, matte protector, brighter display, or larger shade structure.
A laptop hood is a last-mile fix, not a bad-seat fix. It makes sense when you have already found the best seat and still need to work through a bright 60- to 90-minute window. It makes less sense when the table is facing a white wall or sitting on a glowing slab. In that case, the hood may help, but the patio is still fighting you.
If the whole patio is too exposed for normal daytime use, a larger shade plan may be justified. That is where Best Shade Sails and Outdoor Canopies for Hot Patios fits better than another small desk accessory.
The decision point is simple: if the screen only fails in one chair position, fix the work zone; if every chair position fails for hours, fix the patio shade structure.
The simplest working setup is usually not dramatic: a seat turned away from the light path, a matte work surface, a darker background behind the laptop, and shade that protects the screen instead of only the person.
Once those four pieces line up, the patio stops feeling like a place where you can technically work and starts feeling like a place where you actually will.
For broader official guidance on glare and computer workstation setup, see the OSHA Computer Workstations eTool.