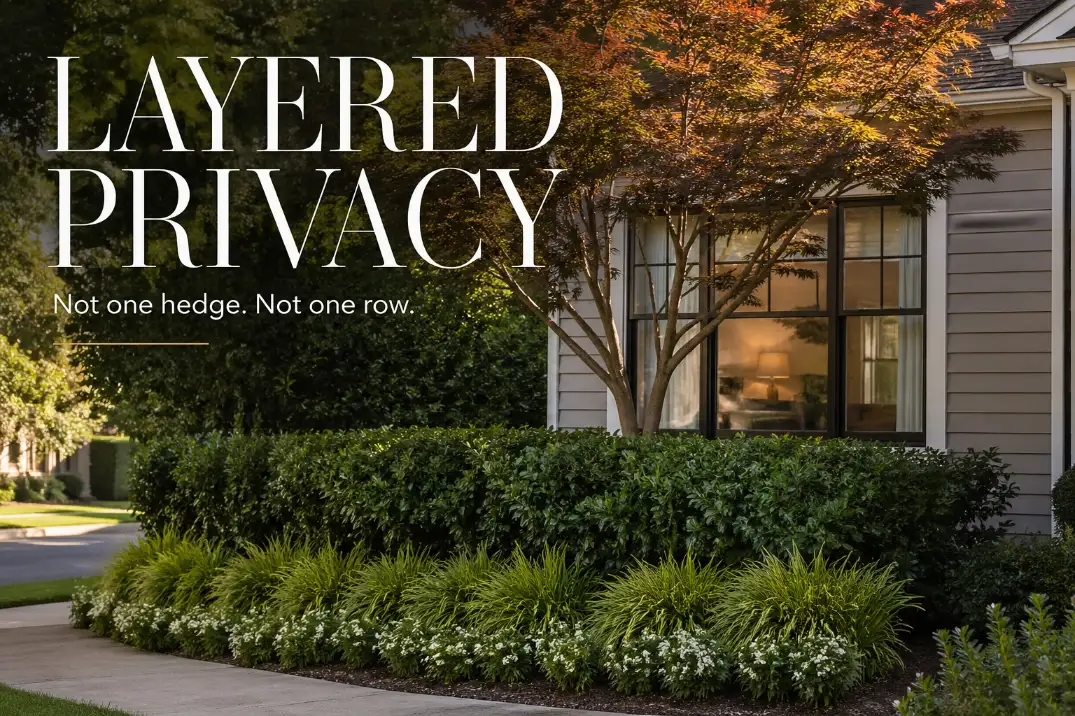
Front yard privacy usually fails when one layer is expected to do the whole job. A single hedge, one row of evergreens, or a few tall planters may block part of the view, but it often looks heavy from the street and still leaves the window exposed from an angle.
A better approach is layered privacy: a low softening layer, a dense middle blocking layer, and a taller layer that breaks the upper sightline.
The most useful privacy zone in many front yards is not 10 or 12 feet high. It is usually between 3 and 7 feet, with the most important sightline around 4 to 6 feet above the ground. Before choosing plants, identify the exact window, porch seat, or front room that feels exposed, then check the view from the sidewalk, curb, driveway edge, and street.
Layer the Sightline, Not the Whole Yard
The goal is not to hide the entire front yard. It is to interrupt the direct view into the place that feels uncomfortable. That distinction keeps the design from becoming oversized, unfriendly, or high-maintenance.
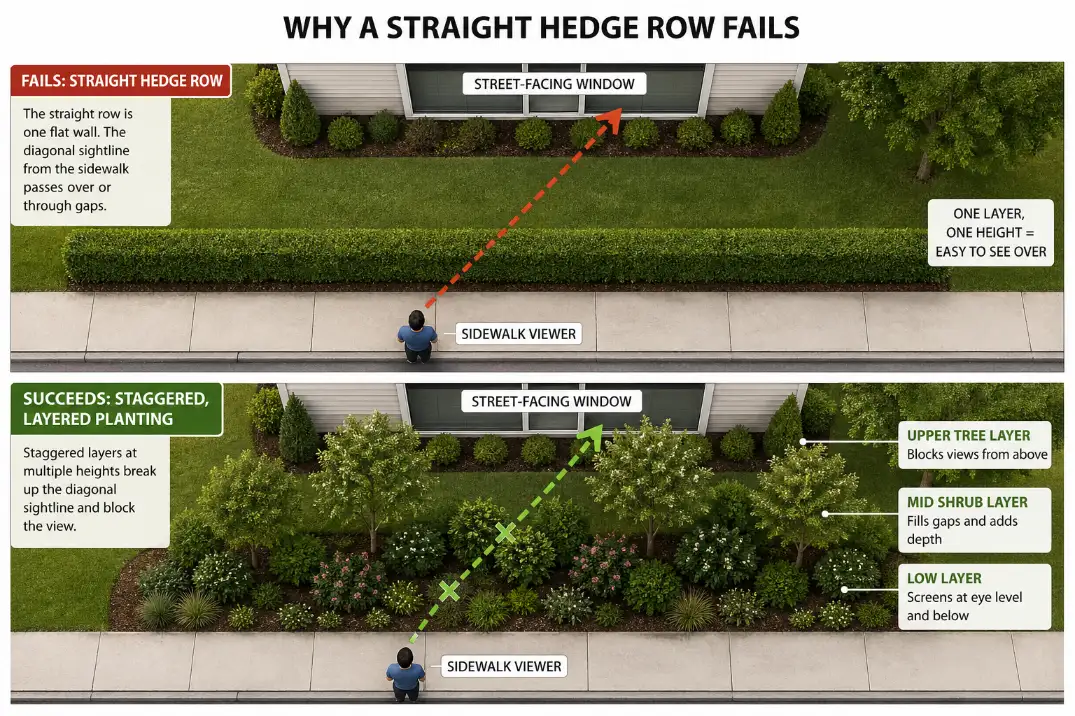
Why one row rarely works well
A straight row looks logical because it feels simple: exposed yard, add screen. But front yard privacy is rarely viewed from one straight-on position. People see the house while walking, parking, turning into a driveway, or standing near the curb.
That is why one row can look dense from the street while still failing from a diagonal angle. It also reads visually as a substitute fence, which is exactly what many front yards are trying to avoid.
For homes where the sidewalk sits very close to the house, the issue is even more precise. The privacy problem is usually proximity and angle, not simply lack of greenery, as explained in Front Yard Privacy Problems When the Sidewalk Runs Only a Few Feet From Your Windows.
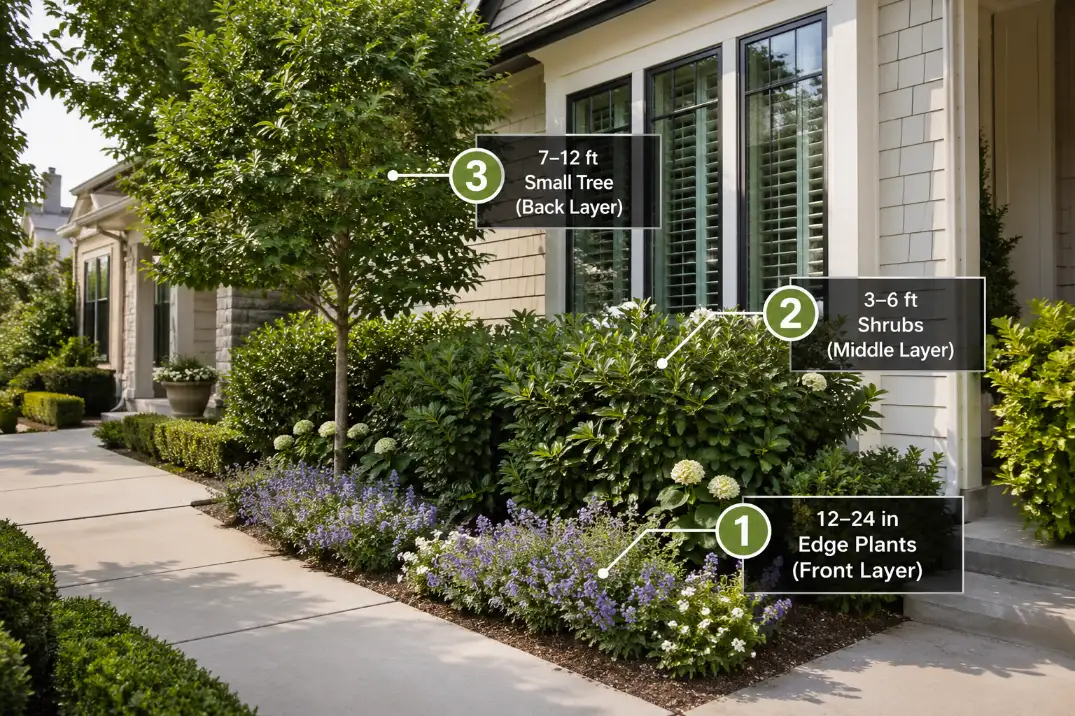
The Layer Formula That Works
A front yard privacy layer should combine height, depth, and job. If all the plants sit in one straight line, the design may still behave like a hedge. The better pattern is staggered: low plants forward, blocking shrubs slightly behind or beside them, and one taller accent offset from the main view.
| Layer | Typical height | Main job |
|---|---|---|
| Low softener | 12–24 inches | Makes the screen look designed |
| Middle blocker | 3–6 feet | Interrupts the main sightline |
| Upper breaker | 7–12 feet | Breaks taller or angled views |
The layers do not need to fill the whole yard. They need to overlap just enough that the eye cannot travel in one clean line from the sidewalk to the exposed window.
The Three Layers That Actually Matter
Each layer has a different job, and the middle layer carries the most weight.
Low layer: the softener
The low layer is usually 12 to 24 inches tall. It may include compact grasses, low shrubs, groundcovers, or sturdy perennials. This layer does not create much privacy by itself, and that is fine.
Its real job is visual. It turns the screen into a designed planting bed instead of a defensive wall. Without it, even attractive 5-foot shrubs can look abrupt near a walkway or front window.
Middle layer: the blocker
The middle layer is the most important part of the system. In many front yards, shrubs that mature around 3 to 6 feet tall are enough to block views into windows, porch seating, or a front sitting area.
Density matters more than height. A loose 7-foot shrub may screen less than a dense 4-foot shrub placed correctly. This is one of the most common misreads: homeowners overestimate height and underestimate structure.
For yards exposed to traffic, the middle layer also has to tolerate dust, wind, reflected heat, and road spray. The plant-selection logic in How to Choose Front Yard Plants for Busy Streets matters more than simply choosing the tallest privacy shrub at the nursery.
Upper layer: the breaker
The upper layer is not a green wall. It is a view breaker. One small ornamental tree, multi-stem tree, or narrow upright shrub can interrupt upper sightlines from raised streets, neighboring windows, or tall vehicles.
This layer often works best between about 7 and 12 feet high. Use it sparingly. One well-placed small tree can make the front elevation feel more private without making the entry feel hidden.
Choose the Layer Pattern by Yard Type
The right layering pattern depends on where the exposure comes from. A wide lawn, close sidewalk, driveway edge, and sloped front yard all need different proportions.
| Front yard condition | Best layering move | What to avoid |
|---|---|---|
| Sidewalk 6–12 ft from windows | Strong 3–5 ft middle layer near the sightline | Tall hedge tight against the house |
| Wide open lawn | Curved island bed 8–15 ft from the house | Property-line hedge that still leaves angles open |
| Driveway open to street | Narrow upright layer plus low softening plants | Blocking driver visibility |
| Yard slopes down to street | Place the middle layer higher on the slope | Adding taller plants only at the curb |
| HOA-sensitive street | Mixed ornamental layers with partial screening | Obvious evergreen wall |
Open lawns need depth, not a border
In a wide open front yard, the instinct is to screen the property edge. That often makes the house feel farther away while doing little for the actual window view. A curved island bed set inside the yard usually works better because it breaks the sightline before it reaches the house.
If the real issue is a constant road view rather than one exposed window, How to Block a Busy Road View in Your Front Yard Without a Fence is the better next step because the layer has to soften movement, headlights, and visual noise—not just one sightline.
This also keeps the entry visible and the yard more welcoming. That balance is the core issue in Front Yard Privacy That Still Looks Welcoming: privacy should improve the view from inside without making the home look closed off from outside.
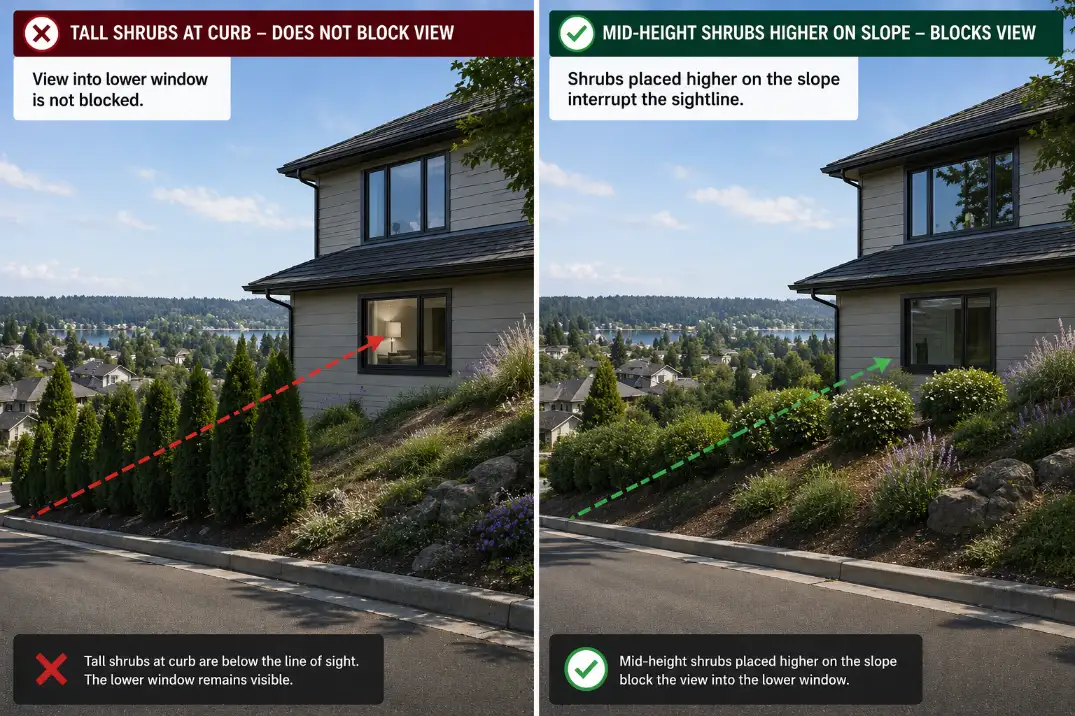
Sloped yards need the layer at the right elevation
On a sloped front yard, plant height matters less than placement. If the house sits below the road, shrubs at the curb may not block the view because people are already looking over them.
Use a temporary 5-foot marker before planting. If the window is still visible from the street, do not keep increasing plant height in that same spot. Move the middle layer uphill or closer to the exposed window.
Common Layering Mistakes
The problem is not always the wrong plant. Often, the layers are arranged in a way that cancels out their advantage.
Putting every layer in one line
If the low plants, shrubs, and taller accents all sit on the same straight edge, the design still reads like a row. Staggering matters. Even a 2- to 4-foot depth change between layers can make the planting feel softer and block angled views better.
Making the upper layer too dominant
A tall plant should break the view, not become the main privacy wall. If the upper layer starts hiding the front door, casting heavy shade over the entry, or making the house look smaller, it has taken over the design.
Using evergreen mass everywhere
Evergreens are useful, especially where winter privacy matters. But a full evergreen block across the front can feel heavy and defensive. Use evergreen structure where the sightline is most exposed, then soften the rest with deciduous shrubs, low planting, and seasonal texture.
Use Plant Roles Instead of Random Privacy Plants
A layered front yard does not need a long plant list. It needs the right roles filled in the right places.
Evergreen structure only where it earns its space
Evergreens are valuable where winter privacy matters. In colder northern states, a screen that feels private in June can become nearly transparent for 4 to 5 months if it relies only on deciduous shrubs and perennials.
But evergreen mass should be selective. If the entire front layer becomes one solid evergreen block, the design starts acting like a hedge wall. Use evergreen structure along the most important sightline, then let softer plants carry the edges.
Deciduous filler for movement and curb appeal
Flowering shrubs and deciduous plants add seasonal change and prevent the privacy layer from feeling rigid. They are useful where privacy is needed mostly during the growing season or where a full evergreen screen would look too heavy.
Low edge planting to finish the composition
The low layer should make the privacy bed feel connected to the yard. Near walkways, keep mature growth at least 18 to 24 inches back from the walking edge so the planting does not crowd the route.
Pro Tip: Design from mature plant size, not nursery size. If a shrub matures 6 feet wide, give it room to become 6 feet wide instead of planting tightly and pruning forever.
What Usually Fails First
The weakest layered privacy plans fail because one layer becomes too dominant. The screen may look effective in the first season, but the imbalance shows up later.
Fast hedges become the whole design
Fast-growing hedges are tempting because they promise results in 1 to 2 years. The problem is that speed rarely stays neat. A hedge that needs pruning more than 3 or 4 times per growing season just to keep the entry visible or the sidewalk clear has stopped being a privacy solution. It has become the main maintenance problem.
Identical rows have no backup
A single row of matching shrubs looks clean until one plant browns out, grows unevenly, or gets damaged by winter burn. Then the entire screen looks broken.
Layering is more forgiving. If one plant struggles, the low layer, middle layer, and upper accents still hold the composition together.
Planters only handle narrow gaps
Tall planters work well for driveway edges, porch corners, and small breaks in the sightline. They are not the best answer for a broad exposed window or long sidewalk view.
Containers dry faster than in-ground beds. In hot or windy weather, some planters may need water every 1 to 2 days. That is fine for a targeted accent, but weak as the main privacy system.
For driveway-specific exposure, Tall Planters for Driveway Privacy is more useful than stretching planters across the whole front yard.
A Better Layering Sequence
The best sequence is not “plant everything at once.” Start with the layer that changes the sightline, then build support around it.
Step 1: Mark the exact exposure
Choose the window, porch seat, or front room that matters most. If the uncomfortable view is only 8 feet wide, do not build a 40-foot screen.
Step 2: Place the middle layer first
Put the 3- to 6-foot shrubs where they interrupt the view, not automatically along the property line. Leave at least 2 to 3 feet between mature foliage and the house wall for airflow, access, and long-term shape.
Step 3: Add the low layer
Use low plants to soften the bed and make the privacy move feel intentional. This is what keeps the middle layer from looking like a planted barrier.
Step 4: Add one upper breaker
Add height only where the view needs it. A small tree or narrow upright shrub should block a specific angle, not dominate the whole front elevation.
If the yard has HOA limits, utility boxes, or a narrow setback, the layering has to be more subtle. Front Yard Privacy Without Fences in Suburban Neighborhoods gives useful context for keeping the screen neighbor-friendly rather than obvious.
When the Layer System Needs Support
Sometimes the best privacy plan is still partial. If a front window sits only a few feet from a public sidewalk, forcing plants to create total privacy can make the yard feel crowded.
In that case, keep the exterior layers lighter and add quiet support indoors: top-down shades, sheer curtains, or window film. These do not replace the landscape, but they reduce the pressure on plants to become too tall, too dense, or too close to the house.
Raised planters and narrow trellises can also support the layer system where allowed, but they should solve a specific sightline. If they start acting like a disguised fence, they usually look heavier than the planting itself.
When Layering Stops Making Sense
Layering has limits near driveways, corners, and intersections. Any plant that blocks driver visibility is in the wrong place, even if it improves privacy. Many front yards also have clear-view areas where tall planting may be restricted.
The practical threshold is simple: if the privacy layer makes it harder to see pedestrians, cars, the mailbox, the front walk, or the entry, it needs to be lower, narrower, or moved.
The best front yard privacy feels partial from the street but complete from the room or porch that matters most. That is the advantage of layering. It does not try to make the whole yard private. It makes the important sightline disappear.
Questions People Usually Ask
Can layered front yard privacy work in one season?
Yes, but only for targeted views. A narrow window view, driveway gap, or porch corner can improve quickly with larger shrubs or planters. A full layered front yard usually takes 2 to 4 growing seasons to settle.
Should the middle layer always be evergreen?
No. Evergreen structure helps where winter privacy matters, but a full evergreen block can look heavy. Use evergreen plants on the most important sightline, then soften the rest with deciduous shrubs and low planting.
Is a taller plant always better?
No. A correctly placed 4-foot dense shrub can block more than a loose 7-foot plant in the wrong spot. Placement and density usually beat height.
How do I know if I have enough layers?
You have enough layers when the direct view into the exposed window or porch is interrupted from the main viewing points, while the front walk, entry, and curb view still feel open.
For broader official guidance on selecting and placing screening plants, see University of Minnesota Extension.