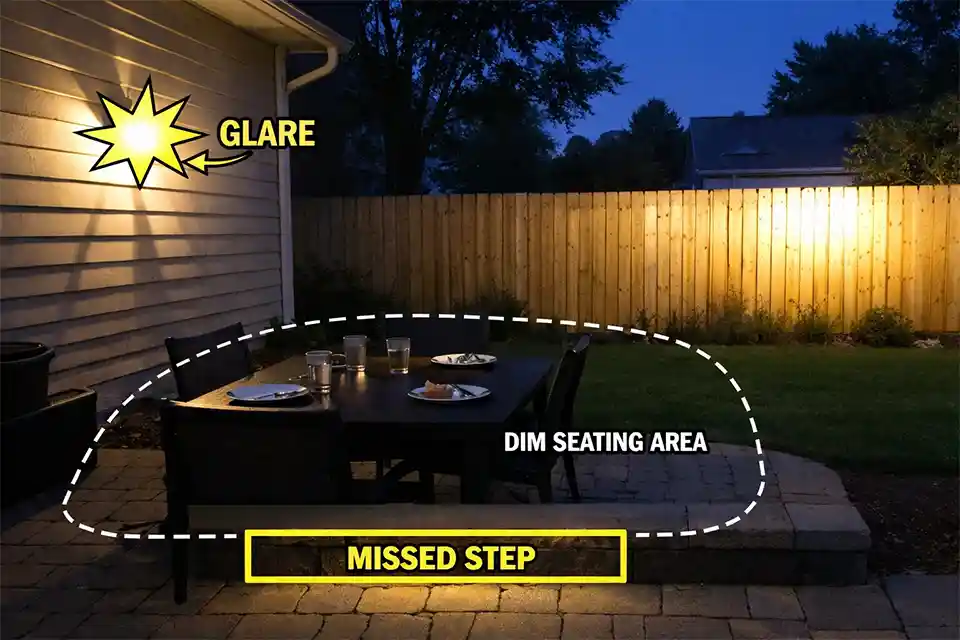
Most backyard lighting problems are not caused by too little light. They come from putting the brightest fixtures in the wrong places, leaving key transitions unreadable, and creating glare that makes darker areas feel worse.
The fastest way to check your yard is to stand outside 15 to 20 minutes after sunset and look for three things: a visible bulb from a seated position 8 to 12 feet away, dark gaps longer than about 6 feet along the main walking route, and step edges that disappear after your eyes leave a brighter nearby zone. Those signals matter more than whether the yard looks bright from inside.
That is the core misread. A backyard can look dramatic through the window and still be awkward once you are in it. One harsh 900-lumen fixture aimed badly can make a patio feel less usable than several lower-output lights placed in the right order.
The real problem is usually contrast, glare, and bad priority, not a simple lack of output.
The backyard lighting mistakes that matter most
Not every mistake deserves equal weight. A few of them ruin evening use early. Others mostly affect appearance.
Lighting the perimeter before the use zones
This is usually the biggest mistake. Homeowners light fences, outer beds, or lawn edges first because those areas create quick visual impact from the house. But nighttime use happens at the table, the steps, the grill, the gate latch, and the route between them.
If the first 3 to 6 feet around seating and circulation stays dim while the boundary glows, the yard will look finished and still feel inconvenient.
Leaving visible bulbs in seated sightlines
A bright source visible from a chair or conversation area creates fatigue fast. This usually happens with low-hung string lights, unshielded wall sconces, decorative lanterns mounted too low, or bollards placed where people look directly across them.
If the fixture itself grabs your attention before the path, table, or step it is supposed to reveal, the problem is glare. More fixtures will not solve that.
Using one kind of light for everything
Backyards become harder to use when one fixture type is expected to handle steps, dining, grilling, and the perimeter at once. The result is predictable: too bright for comfort, too weak for tasks, and too uneven for safe movement.
That same “one solution for every job” problem shows up in broader layout decisions too, which is why Backyard Layout Problems That Make Spaces Hard to Use connects so closely with nighttime usability.
Mixing color temperatures in a compact space
Most patios look calmer when one zone stays within a narrow color range. In many backyards, 2700K to 3000K feels more natural than mixing a warm table light with a noticeably cooler 4000K or 5000K fixture nearby.
Fixtures can look acceptable in isolation. Once installed within 10 feet of each other, the yard starts to feel patchy and overdesigned.
Relying on cheap solar lights for critical paths or steps
Solar fixtures can work for low-priority accents, but they are often given the wrong jobs. A cloudy day, a shaded install spot, dirty panels, or winter sun angle can reduce output enough to make a path turn or step edge unreliable.
The mistake is not using solar. The mistake is treating it as dependable task or safety lighting.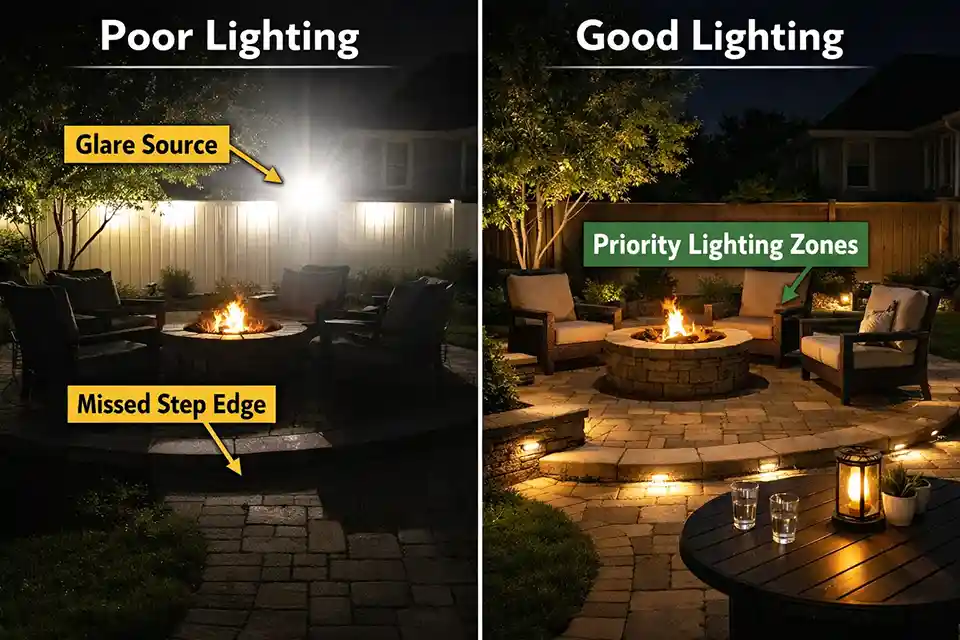
What people usually misread first
Poor backyard lighting is often blamed on bulb strength when the real issue is the relationship between bright and dark zones.
Brightness is not the same as visibility
A path does not become easier to use just because one fixture is brighter. If a wall, post, or corner is much brighter than the walking surface beside it, your eyes keep resetting. The path feels less stable even though the yard technically has more output.
For many residential spaces, a path reading around 1 to 3 foot-candles beside a dining area around 5 to 10 foot-candles usually feels more comfortable than one hot spot surrounded by darkness. The useful comparison is not bright versus dim. It is readable versus tiring.
The lawn usually needs less light than people think
Open turf is one of the most overlit parts of many backyards. Unless the lawn is used for games after dark, broad illumination there rarely changes how the space functions. It mostly adds wattage, glare, and fixture clutter.
The opposite problem is underestimating transitions. A missed step edge or dark turn affects real use more than a dim shrub bed ever will.
Decorative light gets credited for task performance
People often assume that because the yard has atmosphere, it also has usability. Those are not the same thing. A soft glow on planting beds may make the yard look welcoming, but it does not help someone carry plates, check food on a grill, or judge tread depth on a step.
That is the same practical priority that shapes How to Design a Backyard for Everyday Use: everyday function should decide the layout before decorative elements do.
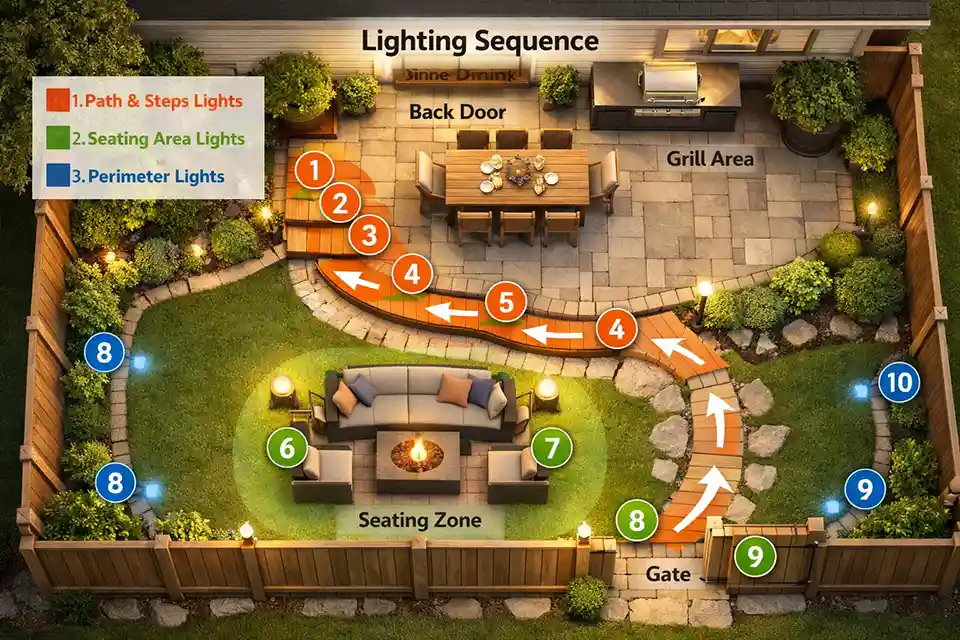
How backyard lighting should be planned for real evening use
The easiest way to avoid most lighting mistakes is to build the scheme in the order people actually use the yard.
Step 1: Light movement points before decorative edges
Start with door-to-patio transitions, steps, path turns, grill routes, and gate hardware. Once these points are readable, the space already becomes easier to use.
As a working rule, many residential paths feel more even when fixtures are spaced roughly 6 to 8 feet apart instead of clustered near the start and forgotten where the route bends.
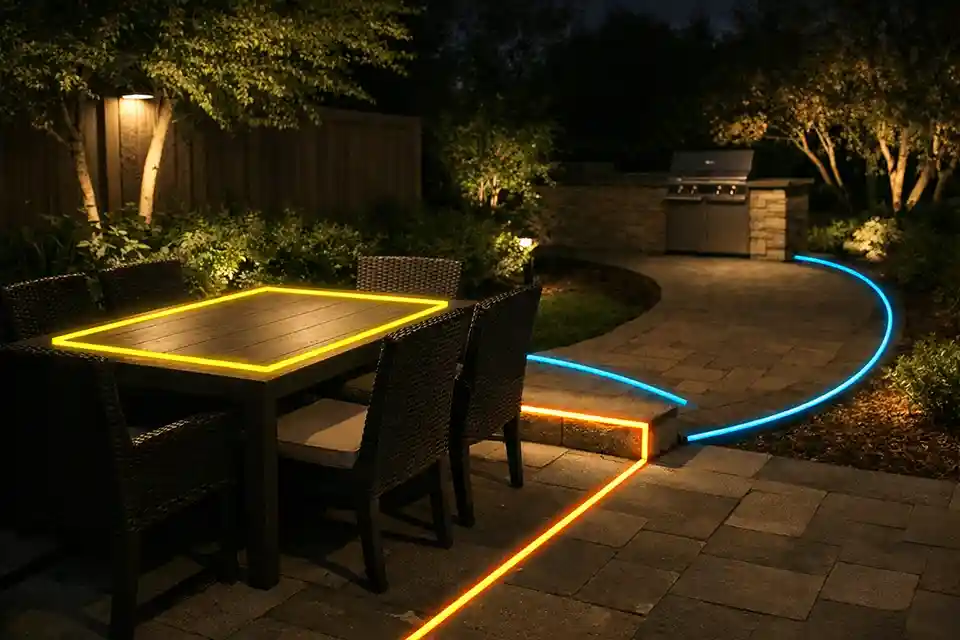
Step 2: Build seating and dining as a separate layer
Seating and dining need a different kind of light from circulation. The goal is comfortable faces, readable table surfaces, and low glare, not spotlight drama.
This is where layered lighting matters. A better backyard separates movement light, task light, and accent light instead of forcing one fixture type to handle all three roles.
Step 3: Remove glare before raising output
If the lamp is visible from a chair, bench, or standing conversation area, fix that first. Shield it, change the angle, reposition it, or lower the mounting height. In many yards, that does more for comfort than buying brighter lamps.
Pro Tip: Turn off half the fixtures for one evening. The lights you genuinely miss are usually the ones doing real work.
Step 4: Keep each zone in one color family
Most patios feel more settled when the main evening-use zones stay in the 2700K to 3000K range. Once noticeably cooler lamps appear inside a compact layout, the whole scheme starts to feel pieced together.
Step 5: Add accent and perimeter light last
Only after the routes, steps, table, and prep surfaces are working should you light trees, fences, or distant beds. Accent lighting is a finish layer, not the functional base of the yard.
That same ordering problem appears in patio planning more broadly, which is why Patio Layout Problems That Make Spaces Hard to Use is closely related.
Wrong fixtures and exposure ratings cause quieter failures
Some lighting problems do not look dramatic at first. They simply make the system less reliable over time.
The wrong fixture for the location
A fixture that works under a covered patio may fail early on an exposed side path, near irrigation overspray, or in freeze-thaw conditions. If water intrusion, corrosion, or intermittent flicker shows up within one season, the issue is usually fixture fit or connection quality, not bad luck.
For exposed locations, weather resistance matters more than squeezing out a little extra brightness on day one.
Cheap housings become maintenance problems fast
Low-cost fixtures often fail in the same pattern: seals weaken, finishes fade, hardware corrodes, and aiming drifts. That matters because small alignment changes can undo an otherwise good plan.
People often overestimate the value of very cheap fixtures and underestimate the cost of replacing them 12 to 18 months later.
Installation quality matters more than people think
A good fixture badly installed can still create a weak system. Loose wire protection, unstable mounting, and poor connection placement show up later as flicker, inconsistent brightness, or lights that stop working after rain.
This is one point where a routine fix stops making sense. If you are repeatedly replacing bulbs or resetting connections in the same exposed area, the problem is probably not the lamp anymore.
When the obvious fix stops making sense
The obvious fix is to add more fixtures. That often wastes time.
Once the step edges are readable, the dining zone is usable, and the main route is clear, more output usually gives diminishing returns. After that point, the bigger gains come from shielding, aiming, mounting height, or layout changes.
Quick Diagnostic Checklist
- The yard looks brighter from indoors than it feels when you stand in it.
- You can see the fixture source more clearly than the surface it should light.
- One fixture is trying to serve steps, seating, and a path at the same time.
- The brightest zone in the yard is not where people actually spend time.
- After 10 to 15 minutes outside, the space still feels visually tiring.
- The same exposed fixture keeps flickering, corroding, or shifting out of aim.
If these signals are present, you probably do not need more light. You need a better hierarchy or better fixture fit.
When layout is the real problem
If the grill sits in a pinch point, the seating interrupts circulation, or the only way to light a level change is with a glaring wall fixture at head height, another lighting tweak may not be enough.
That is usually the point where the issue stops being strictly lighting and starts being zoning. Backyard Zoning Mistakes That Hurt Outdoor Flow matters here because a bad nighttime experience often reveals a daytime planning flaw that was already present.
Practical targets that help more than guesswork
| Zone | What good lighting does | Common failure | Useful starting point |
|---|---|---|---|
| Steps | Shows tread depth and edge | Bright riser, dark tread | 100–200 lumens per small shielded fixture |
| Paths | Marks direction and turns | Hot spots with dark gaps | Often 6–8 feet between fixtures |
| Dining area | Lets people see faces and table surface | Harsh overhead glare | Around 300–800 lumens depending on size |
| Grill or prep zone | Shows hand detail and food color | Backlighting without task light | Around 500–1000 lumens aimed at the work surface |
| Accent perimeter | Adds depth without dominating | Brighter than the patio | Keep clearly secondary to use zones |
These are working ranges, not rigid formulas. A compact patio in coastal California may need less output than a larger open yard in Arizona, where darker surroundings and wider spacing change how contrast reads.
Questions people usually ask
Are solar lights enough for backyard steps?
Usually not as the only light source for important steps or sharp turns. They can work as secondary markers, but key safety points need more consistent performance than low-cost solar fixtures often provide through cloudy weather, shade, and winter conditions.
How far apart should backyard path lights be?
In many residential layouts, about 6 to 8 feet is a useful starting point, then adjust based on beam spread, mounting height, and how dark the spaces between fixtures feel on site. The goal is readable transitions, not perfectly even dots of light.
A backyard works at night when the important surfaces stay readable, bright sources stay out of your eyes, and decorative light stays secondary to real use. Most failures come from getting that order backward.
For broader official guidance, see the U.S. Department of Energy’s outdoor solar lighting guide.