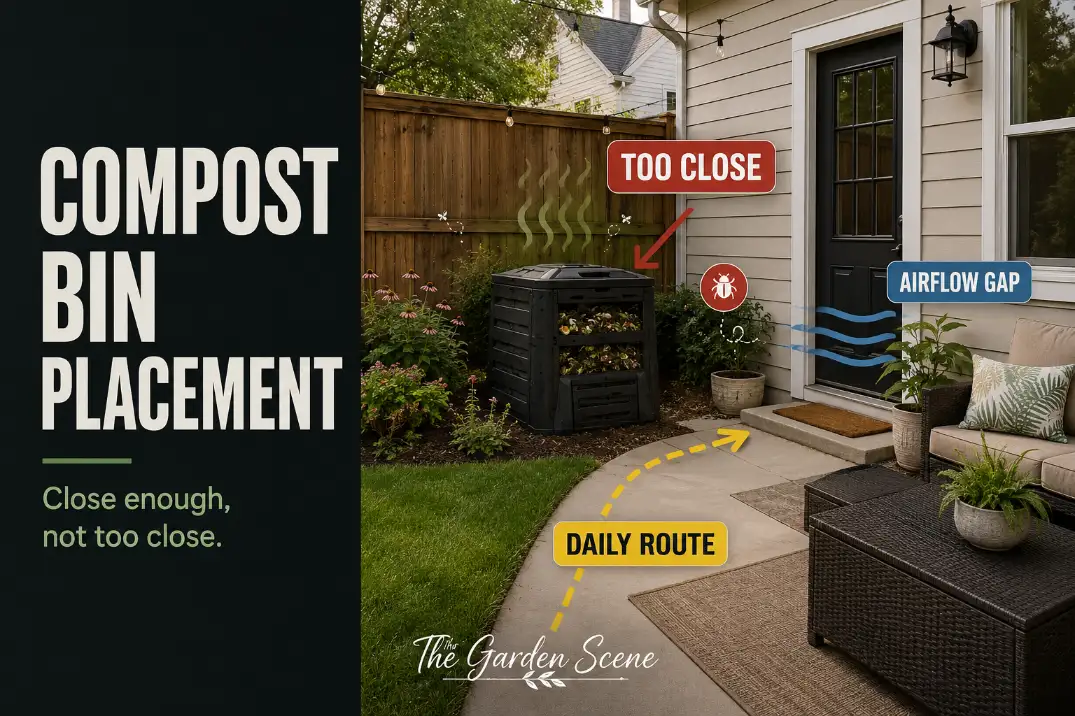
A compost bin works best in a small backyard when it sits on a dry, reachable side route: close enough to use several times a week, far enough from seating, doors, and windows, and open enough for airflow.
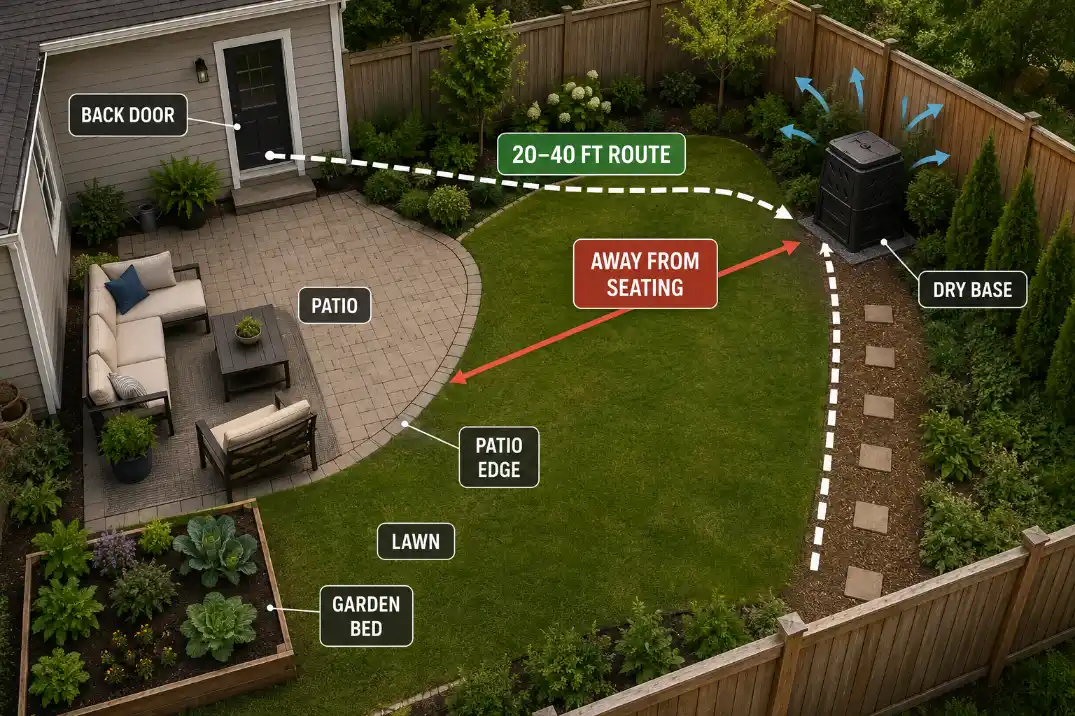
The first checks are simple. Keep the bin roughly 20–40 feet from the kitchen route when possible, avoid placing it within about 6–10 feet of patio seating, and leave at least 24–36 inches of clear working space in front.
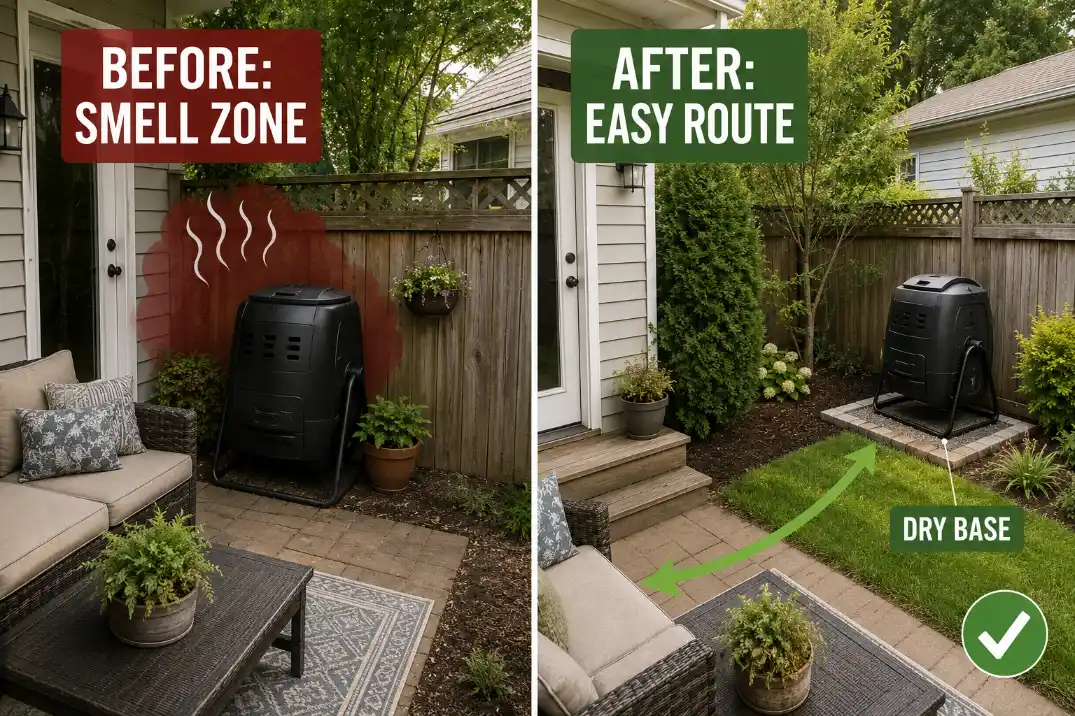
A smelly compost bin is usually not failing because composting is messy by nature. It is usually failing because the spot encourages wet scraps, poor airflow, skipped maintenance, or pest access. If the bin stays soggy for more than 24–48 hours after rain, sits tight against a fence, or forces you to cross the patio with food scraps, the location is already working against you.
Good compost bin placement in small backyards is not about hiding the bin as far away as possible. It is about making the right habit easy without letting the bin take over the outdoor living area.
The Smell Problem Starts With Placement
Compost odor is a symptom. The underlying mechanism is usually excess moisture, not enough oxygen, too many fresh “green” scraps, or food scraps left uncovered. Placement matters because it either makes those problems easy to correct or easy to ignore.
The most likely odor pattern
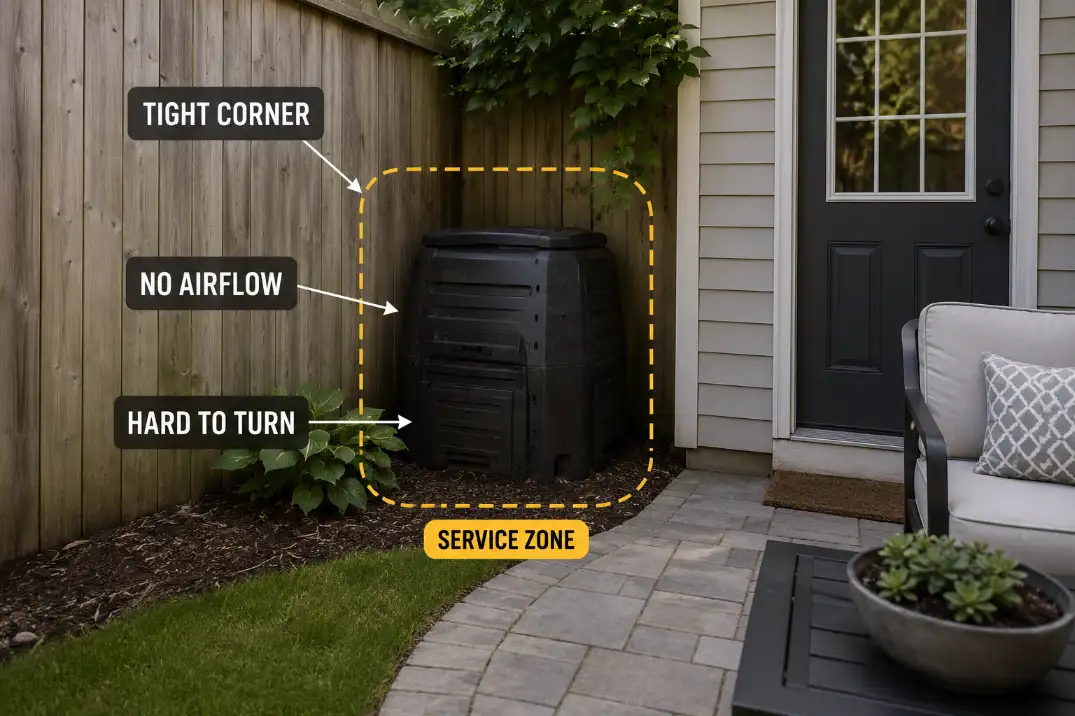
The most common small-yard smell problem is a bin tucked into a shaded fence corner with poor air movement. Shade itself is not the enemy. A little shade can help prevent the pile from drying out too fast in hot summer weather. The problem is shade plus trapped moisture plus no room to work.
When wet food scraps, fresh grass clippings, and dense material sit compacted with little oxygen, the bin shifts from earthy decomposition to sour, anaerobic breakdown.
A healthy compost bin should smell mostly earthy or faintly like leaf litter. A failing one smells sharp, rotten, or swampy within a day or two after scraps are added.
That distinction matters. Moving the bin farther away may reduce how often you notice the odor, but it does not fix the oxygen and moisture pattern that caused it.
Covering scraps matters more than hiding the bin
Kitchen scraps should not sit exposed at the top of the bin. A safer starting habit is to cover fresh food scraps with several inches of dry leaves, shredded paper, small twigs, or other brown material each time you add them.
For a small backyard bin, a rough 3 parts browns to 1 part greens by volume is a practical starting point.
This is where placement affects the recipe. If dry browns are stored 30 feet away in a wet corner, they will not get used consistently. If a small covered container of leaves or shredded paper sits beside the bin, covering scraps becomes automatic.
What people misread first
People often blame the bin type before they blame the location. A sealed plastic bin, open wire bin, or tumbler can all smell if the pile stays wet and oxygen-starved. A more expensive bin in the same damp, forgotten corner may only hide the problem for a few weeks.
The fix that often wastes time is moving the bin to the farthest back corner simply because it smells. That usually makes the bin harder to feed, harder to balance, harder to turn, and easier to ignore.
Too Close to Seating
A compost bin should not compete with the part of the yard where people sit, eat, grill, open windows, or step outside barefoot. In a small backyard, this does not mean the bin needs to disappear. It means the bin should sit outside the patio’s comfort pocket.
Protect the outdoor living zone first
As a practical rule, avoid placing a compost bin within about 6–10 feet of dining chairs, lounge seating, a grill prep zone, a back door landing, or frequently opened windows.
That buffer gives odors, fruit flies, and lid-opening mess a little space before they reach the areas people actually use.
If the yard is very tight, prioritize separation from seating over perfect separation from the fence. A bin 4 feet from a fence with open sides and a dry base is usually better than a bin 4 feet from a dining chair. The seating area is the more sensitive zone.
This is the same kind of layout judgment that makes Small Backyard Fix Priorities so important: the first fix should protect daily use, not just make the yard look tidier.
Do not solve patio smell by moving it onto the neighbor line
The opposite mistake is pushing the compost bin right against the back fence or property line to protect the patio. That may keep the smell away from your chair, but it can create a neighbor issue, block airflow, and make the bin harder to service.
Some cities, HOAs, or local composting rules may have setback requirements for compost bins, especially near property lines.
Even when no rule applies, the practical standard is simple: do not place the bin where odors, pests, or lid noise become someone else’s problem.
A better spot is often along a side edge of the yard, just off the main patio route. That keeps the bin reachable without making it part of the seating scene.
Too Far to Use Daily
A compost bin placed too far away is cleaner in theory and worse in real life. Small backyard composting depends on repeated small habits, not occasional large cleanup sessions.
The 20–40 foot rule
For most small backyards, the best compost location is usually within about 20–40 feet of the kitchen door or the route you already use.
If it is much farther, especially across wet grass, behind stored items, or around a gate, daily food scraps start waiting indoors.
That delay often creates the smell before the compost bin does. A countertop bucket full of scraps for several days becomes a wet batch dump, and wet batch dumping is harder to balance than small additions.
A bin used 4–5 times per week can stay steadier because scraps arrive in smaller amounts and can be covered immediately with dry material. A bin used once every 10–14 days often receives too much wet material at once.
Access matters more than distance alone
The best location is not always the closest spot. It is the closest spot that stays easy in bad weather. If you need to step through mud, squeeze around furniture, lift a lid against a fence, or drag a bucket through a narrow chair gap, the location is not easy enough.
A clear 24–30 inch working lane in front of the bin is usually enough for daily use. If you plan to turn the pile with a fork or shovel, 36 inches is better.
Less than that tends to make the bin feel like a chore, especially when the contents are wet or the lid is awkward.
In tight yards, this is where compost placement overlaps with overall storage judgment. A bin that blocks tools, toys, or chair movement can create the same daily friction described in Storage Mistakes in Small Backyards.
When a tumbler makes more sense than an open pile
In a very small backyard, a tumbler or enclosed bin may make more sense than an open pile, especially near patios, pets, or shared fences. The advantage is control: a lid, cleaner edges, and less loose material around the base.
But a tumbler does not cancel bad placement. If it sits in a wet low spot, blocks the patio route, or stays too far away to use, the same habits fail. Choose the bin style for control, then choose the location for daily use.
Shade, Drainage, and Access
The best compost spot is not simply “sun” or “shade.” It is the place where moisture, air, and access stay balanced through normal backyard use.
Balance moisture, not just sun exposure
Partial shade is often helpful in hot climates because it slows drying. In dry Arizona-style conditions, a bin in harsh afternoon sun may need water added more often, especially if the material dries out in less than 2–3 days. In humid Florida or coastal regions, the bigger risk is often the opposite: a bin that stays damp, shaded, and still.
The practical test is texture. Compost material should feel like a wrung-out sponge, not like soup and not like dry straw. If a handful drips water, the mix or location is too wet. If it falls apart dusty and dry, the bin may be getting too much sun, too much airflow, or too little moisture.
Drainage should be boring
A compost bin should not sit where water pools after rain. If the ground stays soft for more than 24–48 hours after normal rainfall, choose a slightly higher spot or create a simple level base with pavers, gravel, or compacted mulch around the working edge.
The goal is not to build a patio for the bin. It is to keep your feet, the lower bin edge, and the surrounding soil from turning into a wet mess.
Poor drainage also creates a common misread. People assume the compost is failing because they added the wrong scraps, when the real problem is that the bin sits in a damp pocket of the yard.
Small bins may compost slowly
A compact backyard bin can still be useful, but it may not heat and break down material as quickly as a larger pile. Fast hot composting usually needs enough mass to hold warmth and moisture, often closer to a 3 feet by 3 feet by 3 feet pile than a tiny corner container.
That is not a failure. A small backyard bin may behave more like slow, low-odor waste handling than fast hot composting.
In a compact yard, that is often the better goal anyway: clean, steady, usable composting that does not disrupt the patio.
| Placement Signal | Healthy Condition | Problem Condition | Better Decision |
|---|---|---|---|
| Smell | Earthy after opening | Sour or rotten within 1–2 days | Add dry browns and improve airflow |
| Moisture | Damp like a wrung-out sponge | Drips or stays soggy | Move off wet ground or raise the base |
| Distance | About 20–40 feet from kitchen route | So far scraps pile up indoors | Move closer to a daily path |
| Working space | 24–36 inch clear front area | Lid or fork use feels cramped | Shift bin sideways before screening |
| Scraps | Covered with dry browns | Fresh food sits exposed | Keep browns beside the bin |
| Fence line | Airflow and access remain open | Pressed tight to fence or neighbor side | Check setbacks and leave service room |
Screening Without Hiding Trouble
Screening a compost bin makes sense in a small backyard, but only after the bin already works. Screening should soften the view, not bury the problem.
Screen the view, not the service side
The most useful screen is usually partial: a slatted panel, low planting, or fence-side visual buffer that blocks the patio view while leaving the front and at least one side easy to reach.
A solid enclosure on three sides may look clean, but it can trap moisture, reduce air movement, and make turning or emptying awkward. Keep at least 12 inches of breathing room around the bin where possible, and more on the side where you lift, stir, or remove finished compost.
If the screen makes you avoid opening the bin, it is not a screen. It is a maintenance problem with a nicer face.
Do not let plants become the lid
Shrubs and ornamental grasses are useful for softening a compost corner, but they should not lean into the lid, block the front, or drop heavy debris into the bin every week. A plant that looks small at planting time can easily double in width over a few seasons.
This is a condition many homeowners underestimate. They plan for the bin’s footprint, not the mature plant spread plus the standing space needed to use the bin.
The same crowding problem shows up around seating and paths in Backyard Plants Crowding Paths and Seating, and compost areas are even less forgiving because they need regular handling.
Screening should not invite pests
A compost bin should be visually softened, but it should not become a hidden feeding station. Avoid placing it where loose scraps can spill behind plants, under a fence gap, or into a dark corner you rarely check. If you cannot see spilled scraps behind the screen, pests may find them before you do.
Meat, dairy, grease, and oily cooked foods are especially poor fits for a small backyard compost bin because they can attract pests and create strong odors.
In a compact yard, it is better to keep the system boring: plant scraps, fruit and vegetable trimmings, coffee grounds, leaves, shredded paper, and other manageable materials.
Pro Tip: Place the bin first, then screen the view from the patio. Do not design the screen first and force the bin into whatever space is left.
Easy Enough to Keep Using
The right compost location survives real use: rain, evening kitchen scraps, full hands, muddy shoes, and a lid that needs to open without a fight.
Use the rainy-evening test
Before committing to a location, picture using the bin on a rainy evening with a small container of food scraps. Can you reach it without stepping through mud? Can you open the lid with one hand? Is there room to add a scoop of dry leaves or shredded paper? Can you get back to the door without walking around furniture?
If the answer is no, the bin is too hidden, too far, or too cramped. A compost setup that works only on a dry Saturday afternoon is not a daily-use setup.
This is also why compost zones should not interrupt the broader backyard route. If the bin sits where people already move between the patio, lawn, hose, gate, or storage, it will feel like clutter even when it is technically useful. That same route-first thinking applies in Side Yard Access for Mowers and Wheelbarrows when narrow outdoor spaces need to stay functional.
Know when the standard fix stops working
The standard fix for a smelly bin is adding dry browns and turning the pile. That makes sense when the bin has enough airflow and access. It stops making sense when the location itself keeps the pile wet, blocked, or ignored.
If the bin still smells sour after 7–10 days of adding dry material, reducing wet scraps, covering food, and mixing the contents, stop treating it as only a compost recipe problem. Check the site. A bin sitting in poor drainage, pressed against a fence, hidden behind plants, or wedged near seating may need relocation more than another layer of leaves.
The best compost bin spot in a small backyard is dry, reachable, lightly screened, and outside the main seating area. If a location fails one of those tests, the bin may still be visible, but it will not stay easy.
Quick Placement Checklist
Use this checklist before buying a bin, building a screen, or moving the compost again:
- Keep the bin roughly 20–40 feet from the kitchen route when possible.
- Leave about 6–10 feet between the bin and patio seating, doors, or frequently opened windows.
- Keep 24–36 inches of clear working space in front of the bin.
- Avoid ground that stays soggy for more than 24–48 hours after rain.
- Keep dry browns within a few steps so scraps can be covered immediately.
- Check local setback rules before placing the bin directly on a property line.
- Screen the patio view, not the lid, airflow, or service side.
Questions People Usually Ask
Should a compost bin be in sun or shade?
Partial shade is usually the safest starting point in a small backyard. Full sun can dry the bin too fast in hot, dry climates, while deep shade can keep it too wet in humid areas. The better test is moisture: the material should stay damp without dripping.
Can I put a compost bin next to a fence?
Yes, but do not press it tight against the fence. Leave room for airflow, lid movement, turning, and cleanup. If the fence is also a property line, check local rules and use common sense about odor and pest control.
Is it okay to hide a compost bin behind plants?
Yes, as long as the plants do not block the lid, front access, airflow, or drainage. Low side planting or a partial screen is usually better than surrounding the bin on all sides.
What is the biggest placement mistake?
The biggest mistake is hiding the bin so well that it becomes inconvenient. Composting fails faster from skipped use, poor access, wet corners, and uncovered scraps than from being visible in the yard.
For broader official guidance on balancing compost materials and covering food scraps, see the EPA home composting guide.