Last updated: July 4, 2026
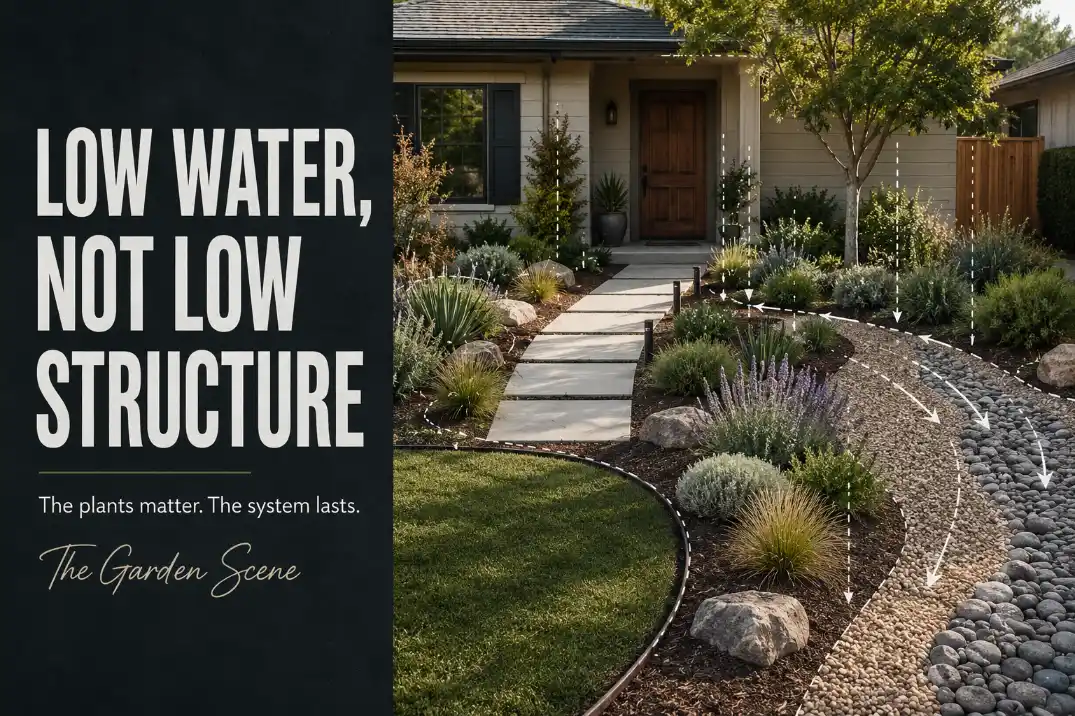
Low-water front yard landscaping does not fail because homeowners forgot one magic plant. It fails when the yard is redesigned in the wrong order.
A front yard can have drought-tolerant plants, mulch, gravel, and drip irrigation and still need constant correction. The soil may shed water before roots can use it. The driveway edge may bake plants that were chosen for a gentler bed.
The lawn may be removed without replacing the visual structure it used to provide. The irrigation may keep rescuing one badly placed plant while overwatering everything around it.
That is the real decision here: not “Which plants use less water?” but “Which yard decisions reduce water demand without making the front yard look thin, harsh, or unfinished?”
A lasting low-water front yard usually follows this order:
- Read how water already moves through the yard.
- Group plants by water need and exposure.
- Reduce lawn where it actually lowers water pressure.
- Make soil cover, mulch, and hardscape support the same water logic.
- Use irrigation to establish the design, then adjust it as the landscape matures.
Skip that order, and the yard can still become expensive, patchy, and fussy. That is why some quick front yard fixes that cost more later look smart at first but create more watering, replacement, and cleanup later.
Low-Water Landscaping Is a System, Not a Plant List
The first setup decision is to stop treating “low-water” as a plant label. A plant can be drought tolerant and still be wrong for the spot, wrong for the irrigation zone, or wrong for the amount of reflected heat near the driveway.
A plant-first approach usually begins with a list: lavender, ornamental grasses, agave, sedum, native shrubs, or whatever fits the region. Some of those plants may be excellent choices in the right place. But if they are scattered across the yard without water grouping, mature spacing, soil behavior, and establishment logic, they can still fail.
A system-first approach starts with the yard itself. It asks where water collects, where it runs off, where soil dries quickly, where heat increases stress, and where the front entry needs structure. Plant choice comes after that.
That difference matters because front yards have a public job. They are not just planting areas. They frame the house, guide visitors, soften hard edges, and create curb appeal. A yard can use less water and still look neglected if the layout has no rhythm, the entry disappears, or every surface reads as leftover filler.
The sequence should be simple:
- Read the site before choosing materials.
- Group plants by similar water needs.
- Reduce or reshape lawn only where it helps.
- Use mulch and permeable surfaces to manage moisture and heat.
- Let irrigation support establishment instead of rescuing bad placement.
- Maintain the system lightly so it does not drift back into high-water behavior.
That is the standard for this page: not a no-water yard, and not a plant catalog. A low-water front yard that lasts is one where every major decision reduces pressure on the next one.
Read How Water Moves Before You Redesign the Yard
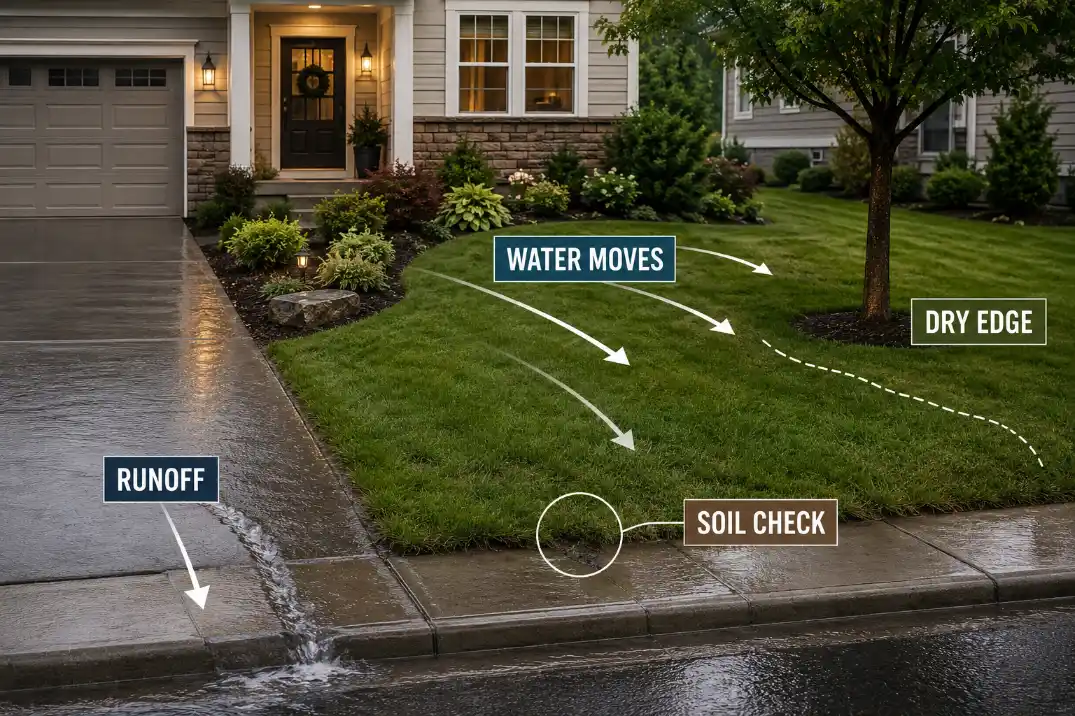
The first physical check is water movement. Before removing lawn, ordering plants, or spreading mulch, watch the front yard after rain or irrigation. The useful clues appear before the redesign begins.
Look for where water runs first. A front yard that slopes toward the sidewalk may send irrigation water into the street before roots can use it. A yard that slopes toward the house may create moisture problems near the foundation. A low area beside a walkway may stay damp long after the rest of the yard dries.
Also notice where the soil dries first. The strip along a driveway or sidewalk often behaves differently from the planting bed near the house. Pavement reflects heat, increases evaporation, and can stress plants that would perform better away from that edge.
The same plant can behave like a low-water choice in one part of the yard and a struggling, thirsty plant in another.
Compaction is another hidden issue. Front yards are often compacted by construction, foot traffic, parked vehicles near the edge, or years of mowing. Compacted soil can shed water instead of absorbing it. When that happens, adding low-water plants does not solve the real problem; water still moves past the root zone.
Check the different exposure zones
A useful front yard water reading separates the yard into practical zones:
- The foundation edge, where roofline, shade, and soil moisture may differ.
- The walkway edge, where foot traffic and reflected heat matter.
- The driveway edge, where heat and runoff often increase stress.
- The curb or street edge, where wind, road heat, and irrigation overspray can be harder to control.
- Any low spot where water collects after rain.
The point is not to turn this into a drainage project unless there is a real drainage problem. The point is to know which areas can support very low-water planting and which areas need more careful soil, surface, or irrigation decisions.
Group Plants by Water Need Before You Group Them by Style
Plant grouping is where a low-water front yard becomes easier, or quietly becomes a yard that needs constant exceptions.
The practical idea is hydrozoning: plants with similar water needs belong together, and irrigation should be able to serve each group without overwatering one area to keep another alive.
EPA WaterSense describes hydrozones as grouping vegetation with similar watering needs so each zone can be watered according to its own needs rather than treating turf, shrubs, and planting beds the same way.
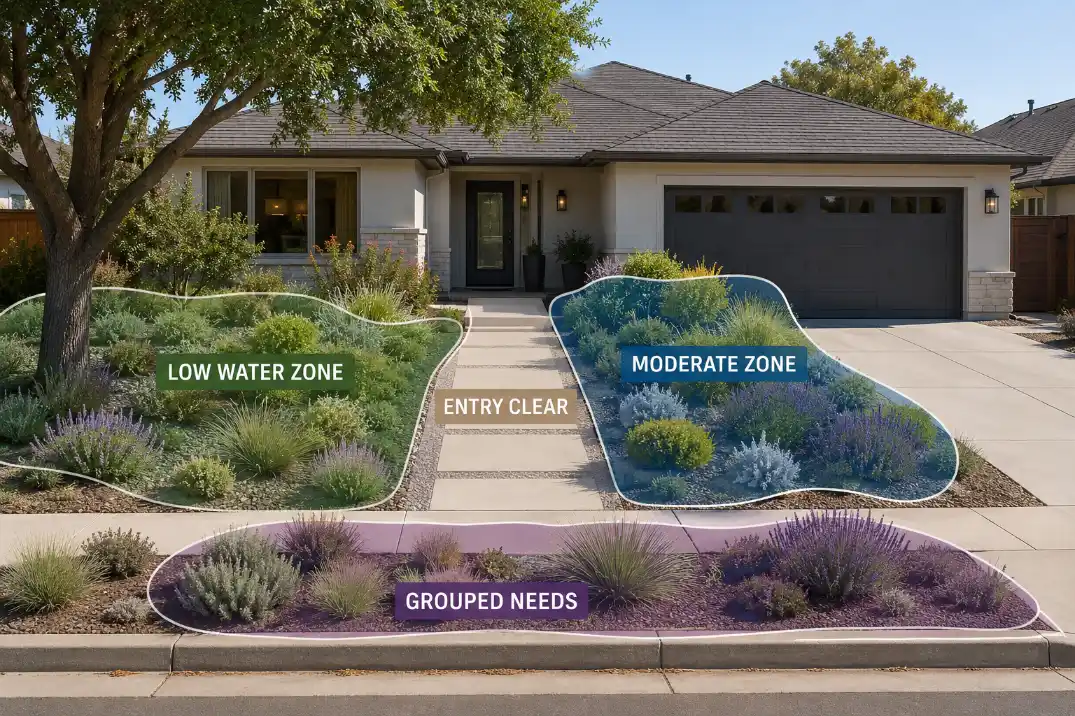
For a front yard, this does not need to become technical. Think in three working groups:
- Low-water zones for the driest, hottest, most exposed areas once plants are established.
- Moderate-water zones for beds that need more consistent moisture, especially during establishment.
- Transition zones where the design shifts from house, walkway, driveway, or street edge.
The mistake is grouping plants only by appearance. A homeowner may place three attractive plants together because the colors work, even though one wants regular moisture, one wants sharp drainage, and one tolerates dry soil after establishment. The bed may look coherent for a few months, then become uneven: one plant grows too fast, one burns at the edge, and one looks overwatered.
Mature size is part of water grouping
Water grouping is not only about watering frequency. It is also about mature size.
Crowded plants create maintenance pressure. They need more pruning, trap debris, shade each other unevenly, and make it harder to see where water is actually landing. A low-water planting plan that ignores mature spread can become high-maintenance even if every plant is technically drought tolerant.
Use repeated masses instead of scattered singles. Three or five plants with similar needs usually read calmer than a collection of individual specimens. In a front yard, that repetition protects curb appeal. It makes the low-water design look intentional rather than like a set of unrelated replacements.
Near the house, choose grouping that frames the architecture without blocking windows or hiding the entry. Near the driveway, expect heat and occasional reflected stress. Near the walkway, keep the plant mass low or controlled enough that visitors are not brushing against it. Near the street, avoid plants that need steady pampering to stay presentable.
Reduce Lawn Where It Actually Lowers Water Pressure
Lawn reduction should be aimed at the areas causing the water problem, not at the idea of lawn itself.
A narrow strip between sidewalk and street may be difficult to irrigate without overspray. A hot edge along the driveway may brown out every summer. A sloped patch may shed water before the roots can use it. Those are good candidates for redesign because the lawn is already asking for more water than the space deserves.
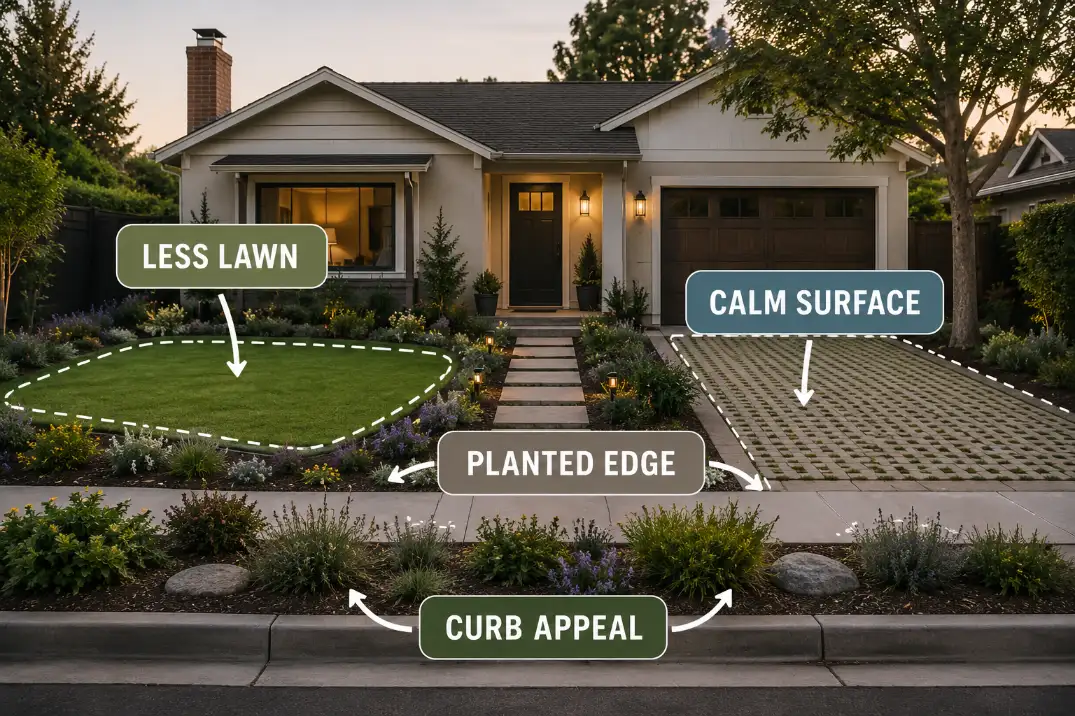
A central lawn panel, however, may still have a role if it gives the house breathing room, keeps the yard calm, and can be watered efficiently. A smaller, purposeful green area can sometimes look better and use less water than a full lawn replaced with scattered gravel, random shrubs, and disconnected mulch islands.
The decision should be based on pressure, not trend.
Remove or shrink lawn where it reduces irrigation waste, mowing difficulty, runoff, or repeated brown spots. Keep or reshape lawn where it still gives the front yard structure and does not fight the site conditions.
When the yard needs a fuller lawn-free framework, the next decision belongs to front yard design without lawn, not to this page. Here, the key is simpler: reduced lawn should support the low-water system, not become the whole design idea.
Make Soil Cover, Mulch, and Hardscape Follow the Same Water Logic
The surface layer has to support the water plan. If mulch, stone, pavers, and planting edges are chosen only for appearance, they can work against the low-water goal.
Mulch is not just a decorative finish. Used correctly, it moderates soil temperature, reduces surface evaporation, protects bare soil from crusting, and helps beds look unified. Used carelessly, it can slide, wash out, pile against stems, or create a false sense that the planting bed is finished.
A practical mulch layer is usually around 2–3 inches, adjusted for the material and site. Keep it away from plant crowns, trunks, and siding. Too little mulch exposes soil.
Too much mulch can hold moisture where it should not, bury small plants, or make the bed look heavy.
Hardscape has a similar trade-off. Permeable surfaces can help reduce runoff when they are placed where water can actually enter the soil. But too much hardscape, especially near pavement and full sun, can raise reflected heat and make nearby plants need more water, not less.
The entry path also matters. A low-water yard can quickly look unfinished if the path is weak, narrow, or visually lost between gravel, mulch, and planting. Good front yard walkway choices that still feel inviting help the reduced-water design read as intentional from the curb.
| Low-water decision | Water problem it controls | What to check before finalizing |
|---|---|---|
| Group plants by hydrozone | Overwatering one plant to save another | Similar water needs, exposure, and mature spread |
| Reduce inefficient lawn | Overspray, runoff, and repeated dry patches | Whether the lawn area is hard to irrigate or still useful |
| Use mulch correctly | Fast evaporation and bare soil crusting | Depth, edge control, and clearance from stems |
| Add permeable surfaces carefully | Runoff from hard surfaces | Whether water can enter soil instead of moving sideways |
| Keep the entry clear | Low-water yard looking sparse or confusing | Path visibility, open space, and planting restraint |
The table is the real setup test. If a design choice does not control a water problem, protect structure, or reduce future maintenance, it may just be decoration wearing a low-water label.
Irrigation Should Establish the Design, Not Rescue It
Irrigation is not the fix for a poorly grouped low-water yard. It is the support system for a design that already makes sense.
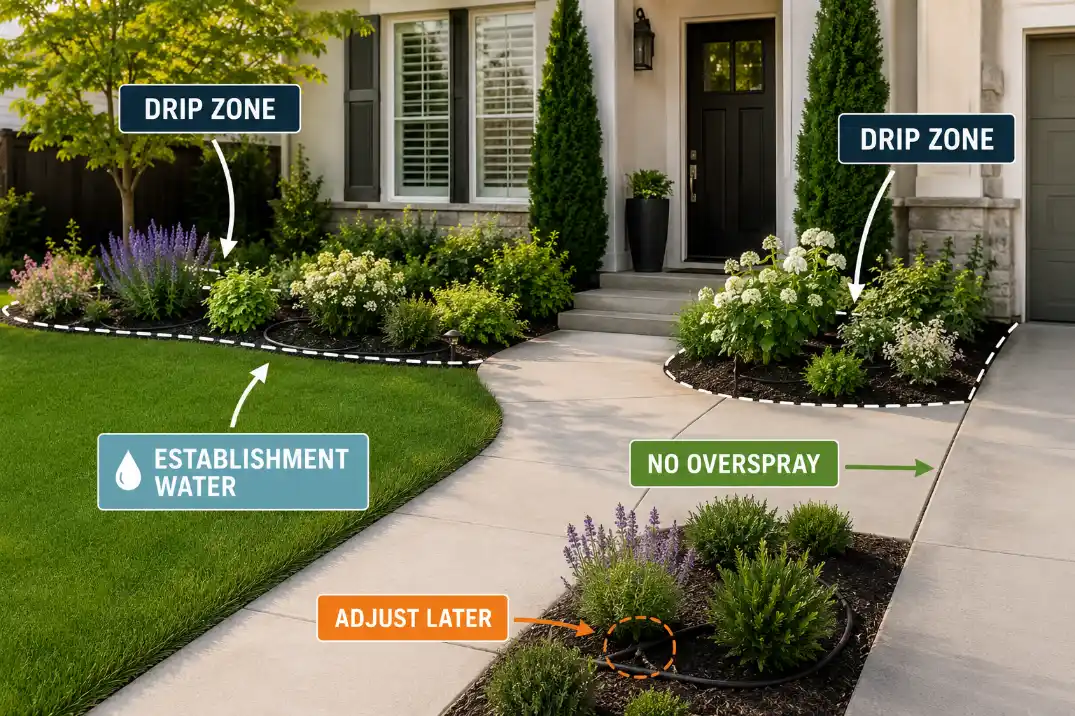
Drip irrigation can be useful because it delivers water near the root zone instead of spraying pavement, sidewalks, or empty spaces. But drip is not magic. If low-water plants, moderate-water plants, and thirsty lawn are all forced into the same watering logic, the system still wastes water or stresses plants.
UC Marin Master Gardeners gives the same practical warning in irrigation terms: plants with similar water needs should be placed in the same zone or valve, and conventional spray and drip should not be placed on the same valve.
Establishment water is not failure
New low-water landscapes still need establishment watering. That does not mean the design failed. It means the plants have not yet developed the root systems that allow them to handle lower-water conditions.
Field Check: Low-water does not mean no establishment water. The first season is when the design is learning the site. Water deeply enough for roots to establish, watch which edges dry first, and adjust gradually. The mistake is keeping the first-season watering pattern forever after the plants no longer need it.
The irrigation setup should match the sequence:
- Put plants with similar water needs on the same practical zone.
- Avoid spray patterns that hit pavement, walls, or unused mulch.
- Give new plants enough establishment water to root properly.
- Reduce or adjust watering as plants mature.
- Watch for one plant forcing the whole zone to receive more water than it should.
This is also where the plant-first approach becomes expensive. If one moisture-loving plant is placed in a dry, low-water zone, irrigation has to rescue that plant. Then the nearby low-water plants may receive too much moisture. One bad placement can distort the whole zone.
Maintenance Is Where Low-Water Design Proves Itself
A low-water front yard is not proven on installation day. It is proven after the first hot stretch, the first dry edge, the first mulch thinning, and the first plant that grows larger than expected.
The maintenance should be light, but it cannot be absent.
Refresh mulch when it thins or exposes soil. Do not bury crowns or keep piling new mulch against old layers without checking what is happening underneath. Prune for plant health, entry visibility, and mature shape, not constant tight control.
If a plant fails, replace it according to the same hydrozone logic instead of filling the hole with whatever looks good at the garden center that week.
Irrigation needs occasional checking, too. Emitters clog, lines shift, and overspray can appear after small changes. A low-water system can quietly become wasteful if one zone keeps running on an establishment schedule or if water is landing on pavement instead of root zones.
This is where curb appeal and water use meet. A front yard that uses less water but hides the entry, lets plants crowd the walkway, or leaves bare patches at the curb will still feel like a problem.
Many front yard landscaping mistakes that lower home value are not dramatic failures; they are small design and maintenance decisions that make the house feel less cared for.
Use this quick stability check before assuming the yard is truly low-water:
- Plant groups still match their water needs and exposure.
- Mulch covers soil without burying stems, trunks, or siding.
- Irrigation is adjusted after establishment, not stuck on the first-season setting.
- Dry edges are expected and planted accordingly, not constantly rescued.
- Walkways, driveway edges, windows, and the front door remain visible.
- Replacements follow the original water logic instead of restarting the problem.
If the yard fails this check, the answer is not always “water more.” Often the better answer is to regroup, reduce pressure, or correct the surface layer that is making plants work too hard.
A Lasting Low-Water Front Yard Still Has to Read as a Front Yard
The final test is not whether the yard contains low-water elements. The final test is whether it still reads as a composed front yard.
The house should feel framed. The front door should be easy to read. The walkway should feel intentional. Planting masses should repeat enough to create rhythm. Open space should look deliberate, not abandoned. Hardscape should support the entry, not scatter the eye across unrelated surfaces.
That is why low-water design cannot be reduced to plant labels. A drought-tolerant plant in the wrong zone becomes a maintenance problem. A lawn removed without structure becomes a visual problem. Mulch used without edge control becomes a cleanup problem. Irrigation used to rescue poor grouping becomes a water problem.
The lasting version is more disciplined. It reads the site first, groups plants honestly, reduces lawn where the lawn is wasting effort, uses surfaces to support moisture behavior, waters for establishment, and then backs off as the landscape becomes stable.
Low-water front yard landscaping works best when less water is not the only goal; the real goal is a front yard that asks for less because it was organized correctly from the start.