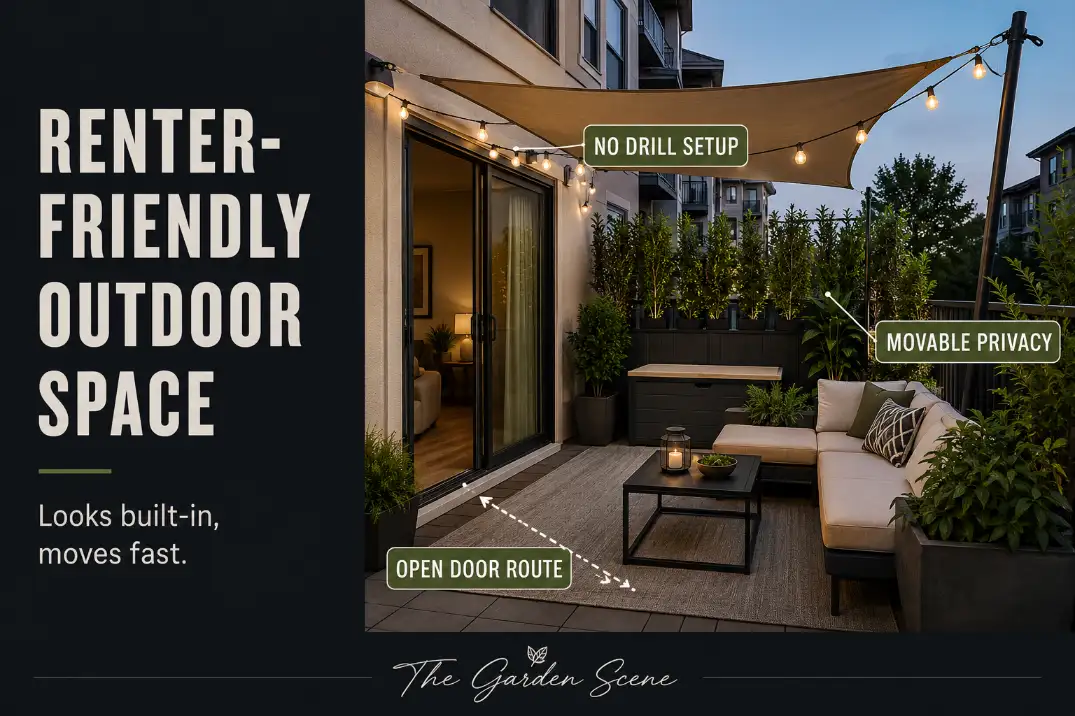
The best renter-friendly outdoor space ideas use freestanding, weighted, removable, or plug-in pieces that improve an apartment balcony, small patio, or townhouse yard without drilling into the building or blocking the door route.
Start with the lease-safe hierarchy: freestanding first, weighted second, clamp or tension only if allowed, removable ties only where rules permit, and drilled hardware only with written permission.
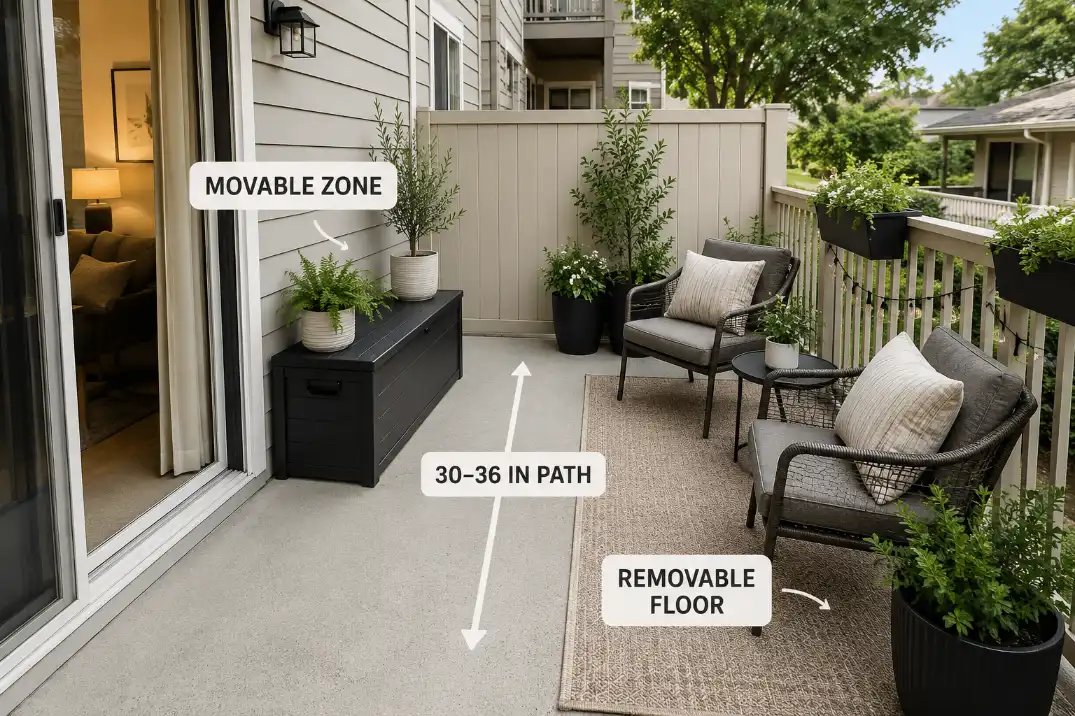
The first practical checks are simple. Keep a 30–36 inch walking route from the door, make sure the main setup can be reset in about 10 minutes, and test rugs, shade, screens, and lights through at least 2–3 real evenings or one weather cycle.
This is what separates a reversible outdoor room from a temporary patio makeover. The goal is not to buy the most portable-looking pieces. It is to make movable pieces feel intentional, stable, and easy to remove.
Start With What Can Move
Match the idea to the rental type
A lease-safe outdoor space starts with the kind of rental you actually have. A balcony has different limits than a ground-level apartment patio, and a townhouse yard gives more freedom but still may have lease, HOA, drainage, or exterior-attachment rules.
On a balcony, the safest ideas are lightweight seating, removable rugs, low planters, clamp lights where allowed, and privacy pieces that do not overload or pull on the railing. On a ground-floor apartment patio, the strongest moves are usually privacy, shade, storage, and a clear route from the sliding door.
In a townhouse rental yard, movable zones can go farther: freestanding screens, outdoor rugs, deck boxes, umbrella bases, and planters can make the space feel more like a small backyard without changing the structure.
The common thread is reversibility. If the upgrade cannot be removed without tools, patching, scraping, repainting, or explaining damage, it is not truly renter-friendly.
Build the room from movable anchors
The mistake many renters make is starting with the prettiest object: a large sectional, a privacy screen, a fire bowl, or a canopy. The better first move is to identify the anchors that can change position without damage.
A chair pair, narrow bench, rolling cart, outdoor rug, planter cluster, and battery or solar light can define the space without touching siding, stucco, railings, posts, or concrete.
A useful test is the 10-minute reset. If you cannot move the main pieces out of the walking route in 10 minutes, the setup is probably too fixed for a rental. That does not mean everything has to be flimsy.
It means weight should come from movable bases, planters, benches, and deck boxes rather than screws, brackets, or permanent mounts.
For apartment patios and small rental yards, the route from the door matters more than the furniture photo. A compact layout that keeps the entry open will usually feel better than a larger setup that blocks the first step outside.
The same principle applies in Keep Patio Entry Clear: the outdoor room fails fast when the door zone becomes the storage zone.
Start with the floor only if it can drain
Flooring is one of the biggest renter upgrades, but it is also one of the easiest to misread. Outdoor rugs, snap-together deck tiles, and artificial turf can make a concrete slab or balcony floor feel finished quickly. They become a problem when they trap water, curl at the door, or hide dirt under the surface.
Use the 24–48 hour drying test. After rain or washing, lift a corner and check whether water is still sitting underneath. If the floor layer stays damp for more than 48 hours, it can create odor, staining, mildew, or a dirty edge near the sliding door.
In a hot, dry climate, a rug may dry quickly but fade or curl faster. In humid areas, trapped moisture is usually the bigger issue.
Deck tiles can work well on flat, draining surfaces, but they should not bridge over low spots where water already collects. Artificial grass can soften a balcony visually, but it often needs more cleaning than renters expect if pets, pollen, or leaf debris are part of the space. A floor upgrade is worth it only when it makes the patio easier to use and easier to reset.
Privacy Without Building
Block the view line, not the whole patio
Renter-friendly privacy should be aimed, not wrapped around the entire space. The goal is usually to interrupt one view line: the neighbor’s balcony, the sidewalk edge, the parking area, or the direct view into the seating chair.
A 6-foot screen in the wrong place can still leave the sitting position exposed, while a 4-foot planter group placed on the view line can make the space feel calmer.
Before buying anything, sit where you actually plan to sit and look outward from 6–8 feet away. That quick sightline test tells you whether the privacy problem is low, eye-level, or coming from above.
For more patio-specific screening logic, Patio Privacy Ideas for Secluded Seating is a useful next layer because it focuses on the seat position, not just the property edge.
Use weight instead of attachment
The best renter-friendly privacy pieces are usually weighted by function: tall planters, storage benches, freestanding trellis panels, folding screens, or planter-screen combinations. They should resist casual shifting but still be removable.
A narrow planter that is 10–14 inches deep may look sleek, but it can become unstable with a tall screen unless the base is heavy enough and the wind exposure is mild.
What renters often overestimate is height. More height does not automatically create more privacy if the screen sits too far from the seating area. What they underestimate is placement. A modest screen near the chair back or side can block the uncomfortable view without making the whole patio feel boxed in.
Do not turn the railing into a sail
Bamboo rolls, fabric panels, and tied-on privacy screens can look renter-friendly because they are removable. The weak point is wind. A screen tied tightly to a balcony railing can act like a sail, especially on upper floors or exposed corners.
If normal afternoon wind makes the screen pull, rattle, lean, or need repositioning, the setup is not stable enough.
Freestanding screens are not automatically better either. They need weight, depth, or a protected position.
A good privacy setup should survive ordinary weather without being dragged back into place every evening. If it only works on calm days, it is a photo solution, not a living solution.
Shade Without Drilling
Follow the no-drill hierarchy
Shade is where rental spaces get overbuilt quickly. A shade sail looks clean in photos, but most sails need tension, strong anchor points, and permission. Without proper anchors, they sag, flap, or pull on surfaces that were never meant to carry that load. For renters, freestanding shade is usually the safer first choice.
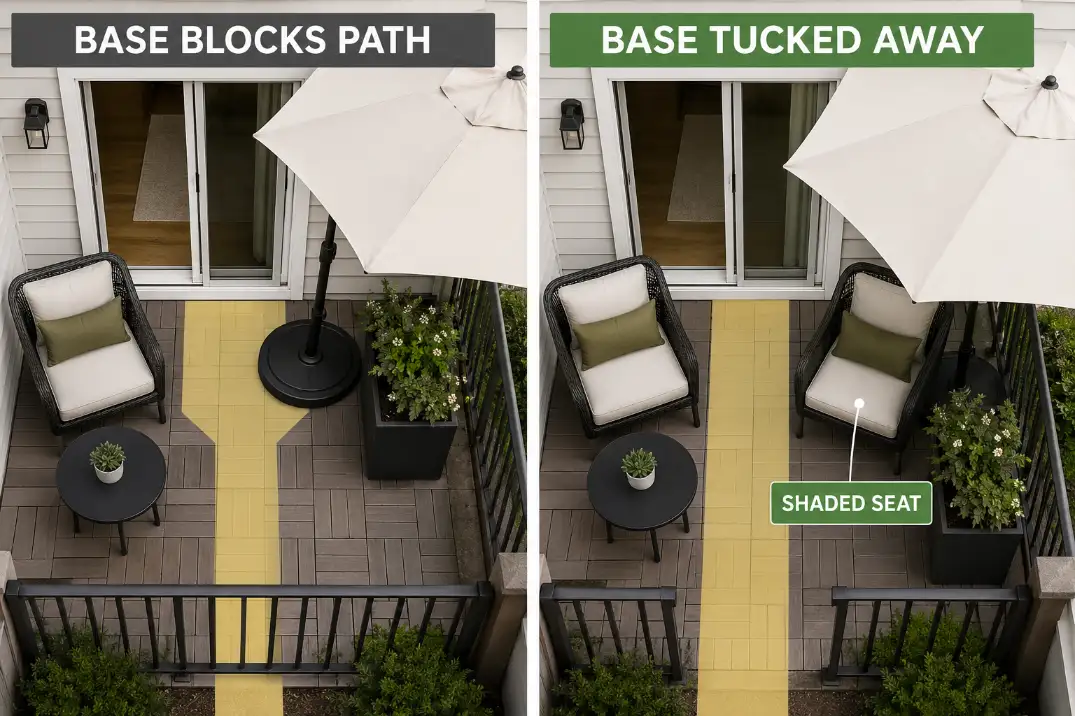
The no-drill shade order is simple: umbrella with weighted base first, clamp umbrella only if the lease or building rules allow it, freestanding canopy only if it does not block the route, and shade sail only with proper anchor points and written permission.
That order prevents the most common mistake: treating a permanent shade method as if it becomes renter-friendly just because the material is fabric.
A market umbrella, cantilever umbrella, clamp umbrella, or small pop-up canopy can work if it shades the sitting position during the actual problem window.
Test the space between 2 p.m. and 5 p.m. if afternoon sun is the issue. Moving shade 18 inches can matter more than buying a larger canopy.
The practical limit is wind and route space. If the base blocks the only walkway, the shade has solved heat by creating a movement problem.
That is why shade placement should be checked with the chair pulled out, not just with the patio staged for a photo. A deeper breakdown of that tradeoff appears in Add Patio Shade Without Blocking Walkways.
Pro Tip: Put the shade base beside a planter, bench, or storage piece so it reads as part of the layout instead of a random obstacle.
When portable shade stops making sense
Portable shade stops making sense when it has to stay open in wind, when the base sits in the main path, or when the canopy needs to be so large that it overwhelms the patio. In those cases, smaller shade zones are better than one big solution.
A shaded chair pair, a narrow bistro corner, or a movable reading spot can feel intentional without pretending the rental patio is a permanent outdoor room.
Storage That Does Not Take Over
Store what actually lives outside
Outdoor storage should reduce friction, not become a second junk drawer. In rental spaces, the best storage usually holds the things that are used outdoors at least once a week: cushions, small tools, throws, grilling accessories where allowed, or watering supplies.
If the item is used once a season, it probably does not deserve prime patio space.
A storage bench or low deck box works better than a tall cabinet in most renter-friendly layouts because it can double as seating, a side surface, or a visual edge. The danger is size creep.
A box deeper than 24 inches can eat the front half of a balcony or narrow patio, especially if the lid needs room to open.
Once the storage piece has to work as seating, side surface, and cushion storage, the choice becomes less about maximum capacity and more about footprint; that is where Best Small Patio Storage Solutions helps narrow the decision instead of simply hiding more stuff.
Keep the storage away from the first step
The first 3 feet outside the door should not become the place where watering cans, shoes, folded chairs, and delivery boxes collect. That zone controls whether the outdoor space feels usable on an ordinary weekday.
A storage piece placed along the side wall or back edge is usually better than one sitting directly beside the threshold.
The point where a storage fix stops making sense is easy to spot: if you have to move stored items before you can sit down, the storage is now part of the problem.
A rental patio should reset in 5 minutes, not require a small cleanup session before every use.
Lighting Without Permanent Wiring
Light the use zones, not the whole perimeter
Renter-friendly lighting should make the seating, step, table, and route readable without creating glare into windows or neighbors’ spaces.
Permanent wiring is rarely the right first move in a rental, and even plug-in lighting should be outdoor-rated, protected from puddling, and routed where no one trips over cords.
For most small patios, three light types are enough: one soft table or lantern light, one low route or step light, and one background glow from solar or battery pieces. Warm light around 2700K usually feels more comfortable than harsh white light, especially near faces and glass doors.
After installation, check it after dark for 15 minutes from both inside and outside the unit. If the light looks nice from the couch but blinds the person sitting outside, it is decoration, not usable lighting.
A small outdoor space usually needs less light than people expect. The goal is not to outline every edge. It is to help people see where to sit, step, and set things down. Light a Small Patio Without Clutter fits this problem well because the best lighting plan often removes visual noise instead of adding more fixtures.
Pro Tip: Rechargeable table lamps are often better than string lights when the lease, outlet location, or railing rules are unclear.
Avoid the temporary-but-messy look
Temporary lighting looks messy when cords cross the floor, string lights sag between weak points, or solar stakes line the patio like a runway.
A cleaner approach is to attach lighting to movable objects: a planter, umbrella pole, shelf, table, or storage bench. The object moves; the light moves with it.
This is also where renters should avoid overcommitting. Test lighting for 2–3 evenings before adding more. Night use reveals glare, shadows, neighbor spill, and awkward cord paths that are easy to miss during setup.
| Need | Renter-Safe Move | Risky Shortcut | Stop Line |
|---|---|---|---|
| Privacy | Weighted planter screen | Tied fabric on exposed railing | Moves or pulls in normal wind |
| Shade | Umbrella with weighted base | Tensioned sail without permission | Base blocks the only walking route |
| Flooring | Draining rug or removable tiles | Turf or rug trapping water | Still damp after 48 hours |
| Storage | Bench or low deck box | Tall cabinet near the door | Door zone becomes storage |
| Lighting | Rechargeable or outdoor-rated plug-in light | Sagging string lights across traffic | Cord or light crosses the walking path |
| Finished look | Repeated materials and grouped pieces | Many small decor items | Setup takes over 10 minutes to reset |
Finished Without Feeling Temporary
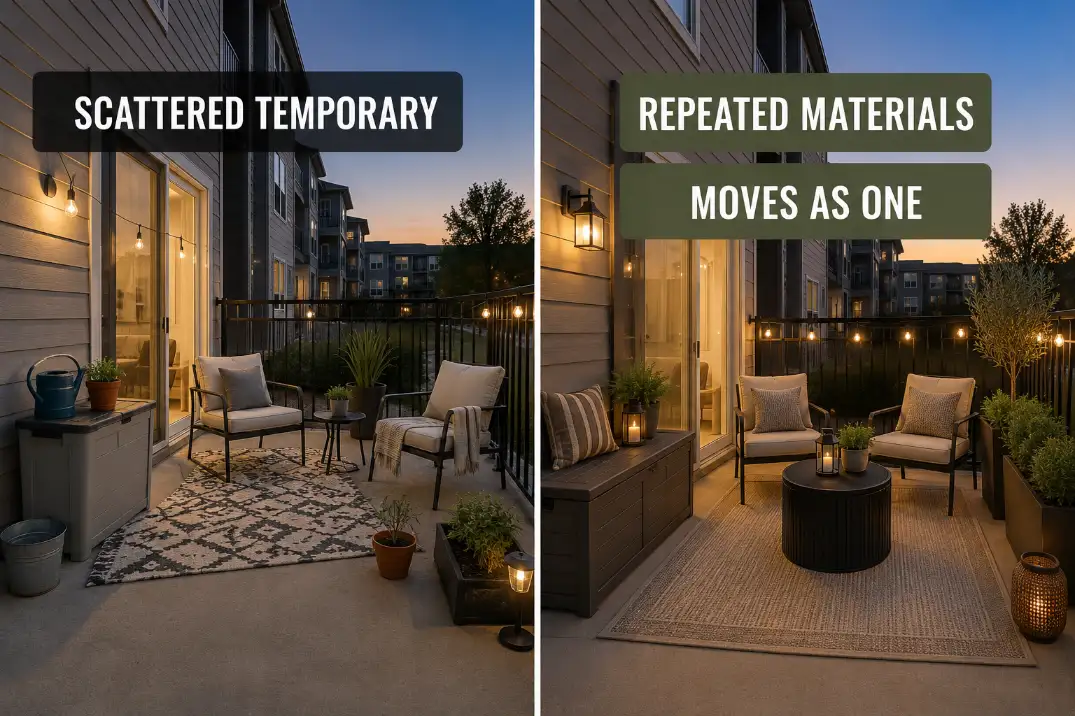
Repeat materials, not clutter
A rental-friendly space feels finished when the movable pieces look intentional together. That does not require a full matching set.
It usually means repeating two or three materials: black metal, warm wood, woven texture, terracotta, neutral fabric, or one consistent planter color. Repetition does more for a rental patio than scattered decor.
The most common overestimate here is decorative volume. More pillows, more lanterns, and more small pots can make the space feel staged but harder to use.
The stronger finish is usually one outdoor rug, one planter group, one useful side table, and one lighting layer that actually supports how the space is used.
A good final test is the 48-hour weather check. After rain, wind, or strong sun, look at what shifted, curled, filled with water, faded, or blocked the path.
If a piece needs constant correction after normal weather, it is not renter-friendly in practice. For long-term material choices, Garden Decor That Ages Well Outdoors helps separate pieces that patina well from pieces that simply look good on day one.
Make it removable without making it flimsy
Finished does not mean permanent. A renter-friendly outdoor space can still feel grounded if the heaviest pieces do double duty: planter as privacy, bench as storage, rug as zone marker, umbrella as shade, and lantern as both light and atmosphere. The space feels temporary only when every piece looks separate.
The best rule is simple: make the layout easy to remove, but not easy to disturb. If a chair tips in mild wind, the setup is too light.
If a planter cannot be moved without two people and a dolly, the setup may be too permanent for a rental. The useful middle is stable, movable, and easy to explain to a landlord if needed.
Questions Renters Usually Ask
Can I attach a privacy screen to a balcony railing?
Only if the lease, building rules, and local requirements allow it. Even then, attachment is not the same as stability. If a screen pulls on the railing in wind, rattles loudly, or changes the exterior appearance of the building, a freestanding planter screen is usually the safer option.
Are deck tiles safe for rental patios?
They can be, but only on a flat surface that drains. Do not use deck tiles to hide water pooling, loose concrete, or a dirty low spot. After rain, lift a tile and check whether the surface underneath is drying within 24–48 hours.
What outdoor upgrades should renters avoid?
Avoid drilling, permanent wiring, glued flooring, attached shade sails, heavy items that stress balconies, and anything that blocks shared walkways or emergency access. Also avoid decor that needs constant correction after normal weather.
How do I make a rental patio look finished without spending too much?
Choose fewer pieces that do more than one job. A rug that defines the zone, a planter that adds privacy, a bench that stores cushions, and one warm light source usually create a more finished space than many small accessories.
Before making any permanent exterior change, check your lease, building rules, and local tenant guidance; HUD’s tenant resources are a useful starting point for broader renter-rights context.