A rooftop garden usually overheats for structural reasons, not just because it needs more water. The most common pattern is stacked exposure: 8 to 10 hours of direct sun, hot roof surfaces that can run 30 to 60 degrees F above air temperature in late afternoon, and wind that dries containers far faster than most ground-level gardens.
Start with three checks. Touch the container wall after 3 p.m. If it is too hot to keep your hand on comfortably for more than 2 to 3 seconds, the root zone is under direct heat stress.
Check soil depth next. Anything under about 12 inches is usually unstable on an exposed roof. Then look at the surface around the planters. Dark membrane, black pots, gravel, and reflective walls create a harsher heat profile than an ordinary sunny patio.
That difference matters because many gardeners try to fix rooftop stress with more irrigation alone. Water can keep a struggling plant alive for a while, but it cannot cool overheated container walls, reduce reflected heat, or slow wind-driven moisture loss. A real rooftop microclimate comes from combining shade, airflow control, root-zone insulation, and better plant placement into one system.
What a Rooftop Microclimate Is Meant to Fix
A rooftop microclimate is a smaller protected growing zone inside a harsher rooftop environment. The goal is not to make the whole roof cool. It is to lower plant stress enough that soil, roots, and foliage can recover between one hot afternoon and the next.
Why rooftop gardens fail faster than small yards
The same general heat logic appears in How to Design a Small Garden That Survives Extreme Heat, but rooftops compress the problem. Surfaces are hotter, exposure is more complete, and wind becomes part of the failure pattern instead of a minor side factor.
What actually changes the outcome
The difference between a failing setup and a stable one is often not dramatic visually. It may only be 10 to 15 degrees F less heat on the container wall, a few hours of filtered shade from 2 p.m. to 6 p.m., and a root zone that dries more slowly overnight. But that margin is often enough to separate repeated decline from consistent recovery.
Start With the Three Fixes That Matter Most
If the rooftop garden is overheating, the strongest default order is usually this:
-
Reduce afternoon sun on the hottest side
-
Protect the root zone before replacing plants
-
Slow wind exposure without trapping heat
That ranking matters because people usually do the reverse. They replace plants first, water more often second, and think about exposure last. On roofs, roots often fail before leaves fully show why.
What people usually misread first
The most common misread is thinking a plant is simply thirsty because it wilts at the end of the day. Sometimes it is. But on rooftops, wilt often begins as root-zone overheating or excessive wind-driven drying rather than simple lack of water.
The fix that wastes time
The biggest time-waster is treating the roof like any other sunny container garden. Rotating pots every hot afternoon, changing fertilizers, or swapping one plant variety for another may buy a little cosmetic improvement, but none of that changes the site itself.
Shade Works Best When It Targets Late-Day Heat
Morning sun is rarely the real problem. The harder stress usually comes from midafternoon into early evening, especially on west- and southwest-facing rooftops where surfaces begin reradiating stored heat.
How much shade is usually enough
The best rooftop shade is often partial afternoon shade rather than full cover all day. A reduction of about 30 to 50 percent during peak late-day exposure is usually more useful than dense shade that traps heat and reduces airflow.
Best shade tools for exposed rooftops
Shade sails, slatted pergolas, movable umbrellas, and tensioned fabric panels can all work. The better choice depends less on looks than on whether air can still move through the planting area. Temporary or movable shade often makes more sense first because it lets you test the hottest zones over 7 to 10 days before building anything permanent.
Pro Tip: Test shade where the containers overheat first, not just where people prefer to sit. Plant stress and human comfort often overlap, but they are not always in the same exact spot.
Roof Surface Materials Change Heat Stress More Than People Expect
A rooftop garden is heavily shaped by the material under and around the containers. This is one of the most underestimated variables because it is less visible than wilt or scorch.
Dark roofs, concrete, and gravel do not behave the same
Dark roof membranes and dark decking absorb and hold intense heat. Concrete also gets hot, but often stores and releases heat differently than black membrane. Gravel is not automatically cooling either. On rooftops, decorative stone can increase heat around planters unless the design is built around sparse desert-style planting.
Why parapet walls make some zones worse
Parapet walls can intensify heat in two ways. Light-colored walls can reflect sun into the planting area, while darker walls can radiate stored heat back toward foliage after sunset. If containers sit within about 2 to 4 feet of a wall, that zone usually needs extra protection rather than tougher plants.
This is one reason hardscape-heavy layouts often disappoint long term. The same false promise appears in Why “Low-Maintenance” Gardens Never Stay That Way. On rooftops, cleaner and barer often means hotter and less stable.
The Root Zone Matters More Than the Plant Label
A plant labeled full sun may still fail on a rooftop because plant tags do not account for hot container walls, shallow soil, and constant wind. On exposed roofs, container setup is often more important than the plant description.
Safer soil depth for rooftop containers
For most mixed ornamental or edible plantings, 14 to 18 inches of usable soil depth is a far safer baseline than 8 to 10 inches. Larger shrubs and screening plants often need 18 to 24 inches if they are expected to stay stable through repeated hot spells.
Best container materials for hot rooftops
| Container type | Heat behavior on exposed roofs | Better use case |
|---|---|---|
| Black plastic nursery pots | Heat up fast and dry quickly | Temporary holding only |
| Metal planters | Can overheat rapidly in direct sun | Limited use with shade and liner |
| Terracotta | Cooler than black plastic but dries fast | Herbs and drought-tolerant plants with close watering |
| Light-colored resin or composite planters | More stable surface temperature | Best general-purpose option |
| Fabric grow bags | Good airflow but lose moisture quickly | Better in milder heat or tightly managed watering |
Simple root-zone upgrades that actually help
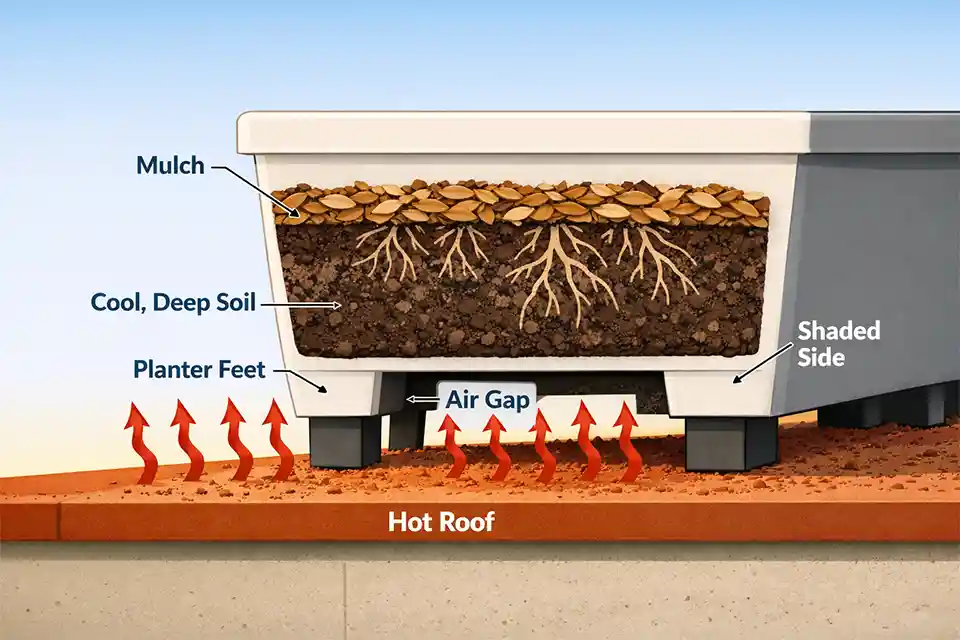
Light-colored containers usually outperform dark ones for the same reason lighter roofs outperform darker ones. Double-potting can also help. A nursery pot inside a slightly larger outer container with an air gap reduces heat transfer through the outer wall. Raising planters 1 to 2 inches above the roof surface with pot feet or stands also helps reduce direct heat gain from below.
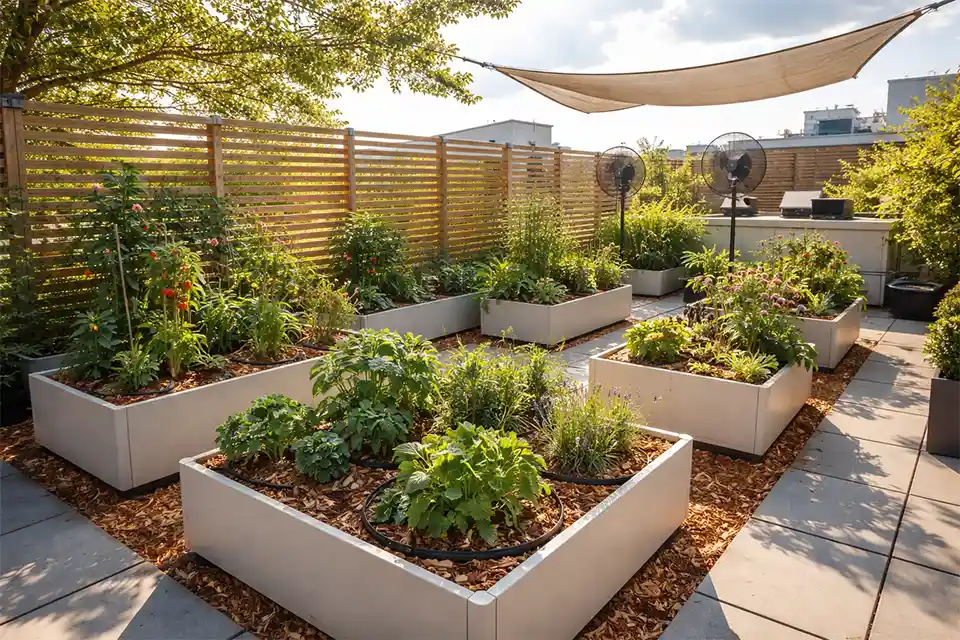
Grouping Containers Creates a Cooler Growing Zone
Scattered pots are one of the most common rooftop mistakes. Each container sits exposed on all sides, which increases heat gain and speeds drying. Grouping containers changes that pattern.
Why grouped planters perform better
When containers are close enough to shade each other’s sidewalls without crowding the foliage, they create a more stable zone with less direct heat on the container walls and slower moisture loss through the day.
A better way to arrange the planting zone
A strong general layout places taller or tougher plants on the west or southwest edge, medium-height plants behind them, and the most heat-sensitive containers farther inside the grouped area. This makes plant layering functional rather than decorative. The same broad principle appears in How to Layer Plants in Front Yard Landscaping, but on rooftops the point is protection, not curb appeal.
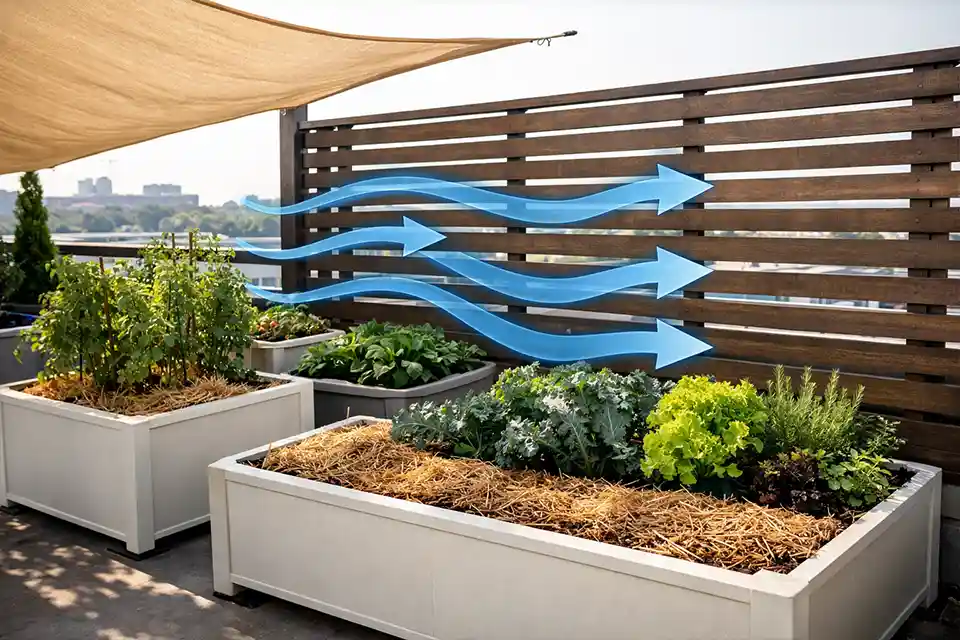
Wind Control Should Slow Drying, Not Seal the Space
Wind is often the factor people underestimate most. A roof that looks merely sunny can behave like a drying chamber once wind exposure is added.
How much wind changes container performance
On an exposed rooftop, a container that stays evenly moist for 24 hours in a sheltered courtyard may reach the stress point in 10 to 12 hours. That is why some rooftop gardens seem impossible to keep stable even with regular watering.
What kind of screen works best
A porous screen usually works better than a solid one. Slatted wood, open trellis panels, mesh-backed supports, and staggered screening planters can all soften gusts without creating a stagnant hot pocket.
When wind protection goes too far
If leaves are constantly whipped around and the soil surface crusts early, the roof needs more wind filtering. But if the protected corner feels noticeably hotter and heavier than the surrounding roof, the barrier is too solid and is now trapping heat instead of solving the real problem.
Edibles and Ornamentals Do Not Need the Same Rooftop Setup
Users searching this topic are often trying to protect vegetables, herbs, flowering containers, shrubs, or mixed ornamentals. Those groups do not respond to rooftop heat the same way.
Rooftop edibles usually need deeper buffering
Edibles often need steadier moisture and more protected root zones than ornamentals. Tomatoes and peppers may tolerate high air temperatures, but they still struggle when root temperatures stay too high. Greens and tender herbs usually need earlier shade intervention because they scorch faster and recover more slowly.
Ornamentals fail for a different reason
Ornamentals are more variable. Some drought-adapted species can tolerate rooftop exposure if the root zone is properly buffered. Others fail because they were chosen mainly for looks. That mismatch resembles the broader issue discussed in Small Garden Plants That Fail — And What Works Instead. On rooftops, visual appeal matters less than environmental fit.
Signs the Rooftop Is Too Hot Even When You Are Watering Enough
The easiest mistake is assuming all wilt means “needs more water.” Sometimes that is correct. But several signals point more strongly to heat stress than simple thirst.
Quick diagnostic checklist
-
Container walls are hot to the touch after 3 p.m.
-
Plants wilt late in the day and still look stressed by 8 a.m.
-
Soil seems damp near the top but leaves still scorch
-
Blossoms drop during hot weather despite regular watering
-
Dark containers dry much faster than lighter nearby containers
-
Plants near parapet walls or roof edges decline first
If the decline follows exposure patterns rather than species patterns, the roof is usually the main problem.
Irrigation Supports the Microclimate, but It Is Not the Microclimate
Watering still matters, but it should support a stronger setup rather than compensate for a bad one.
Deep watering usually works better than constant short cycles
Deep watering encourages fuller root use through the container profile. Short shallow watering may make the foliage look better for a few hours, but it often leaves the deeper root zone underused and thermally unstable.
When more watering stops making sense
If water runs through the pot in under about 5 seconds and the plant is wilted again the same afternoon, the setup is usually too shallow, too rootbound, too exposed, or some combination of all three. At that point, increasing watering frequency is only slowing the failure pattern.
This is where gardeners often overestimate irrigation tools and underestimate site design. Self-watering planters can help, especially for edibles, but they stop being a real fix when they are masking a bad west-facing exposure or overheated root zone.
The Strongest Default Rooftop Microclimate
For most U.S. rooftop gardens, the strongest general-purpose setup is not the prettiest installation on day one. It is the one that reduces stress from several directions at once.
What the best default setup usually includes
Filtered afternoon shade, light-colored or insulated containers, grouped planters, at least 14 inches of usable soil for most mixed plantings, 2 to 3 inches of organic mulch, and porous wind screening on the most exposed side make the best general starting point.
What people usually underestimate
People often overestimate the importance of finding the perfect plant and underestimate the importance of changing the site. In many rooftop gardens, the roof is the real problem. Once the heat profile is improved, plant choice gets easier and irrigation becomes less reactive.
A successful rooftop microclimate is not measured by whether everything looks flawless during an extreme heat spike. It is measured by stability: fewer emergency watering cycles, slower drying, less leaf scorch, and better overnight recovery.
For broader official guidance on climate-appropriate water-efficient landscaping, see the U.S. Environmental Protection Agency WaterSense program.