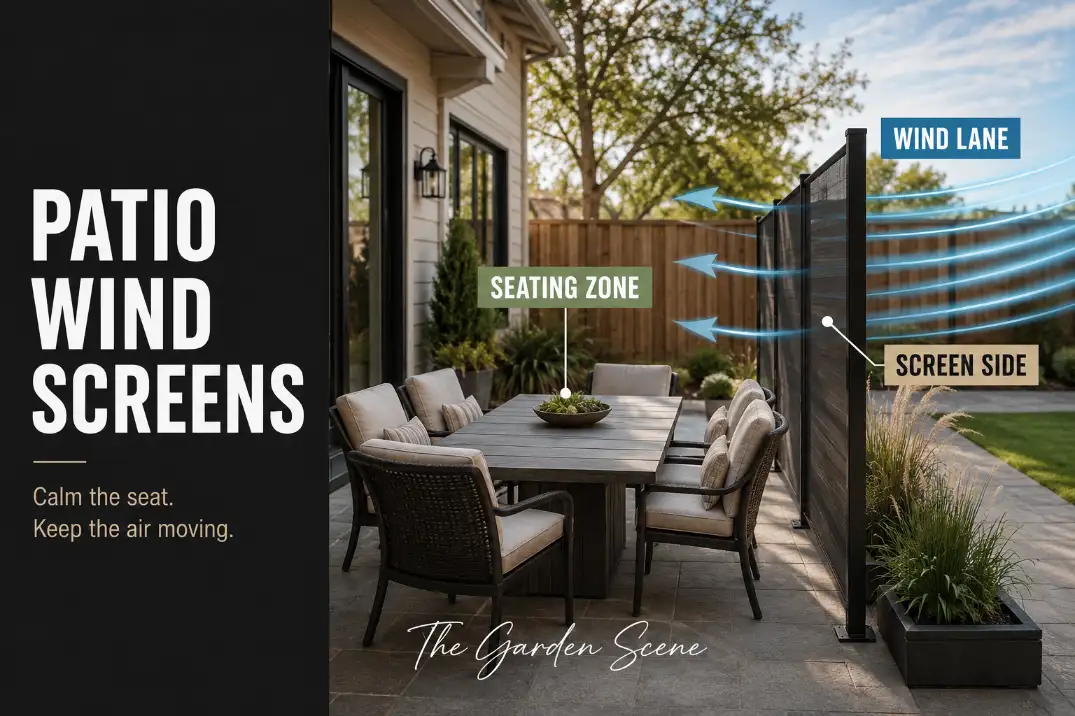
The best patio wind screen for an unusable seating area is the one that slows wind before it reaches the chairs, not the one that looks tallest on the patio edge.
Start with three checks: which side the wind enters from, which seat gets hit first, and whether gusts around 15–20 mph make people leave after 10–15 minutes. If a screen misses that wind lane, it can be expensive, tall, and still disappointing.
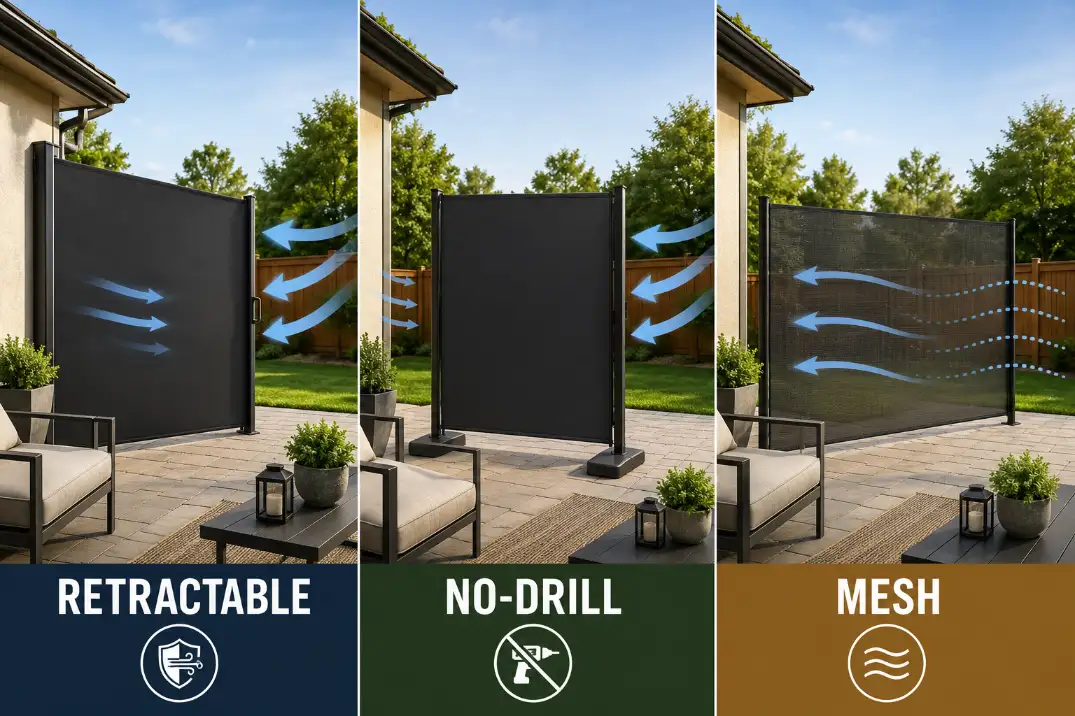
For most buyers, the best first-click categories are the ones that solve the seating problem without requiring a custom build: retractable patio side screens for one-sided wind, weighted freestanding outdoor screens when mounting is not practical, and mesh patio wind screens when airflow still matters.
Clear panels and slatted screens can work, but they are usually more permanent, more installation-sensitive, and less likely to be the first simple purchase.
Quick Answer: The 3 Patio Wind Screen Categories Worth Browsing First
1. Retractable Patio Side Screens
Choose a retractable patio side screen when the patio is mostly usable, but one exposed side sends wind across the chairs. This is common beside driveways, open lawn edges, side yards, and house corners where the wind has one obvious entry point.
This category wins because it controls the wind only when needed. You can pull the screen out during a breezy dinner and retract it when the patio feels calm again.
That is stronger than building a permanent wall around a problem that may only show up for a 2–4 hour afternoon window.
Look for outdoor-rated fabric, a rigid post or wall-mounted system, and enough useful height to protect seated shoulder level.
For dining or conversation seating, that usually means about 48–72 inches of screen height. Skip this category if there is no solid wall, post, or anchored receiving point.
When the wind has one clear entry side, do not start with decorative panels or full enclosures. Start with a retractable side screen because it solves the actual use problem without permanently closing the patio.
BEST SCREEN TYPE FOR ONE-SIDED WIND
Retractable Patio Side Awning
Best for patios where wind enters from one clear side and the seating layout already works.
It fits because the side awning can protect the chair zone only when the gust lane is active.
Look for outdoor-rated fabric, a rigid post system, and enough height to cover seated shoulder level.
🔴 SHOP retractable patio side awnings
2. Weighted Freestanding Outdoor Screens
Choose a weighted freestanding outdoor screen when you need a no-drill solution. This is the practical category for renters, seasonal patios, apartment patios, and seating areas where you cannot mount a retractable screen into a wall, post, deck frame, or concrete surface.
The appeal is speed. You can place the screen directly on the exposed side and adjust it as the patio layout changes.
That makes it more useful than a permanent panel when the seating area changes between dining, lounging, and occasional entertaining.
The limit is wind strength. A freestanding screen is not a heavy-gust barrier unless it has enough base weight and outdoor stability.
Look for a wide base, weather-resistant frame, moderate height, and a lower center of gravity. A 4–5 foot screen often behaves better than a tall lightweight divider when the breeze picks up.
If drilling is not realistic, do not waste time comparing mounted systems first. Start with a weighted freestanding outdoor screen, but treat it as a light-to-moderate wind solution rather than a heavy-gust barrier.
BEST NO-DRILL SCREEN OPTION
Freestanding Outdoor Privacy Screen Panel
Best for renters, seasonal patios, and seating areas where permanent mounting is not practical.
It fits because the panel can be placed on the exposed side without drilling into walls, posts, or concrete.
Look for an outdoor-rated frame, wide base, moderate height, and enough weight to resist light gust movement.
🔴 SHOP freestanding outdoor privacy screen panels
If the furniture itself sits in the strongest open lane, a screen may need help from a better layout. The placement logic in Windy Patio Layout Ideas is useful when the patio needs both a product choice and a seating-zone correction.
3. Mesh Patio Wind Screens
Choose a mesh patio wind screen when the patio needs wind relief but still needs airflow. Mesh is often the best fit for warm patios, railing edges, pergola sides, fence lines, and seating areas that would feel too enclosed behind a solid panel.
Mesh works by slowing the air rather than fully stopping it. That matters in humid or hot conditions because a solid screen can solve wind and create a new comfort problem. If the patio feels stuffy after 20–30 minutes, the screen may be too closed for the space.
Look for reinforced edges, UV-resistant fabric, tight mounting, and enough height to protect the chair zone. Skip loose tie-on mesh if repeated gusts are the real issue or if the fabric will stay under tension for months.
When airflow is part of the comfort problem, mesh is not the cheap compromise. It is the better-fit category because it softens the wind without turning the seating area into a box.
BEST VALUE FOR BREATHABLE WIND CONTROL
Outdoor Mesh Privacy Screen
Best for patios, railings, fence edges, and pergola sides that need softer wind control without feeling enclosed.
It fits because mesh fabric can cover a longer exposed edge while still letting some air move through.
Look for UV-resistant outdoor mesh, reinforced grommets, tight mounting points, and enough height for the chair zone.
🔴 SHOP outdoor mesh privacy screens
What Makes a Patio Seating Area Feel Unusable?
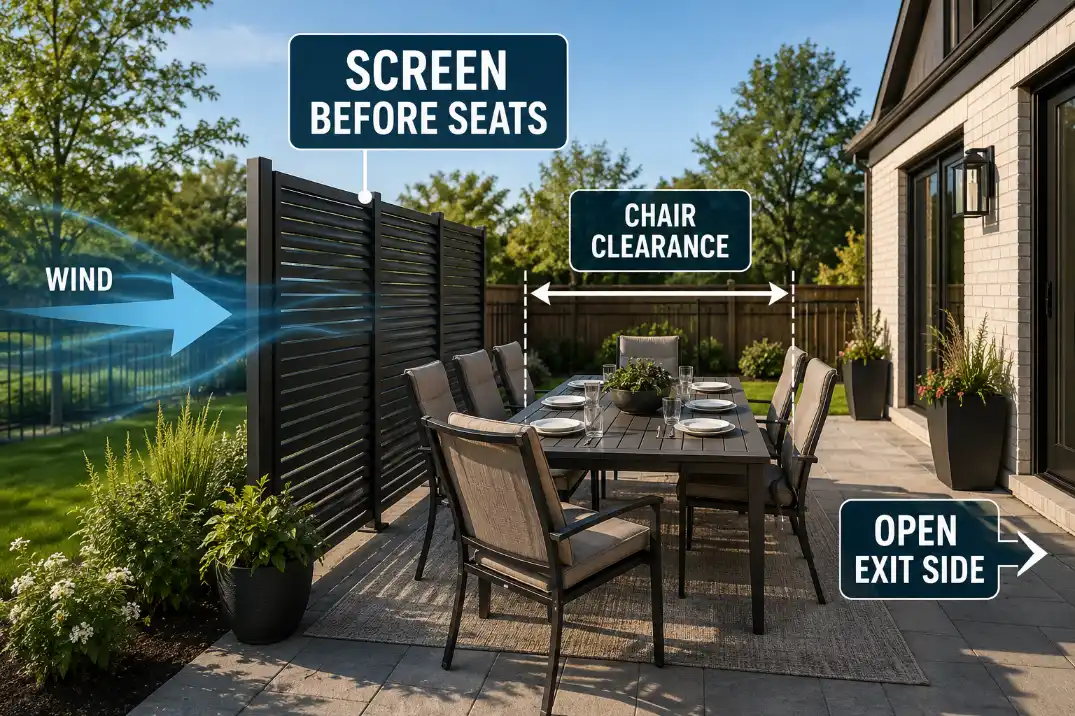
A patio does not need to become windless. It needs to stop sending direct air across bodies, plates, cushions, and shade systems. That is why a lower screen placed correctly can outperform a taller screen placed along the wrong edge.
The First Chair Hit Matters Most
The first uncomfortable chair tells you where the screen should work. If wind crosses that chair before it reaches the panel, the product is already too late.
A 12–18 inch open gap at the windward end can be enough for the strongest stream to wrap around the screen. This is why screens placed for symmetry often fail. They look centered, but they do not interrupt the wind path.
Screen Height Should Match the Seat, Not the Fence
For low lounge seating, a 30–48 inch screen can be useful if it is close to the exposed side. For dining chairs and conversation sets, 48–60 inches is usually more helpful because the wind hits the tabletop, torso, and face.
A full 6-foot barrier can be useful for privacy, but it is not automatically better for wind comfort. On a compact patio under about 150 square feet, tall solid panels can trap heat and make gusts curl around the ends.
That is the difference between a symptom and a mechanism. The symptom is “this patio is windy.” The mechanism is “air is reaching people at seated height before it slows down.”
What Buyers Usually Get Wrong
The most common buying mistake is choosing the most solid-looking screen first. That can work for privacy, but wind comfort is different. A screen that blocks too much air can create swirl, heat buildup, or pressure around the ends.
Decorative Dividers Are Often Overestimated
A decorative divider can make a patio look more finished, but it is not automatically a wind screen. If the base is narrow, the frame is light, or the panel shifts during the first breezy afternoon, it will probably annoy you all season.
Freestanding screens can still be the right purchase. The difference is whether the product is built like an outdoor barrier or just an indoor-style divider placed outside.
Solid Panels Are Often Overused on Hot Patios
Solid panels are tempting because they look decisive. But on a small patio, especially one that already gets afternoon sun, a full solid barrier can reduce wind while making the area feel hotter and more closed in.
Mesh is usually the better first browse path when comfort depends on keeping air moving. Clear and slatted panels belong later in the decision, when view, structure, or long-term appearance matters more than simple seating comfort.
If your main issue is an umbrella tilting, spinning, or lifting in the wind, solve that system before adding screens. The failure patterns in Patio Umbrella Problems in Windy Yards are a better match when the shade setup is acting like a sail.
Patio Wind Screen Comparison Table
| Patio condition | Browse first | Avoid first | Why |
|---|---|---|---|
| Wind from one clear side | Retractable patio side screen | Decorative freestanding divider | Better control from the exact wind side |
| No drilling allowed | Weighted freestanding outdoor screen | Permanent framed panel | Easier to place, move, and remove |
| Hot or humid patio | Mesh patio wind screen | Full solid panel | Slows wind while keeping airflow |
| Railing or fence edge | Mesh wind screen | Short decorative panel | Covers a longer wind lane more affordably |
| Small patio under 150 sq ft | Retractable or mesh screen | Tall solid enclosure | Less heat buildup and less swirl |
| Strong repeated gusts | Mounted retractable or tensioned mesh | Lightweight freestanding screen | More stability under repeated movement |
Where Clear Panels and Slatted Screens Fit
Clear panels and framed slatted screens are useful later-stage choices, not the best first-click categories for most buyers trying to fix an unusable seating area quickly.
They need more confidence in placement, more structure, and more tolerance for installation details.
Clear panels make sense when the patio faces a pool, garden, or open backyard view that should stay visible. They preserve the sight line but show pollen, water spots, fingerprints, and scratches more than mesh or fabric.
In coastal or dusty climates, they may need cleaning every 1–2 weeks during active patio season.
Slatted screens make sense when the patio needs a finished architectural edge. They work best when the screen looks about 40–60% visually open, so air can slow down without fully backing up against the panel.
If the main concern is protecting a view while reducing wind, the view-first logic in How to Block Wind on a Deck Without Blocking the View also applies to many open patios.
When Not to Buy a Patio Wind Screen Yet
Do not buy a wind screen first if the real problem is an unstable umbrella, a poor furniture layout, or a seating area placed directly in the strongest open lane.
Also delay the purchase if you cannot identify the main wind direction. Spend one breezy afternoon watching which chair gets hit first.
Mark the windward side, the first uncomfortable seat, and the point where air seems to wrap around the patio. That short check prevents the most expensive mistake: buying the right screen category for the wrong side.
Final Buying Verdict
For most unusable patio seating areas, start with the most commercially practical category that fits the actual constraint. Choose a retractable patio side screen when wind comes from one clear side.
Choose a weighted freestanding outdoor screen when you need a no-drill, moveable barrier. Choose a mesh patio wind screen when the patio needs breathable wind control more than full blockage.
Do not start with the tallest screen or the most solid-looking panel. Start with the category that protects the first uncomfortable chair, keeps enough air moving, and fits the way the patio is actually used.
For a useful official reference on wind speed descriptions, see the National Weather Service.