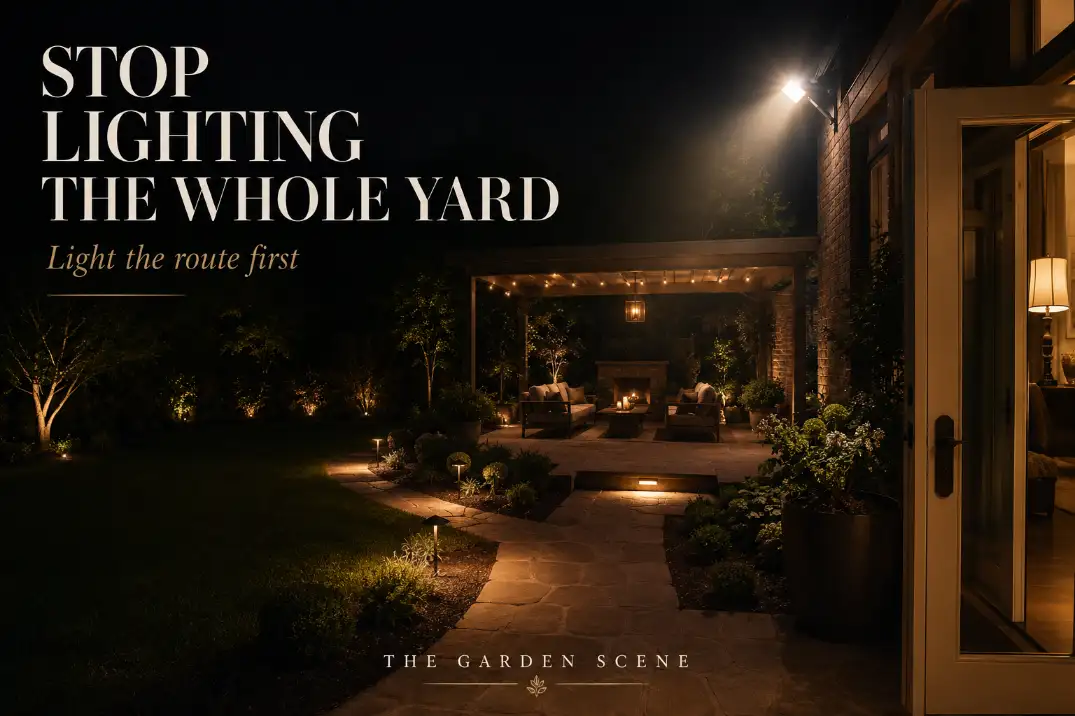
The best backyard lighting layout for patios used at night is not the brightest layout. It is the one that makes routes, seating, cooking, and edges readable without glare. In most backyards, that means route lighting first, activity lighting second, and step or edge lighting third. Decorative accents come last.
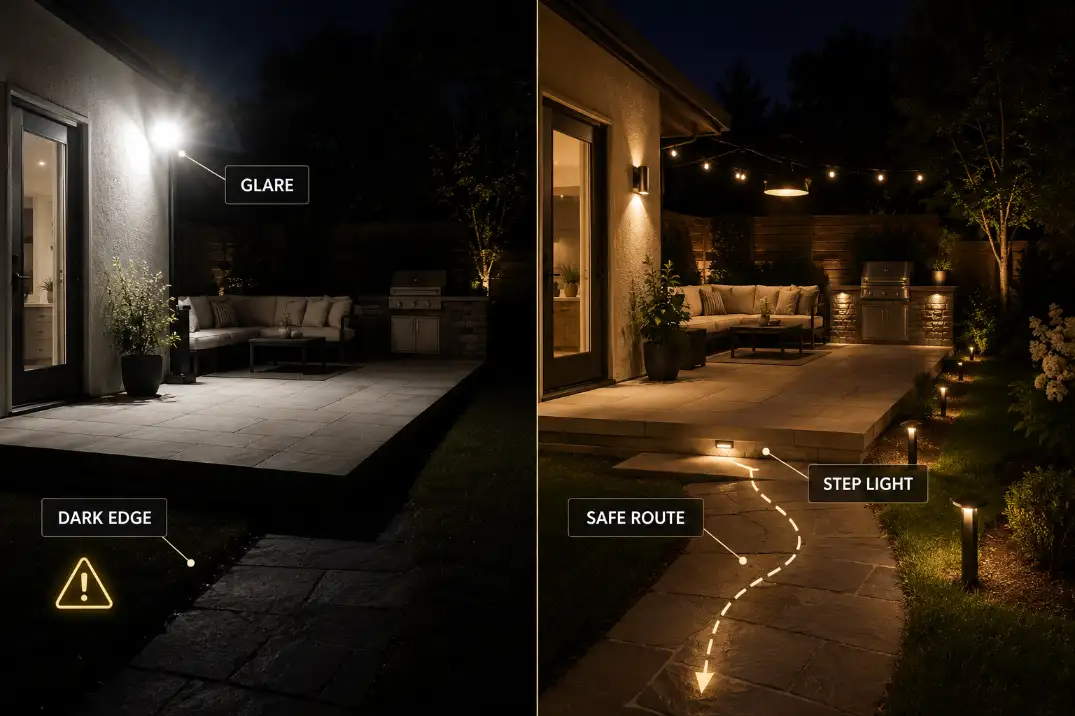
Start with three checks after dark. Can someone walk from the door to the main seating area without crossing a dark gap? Can a step or patio edge be recognized from 6 to 8 feet away? Does any bulb sit directly in a seated eyeline?
If the patio fails one of those tests, the problem is usually placement, not total brightness.
For most patios, warm light around 2700K to 3000K, path fixtures spaced roughly 6 to 10 feet apart, and separate control for grill or task lighting will beat one high-output wall fixture.
Security lighting exposes a yard quickly. Patio lighting has to stay comfortable for 20 to 30 minutes of real use.
The Best Patio Lighting Layout in One Pass
A patio used after sunset needs lighting by job. The first job is movement. The second is the activity zone. The third is the edge condition: steps, grade changes, patio borders, and surface transitions.
Light the route from the house first
The most important lighting path is usually the plainest one: door to seating, seating to grill, seating to step, and seating to side yard or gate. If that route is weak, the patio will feel unfinished no matter how attractive the overhead lights look.
Path lights should be placed at decision points, not sprinkled evenly around every border. Put them where the route turns, where the patio meets lawn, where chairs narrow the walking lane, and where the surface changes.
On many patios, setting fixtures about 18 to 24 inches off the walking edge gives enough guidance without crowding the hardscape.
If the walking route is already squeezed by furniture, lighting will not fully rescue it. It will usually make the weak layout more obvious. Before buying extra fixtures, check whether the furniture arrangement is blocking the route; Patio Furniture Layout by Size is more useful when the patio feels cramped before the lights even turn on.
Light the activity zone second
Once people can move safely, light the area where they spend time. A dining patio needs the tabletop and chair zone readable. A lounge patio needs soft light around faces. A grill patio needs clear light on food, knobs, tools, and footing.
This is where string lights are often overvalued. They can create an inviting ceiling over the space, but they rarely solve the entire layout. If the grill, step, or threshold remains hard to see, the string lights are mood lighting, not functional lighting.
Mark edges and steps third
A 4-inch step can disappear at night when dark pavers, lawn, and shadow blend together. Small step lights, shielded downlights, or low fixtures aimed across the edge usually work better than a bright fixture aimed from the house.
A useful rule: if someone needs more than 3 seconds to understand where the patio ends or where the level changes, the light is in the wrong place. More brightness from the same poor angle usually increases contrast instead of improving safety.
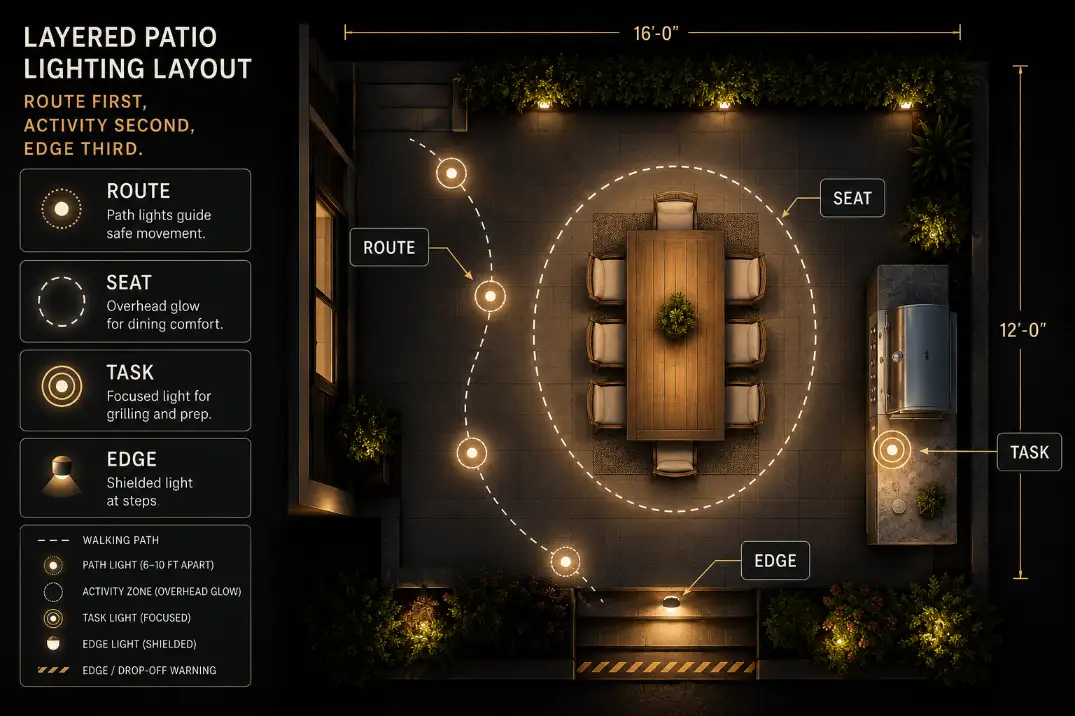
Example layout for a 12-by-16-foot patio
A 12-by-16-foot patio used for dining and lounging can often work with two or three route lights between the house and patio, one warm overhead source centered over the table or seating area, one shielded task light at the grill, and one step light if there is a grade change.
That layout solves the main use problems before it decorates the yard. If the patio still feels flat after those fixtures are placed well, add one or two low accent lights near planting, a wall, or a fence. Starting with accents first is the common waste.
How Bright Each Patio Zone Should Be
Lumens help as a buying filter, but only after placement is right. A modest fixture close to the task is usually more useful than a powerful fixture across the patio.
| Patio zone | Useful brightness range | Best use | What to avoid |
|---|---|---|---|
| Path lights | About 100–200 lumens each | Walking routes and patio approach | Lighting every border equally |
| Step lights | Low-output, shielded LEDs | Treads, edges, level changes | Exposed bulbs at eye level |
| Dining or seating | Moderate, dimmable warm light | Tabletop, faces, chair movement | One bright wall fixture behind guests |
| Grill or prep zone | Brighter focused task light | Food, knobs, tools, prep area | Relying on decorative light alone |
| Accent lighting | About 50–300 lumens | Planters, walls, fence lines | Lighting scenery before hazards |
Lower output often works better
One 1500-lumen floodlight can make a patio look bright from inside the house and still make it uncomfortable outside. The eye adjusts to the brightest point, so the outer edge, step, and route around furniture feel darker by comparison.
The healthier layout is distributed light. The failing layout is one dominant source with shadow pockets behind chairs, planters, grill carts, and steps.
Dimming belongs where people linger
Dining and lounge zones benefit most from dimming because dinner, cleanup, and late-night conversation do not need the same light level. Grill and step lights are different. Their job is not mood. Their job is clarity.
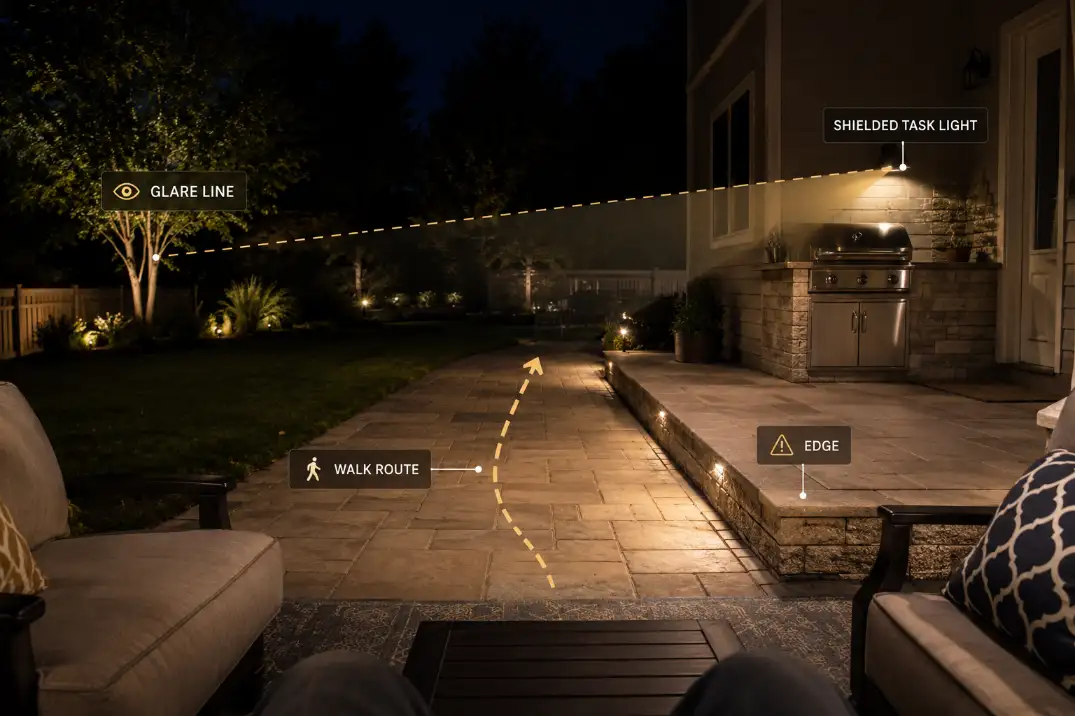
Pro Tip: If a fixture is visible from the main seat, choose a shielded design before choosing a brighter bulb. Glare is usually an angle problem, not a shortage of output.
What People Usually Misread First
Most patio lighting mistakes come from fixing the most visible darkness instead of the most important visibility problem. The issue is often not lack of light. It is light aimed at the wrong surface.
String lights are not a navigation system
String lights make a patio feel finished quickly, which is why they get used as the whole solution. They are useful above a table or lounge zone, but they are often too high, too diffuse, or too far from the route to help with movement.
Hung along a distant fence, they make the yard prettier. Hung over the actual seating zone, they become useful. The difference matters.
Fence lights are usually secondary
Fence lights can frame the yard nicely, but they are usually too far away to solve steps, grill visibility, or door-to-patio movement. If the table, grill, or edge remains awkward after dark, fence lighting is cosmetic.
That matters more on compact patios, where extra fixtures can make the perimeter feel busy. If the open lane is already weak, Small Rectangular Patio Layout Flow can help clarify where circulation should stay open before the lighting plan gets crowded.
Path lights should mark decisions
The best path lights tell your feet what is changing: a turn, an edge, a narrow spot, or a surface transition. They do not need to outline every inch of hardscape.
A patio with fewer lights at decision points usually works better than a patio with many lights placed evenly but thoughtlessly.
Fixture Ratings, Controls, and Placement Details That Prevent Regret
The difference between a polished patio and an improvised one often appears after the first season. Fixtures corrode, lenses cloud, motion lights annoy people, or a bright bulb spills into a neighbor’s window.
Use wet-rated fixtures where water can hit them
Uncovered patios need fixtures designed for direct outdoor exposure. Covered patios may allow damp-rated fixtures in protected locations, but only where rain and irrigation spray do not reach them. If sprinklers hit the fixture, treat that location as wet.
This matters in humid Florida yards, coastal California neighborhoods, and patios that stay damp after evening watering. A cloudy lens or corroded finish can reduce performance long before the layout looks obviously broken.
Put the patio on two or three controls
One switch for the whole patio is rarely the best setup. Path and step lights can run on a timer, dusk-to-dawn sensor, or simple switch. Dining and lounge lighting should be dimmable. Grill or prep lighting should be separate so it can stay bright without forcing the whole patio into work mode.
Motion lighting works near gates, side yards, and security areas. It is usually a poor choice over a dining or lounge space because it makes the patio feel reactive instead of calm.
Keep light out of neighbors’ windows
A patio light that feels fine from your chair may be harsh from a neighboring bedroom. Stand near the fence line and look back toward the fixtures. If exposed bulbs are visible from the neighbor-facing side, shield them, redirect them, lower the output, or choose a warmer lamp.
For most residential patios, 3000K or lower is the safer choice. Cool, bright light travels visually in a way that feels sharper across small suburban lots.
The 5-Minute Night Test Before Buying Fixtures
The fastest way to improve a lighting plan is to test the patio in darkness before buying a full kit. This prevents the budget from going toward the parts of the yard that photograph well instead of the places people actually use.
Walk the real route
Turn off existing patio lights and walk from the door to seating, seating to grill, and seating to any step, gate, or side yard. Mark where your pace slows, where your foot placement becomes uncertain, or where furniture forces an awkward turn.
If the route is unclear without moving furniture, fix the layout first. A lighting plan should support the patio, not rescue a blocked traffic lane.
Sit before judging glare
Stand-up tests miss the problem that ruins many patios: seated glare. Sit in the main chair for 10 minutes and look toward the table, the grill, the door, and the yard. If one bulb keeps pulling your eyes, it is too exposed, too bright, or aimed poorly.
This is where a small adjustment can beat a new fixture. Lowering output, shielding the bulb, or moving the fixture a few feet can change the comfort of the whole space.
Check the patio after rain or irrigation
Dark pavers, stained concrete, and wet stone can reflect bright points while still hiding edges. That creates glare without visibility. If the patio feels worse after rain, lighting may only be part of the issue.
A wet surface that stays dark, slick, or visually flat may need surface or drainage improvements as much as better fixtures. Best Patio Materials for Wet Backyards is useful when night visibility problems are tied to moisture and surface behavior.
When the Standard Fix Stops Working
Some lighting fixes are popular because they are easy to buy. That does not make them the right fix.
Brighter bulbs make bad placement worse
If the fixture is in the wrong place, a brighter bulb increases contrast. The wall near the fixture gets brighter, the edge feels darker, and the eye keeps returning to the wrong visual anchor.
The better move is usually a lower-output fixture closer to the job: the step, the route, the grill, or the table.
Solar stops making sense for critical routes
Solar lights can work for decorative marking in sunny, open yards. They become less reliable when the route includes steps, uneven pavers, a drop-off, or the only path back to the house.
Output drops after cloudy weather, under tree shade, and during shorter winter days in northern states. For safety-critical routes, low-voltage wired lighting usually makes more sense because it is more predictable after 3 cloudy days and later in the evening.
DIY stops making sense once power planning gets real
Many homeowners can place low-voltage landscape fixtures carefully, especially with a transformer connected to an existing outdoor GFCI-protected outlet. The line changes when new exterior outlets, line-voltage fixtures, buried power runs, or complex grill-zone lighting are involved.
On patios where cooking, prep, and dining are packed tightly together, lighting should support the functional layout first. Patio Layout for Grill, Prep, and Dining helps when the lighting problem is really a zone-priority problem.
Questions People Usually Ask
How many lights does a small patio need?
A small patio often needs only four to six useful light points: one near the door, two along the main route or edge, one over the table or seating area, and one task light if there is a grill. The count matters less than whether each light solves a real visibility problem.
Are solar lights enough for patio paths?
Solar lights can be enough for decorative route marking in full sun, but they are not the best choice for steps, uneven surfaces, or the main return path to the house. Those areas need predictable output more than convenience.
Should patio lighting be warm white or daylight?
Warm white is usually better for patios used for sitting, eating, and relaxing. Stay around 2700K to 3000K. Daylight bulbs may help in work zones, but over a patio they often make the space feel exposed instead of comfortable.
When is a patio overlit?
A patio is overlit when the fixtures become more noticeable than the space, or when people avoid looking in a certain direction because of glare. Reduce output, shield the bulb, or move the fixture closer to the task before adding more lights.
For broader official guidance on efficient lighting controls, see the U.S. Department of Energy.